The Asset Guardian (TAG)
TAG | TAG quick start transaction guide
- Important: Quick Start expects that TAG Plan setup and Initial Data setup has been completed. More detailed setup notes are available in section additional details.
User note:
The following section is to provide a quick excerpt of basic maintenance functions for Testing Review:
- Create Work Request ticket
- Create a Work Order from Request
- Finish Request and Work Order
- Create manual Released Work Order document
- Complete a Work Order document
- See the result of posting the Work Order document on equipment
Creat a Work Request
Start from the TAG Maint. Manager Role Center Profile.
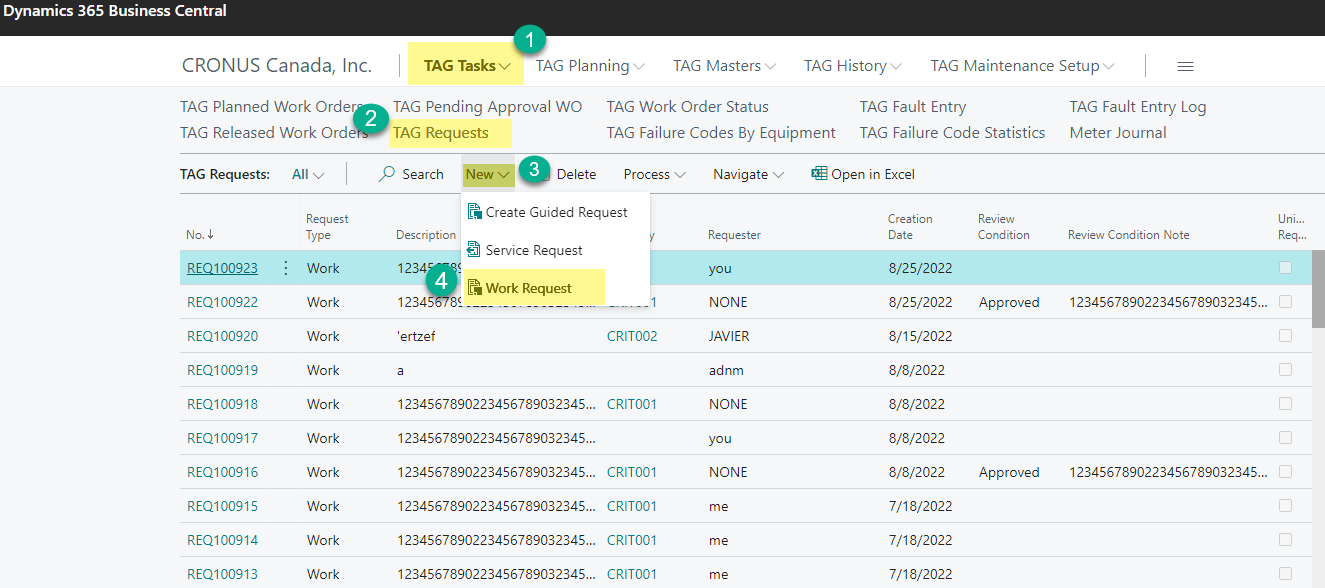
Go to the TAG Tasks section, select TAG Requests menu.
Click New and then Work Request to open the Create Work Request Card.
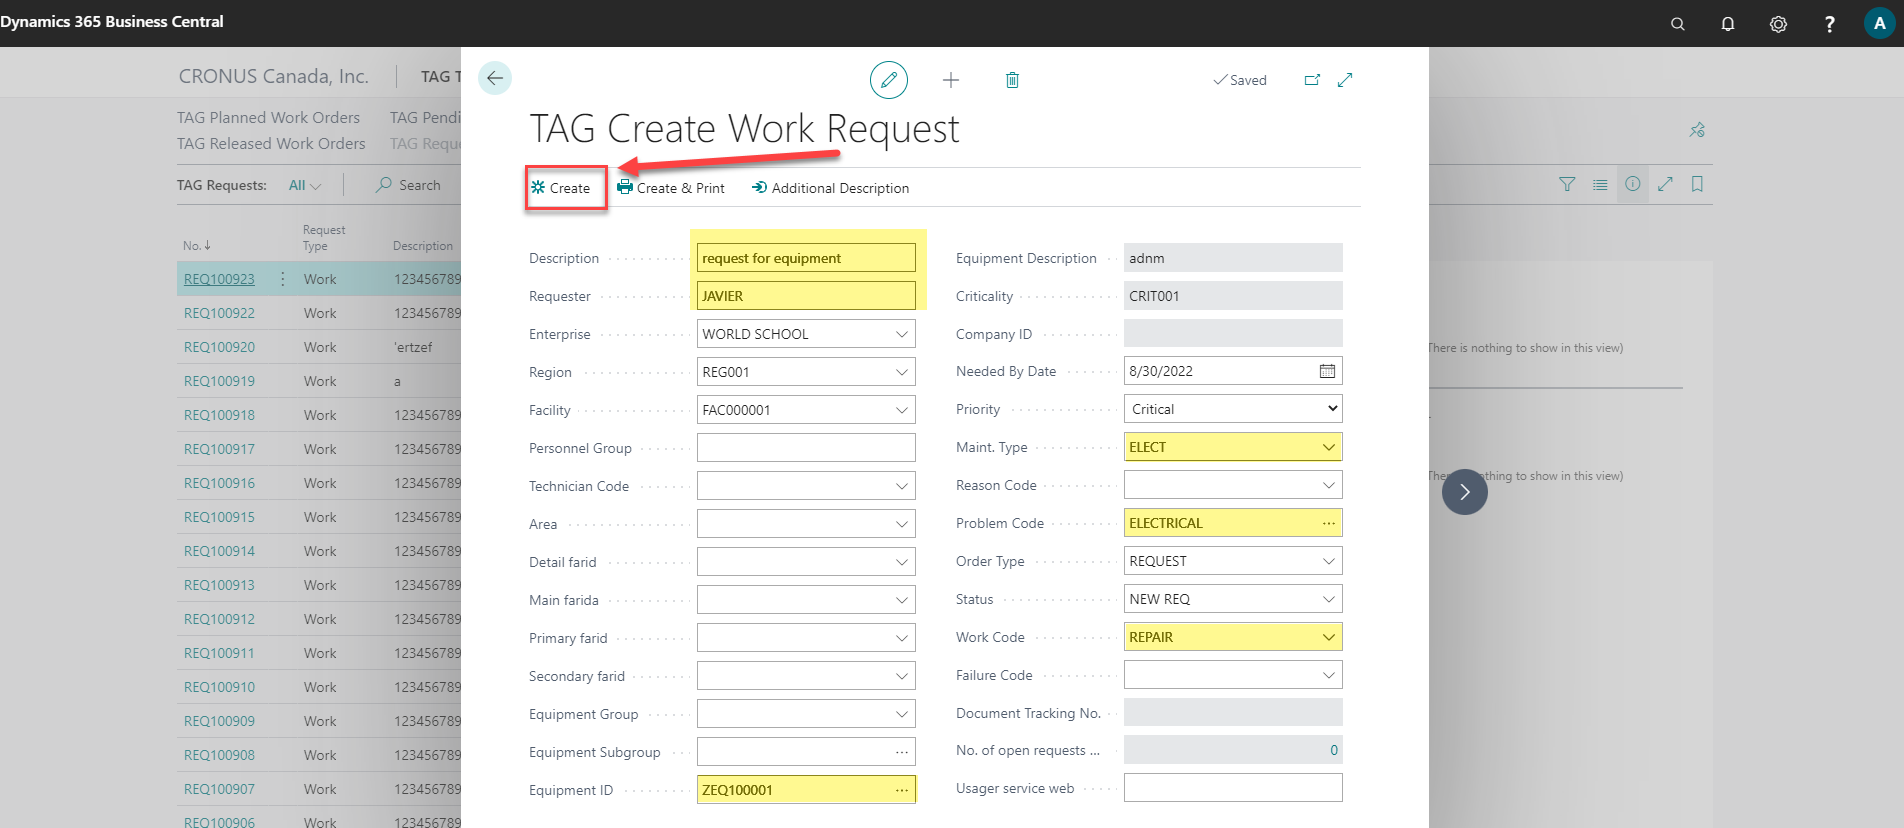
Populate fields:
- Enter a Description, and select an equipment ID.
- Confirm field Requester has a value (will error if blank)
- Select the desired information of request such as (Priority, Maintenance type, Problem Code, Work code).
- Note: Description, Equipment ID and Requester are required fields for a Work Request based on the configuration in TAG Controls as set by Initial Data Setup
- Click "Create" button to create the request
- Note: leaving the page will not create the request as a message will advise.
Expected result:
- TAG will create the request record and advise the record Request number and the Universal Document Number (UDN).
Confirm:
- you can open the TAG Request record from the TAG Request list.
Steps:
- Note: if TAG Plan is for Trial or 0 licensed users in TAG Licensing, there are limitations as noted in section TAG additional details.
Create a Work Order from Request:
- Start from TAG TAG Maint. Manager Role Center Profile.
- Go to the TAG Tasks Section, select TAG Requests menu
- Select the Request that you want to create to Work Order
- Open the card by clicking on the first column (No.)
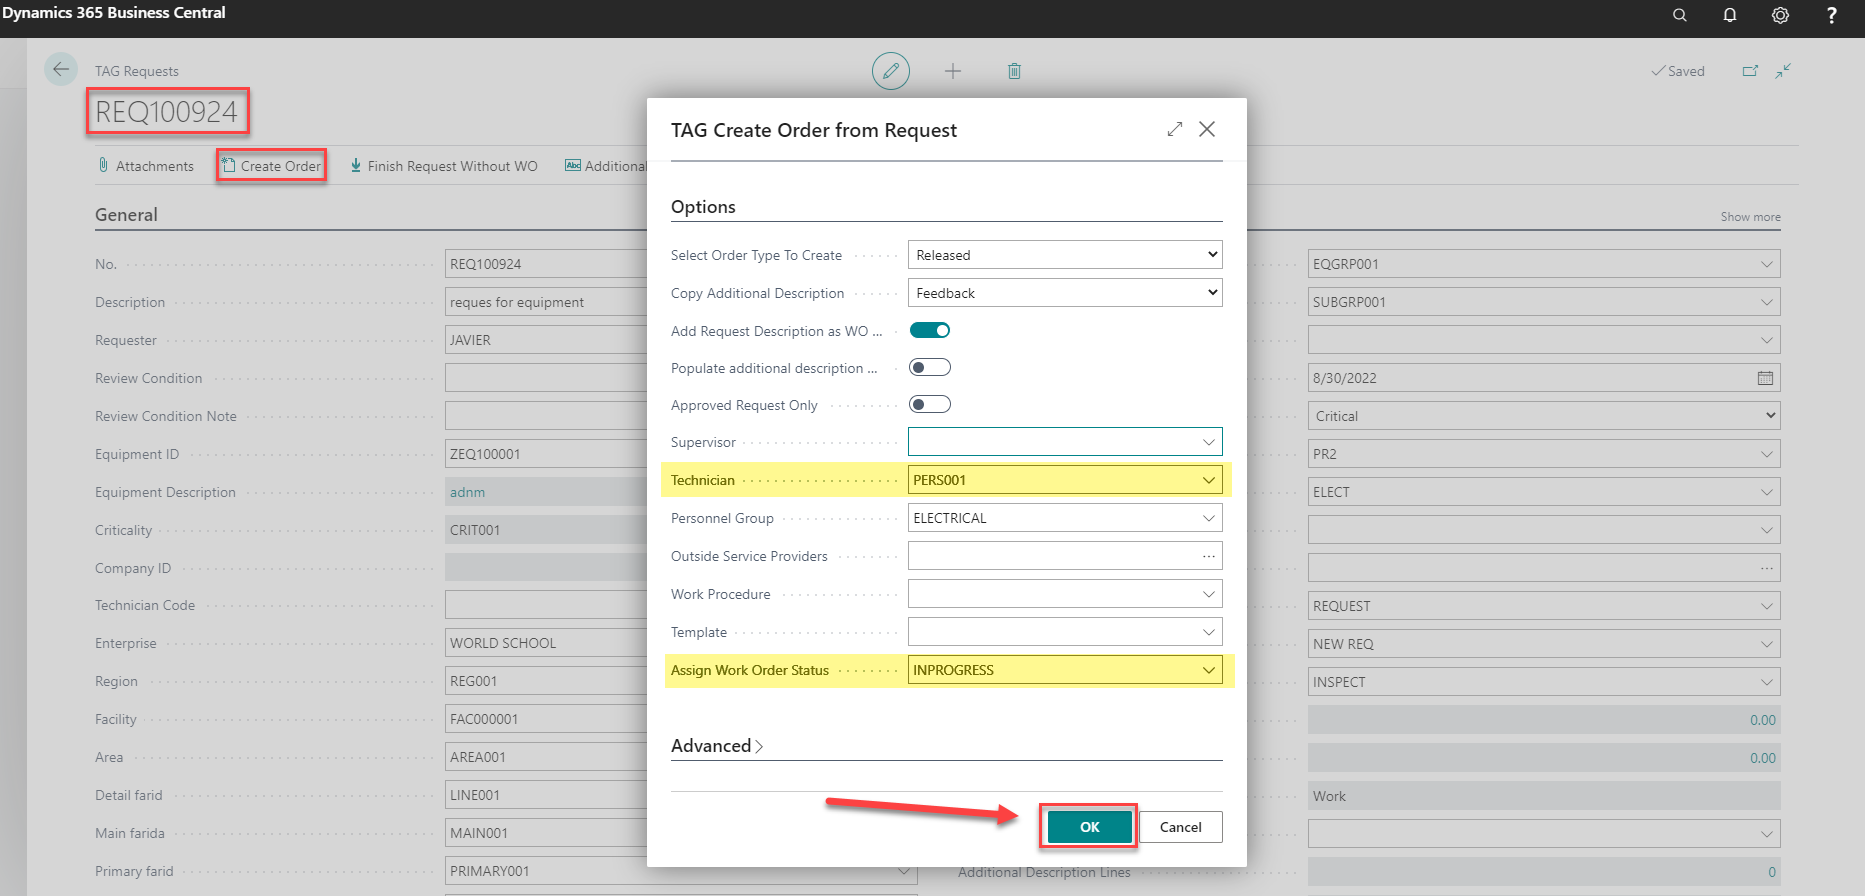
- Click "Create Order" button on the request ribbon.
- Select the desired options
- Select Technician
- Assign WO Status
- Click ok to create the Work Order
- Expected result: TAG provides the record Work Order Number and UDN no.
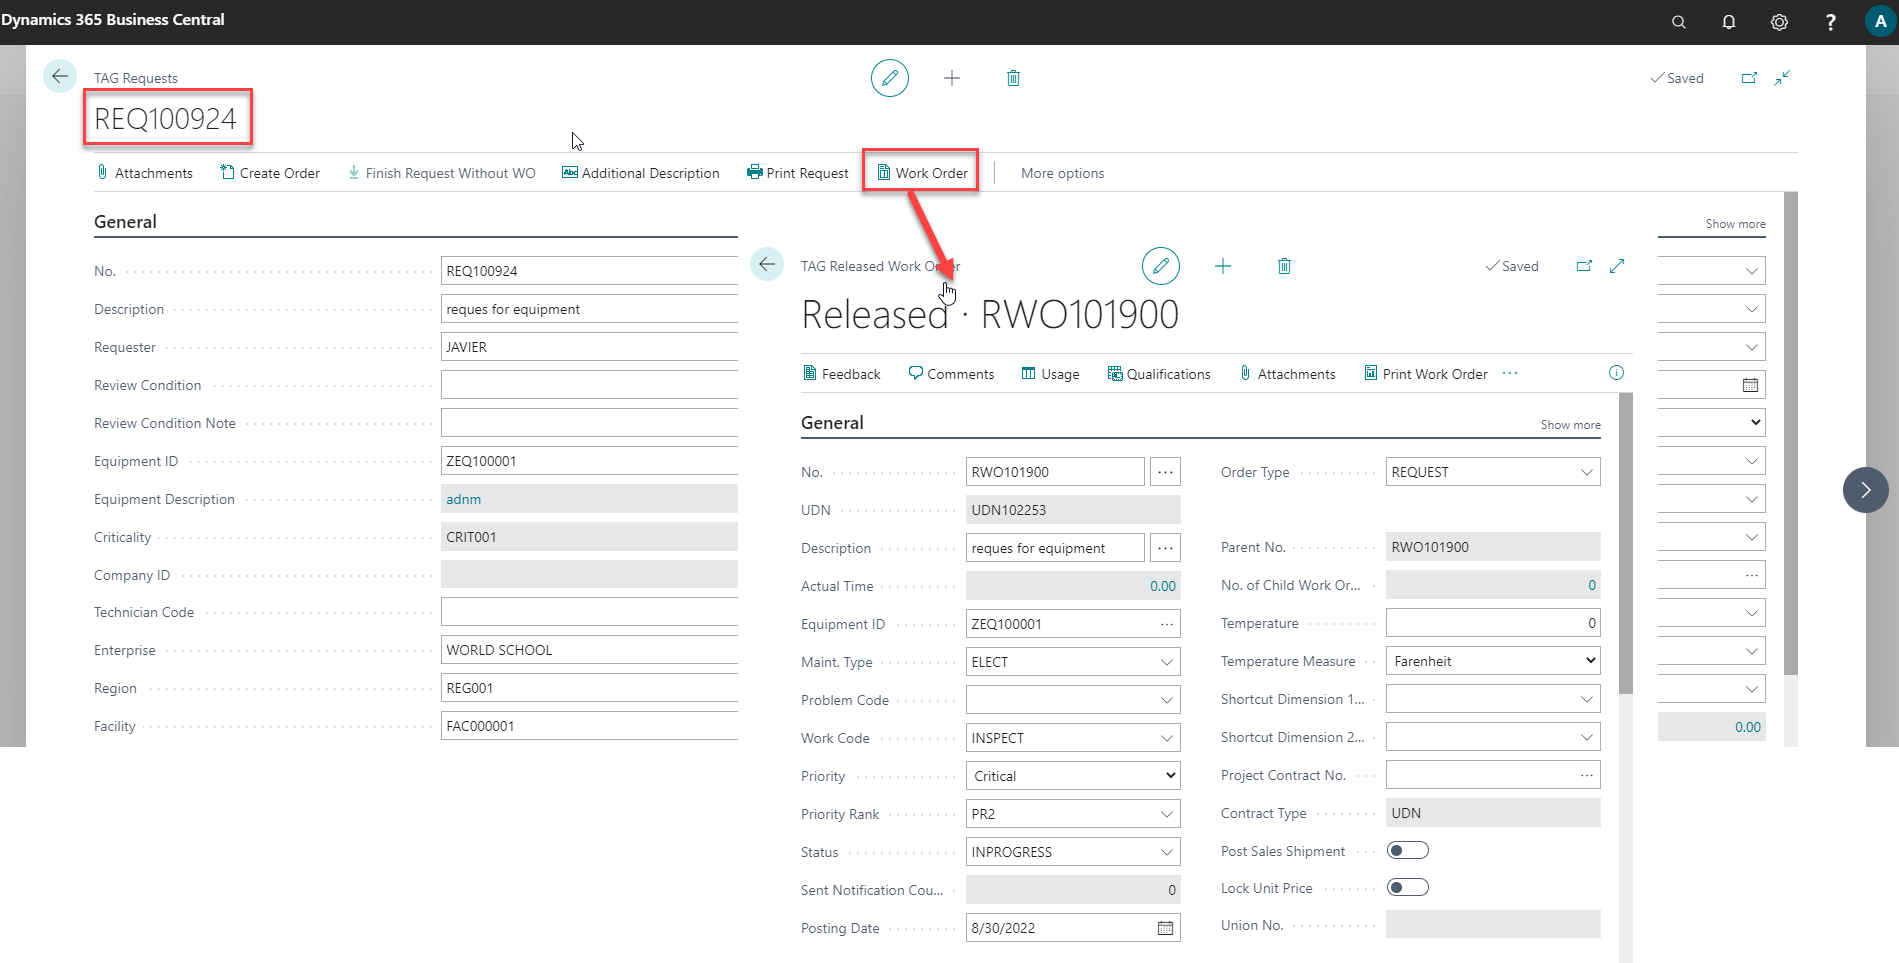
- Confirm: From the selected Request:
- Click "Work Order" on the ribbon
- The created Work Order card will open
(alternate: you can find the Work Order on the Work Order list)
Create WO from Request Steps:

This is not a complete list, however these are typical potential messages that may occur on post of a RWO with typical setup.
Finish Request and Work Order
- Start from TAG Maint. Manager Role Center Profile.
- Go to the TAG Tasks section, select TAG Requests menu
- Select the same Request with Work Order
- Open the request card by clicking on the first column (No.)
- From the selected Request card, click "Work Order" on the ribbon
- The created Released Work Order Card will open
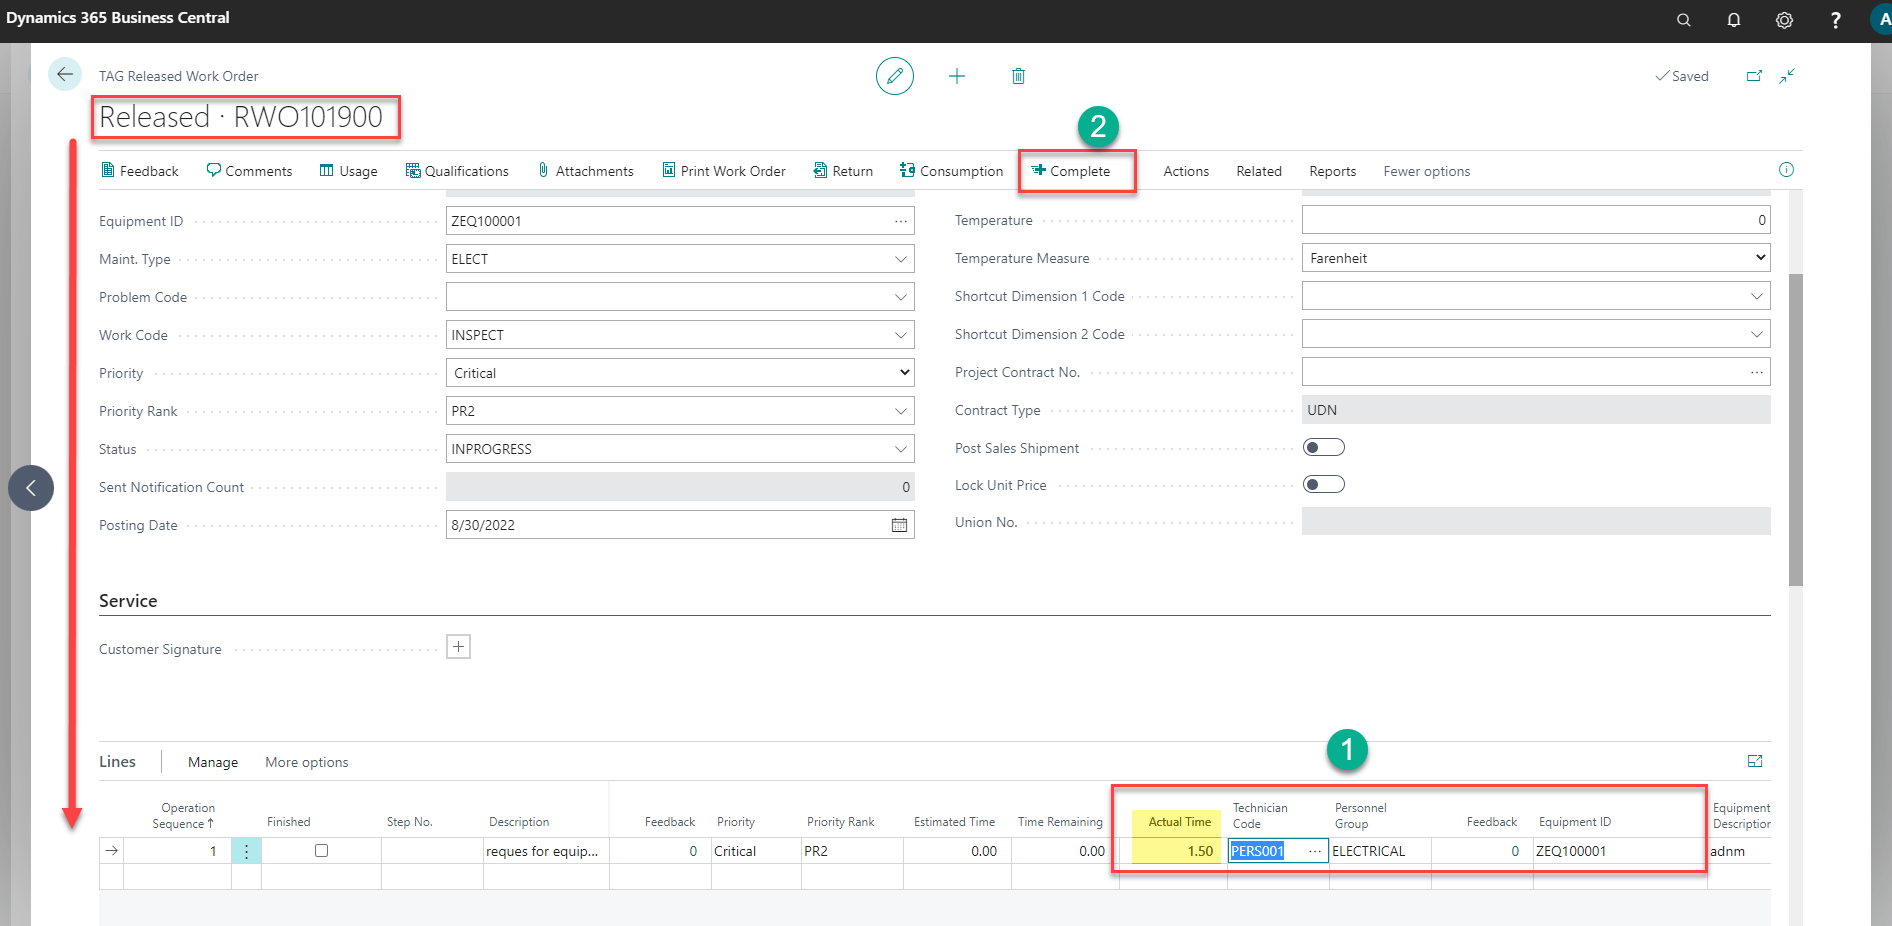
- On the Released Work Order Card, scroll down to Lines FastTab
- Confirm there is an equipment and technician code on the Work Order line
- Enter an actual time
- On the Work Order ribbon, select action button "Complete"
- Answer "Yes" to complete
Expect result:
- The Released Work Order (RWO) will disappear leaving the original request (the RWO disappears when it is posted complete and a Finished Work Order (FWO) is created)
Confirmation:
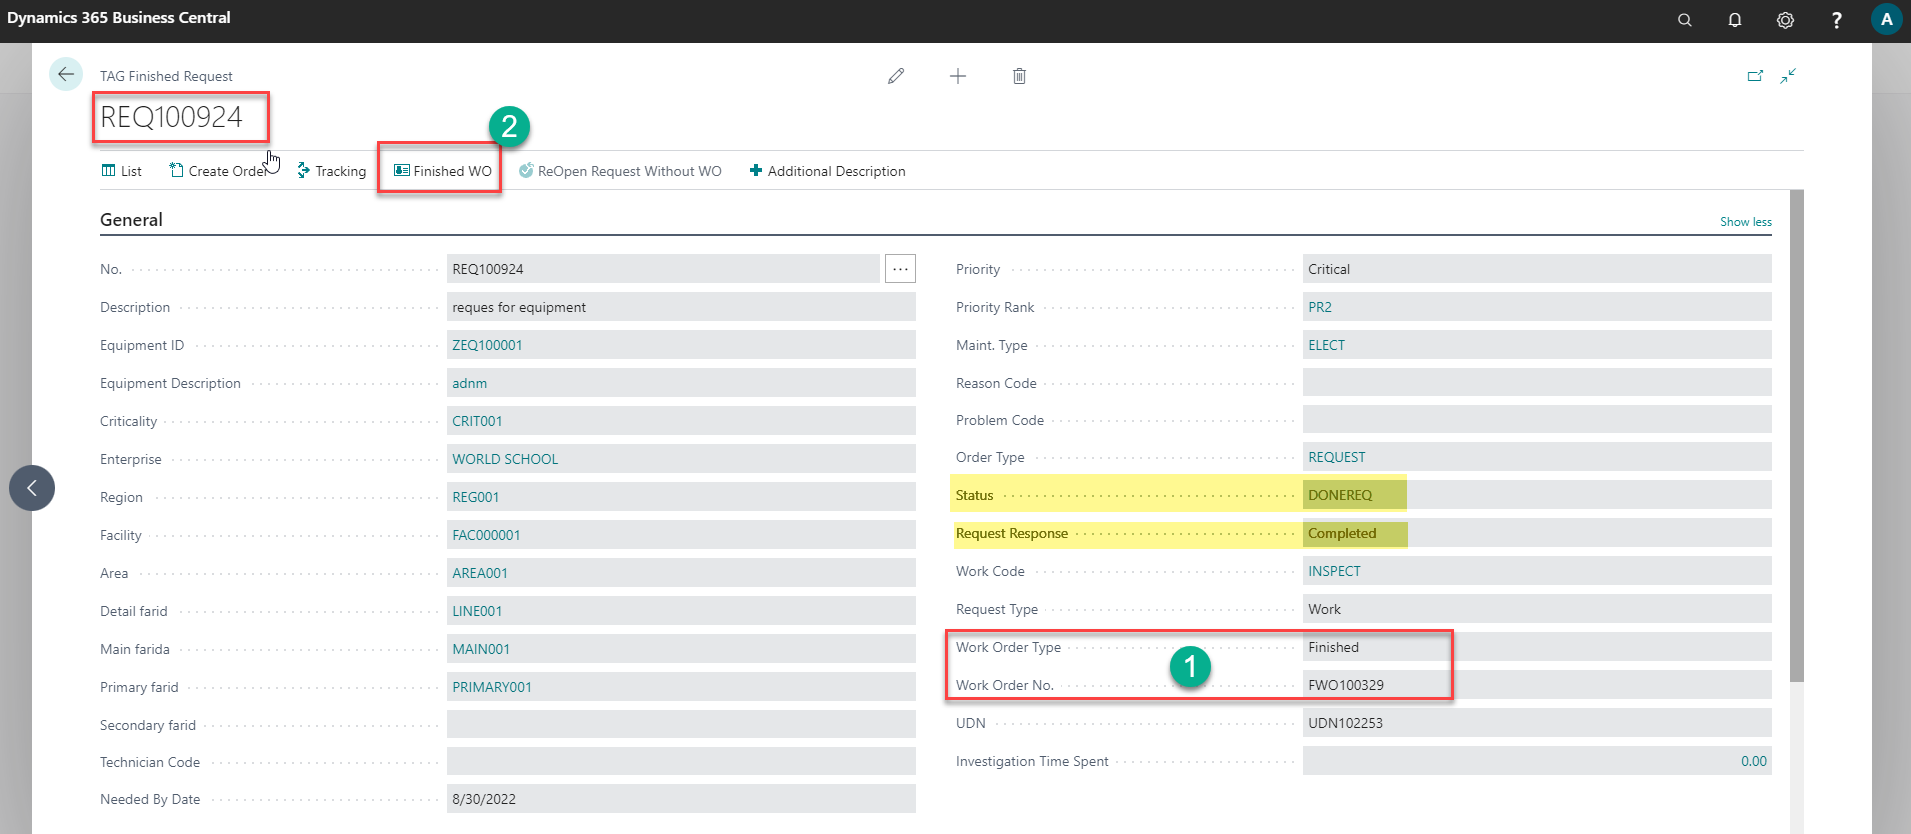
Return to the original request record to confirm:
- The request now has Work Order type Finished
- If ribbon button "Work Order" is selected the Finished Work Order opens
- Fields on the Work Order show: FWO number and actual time
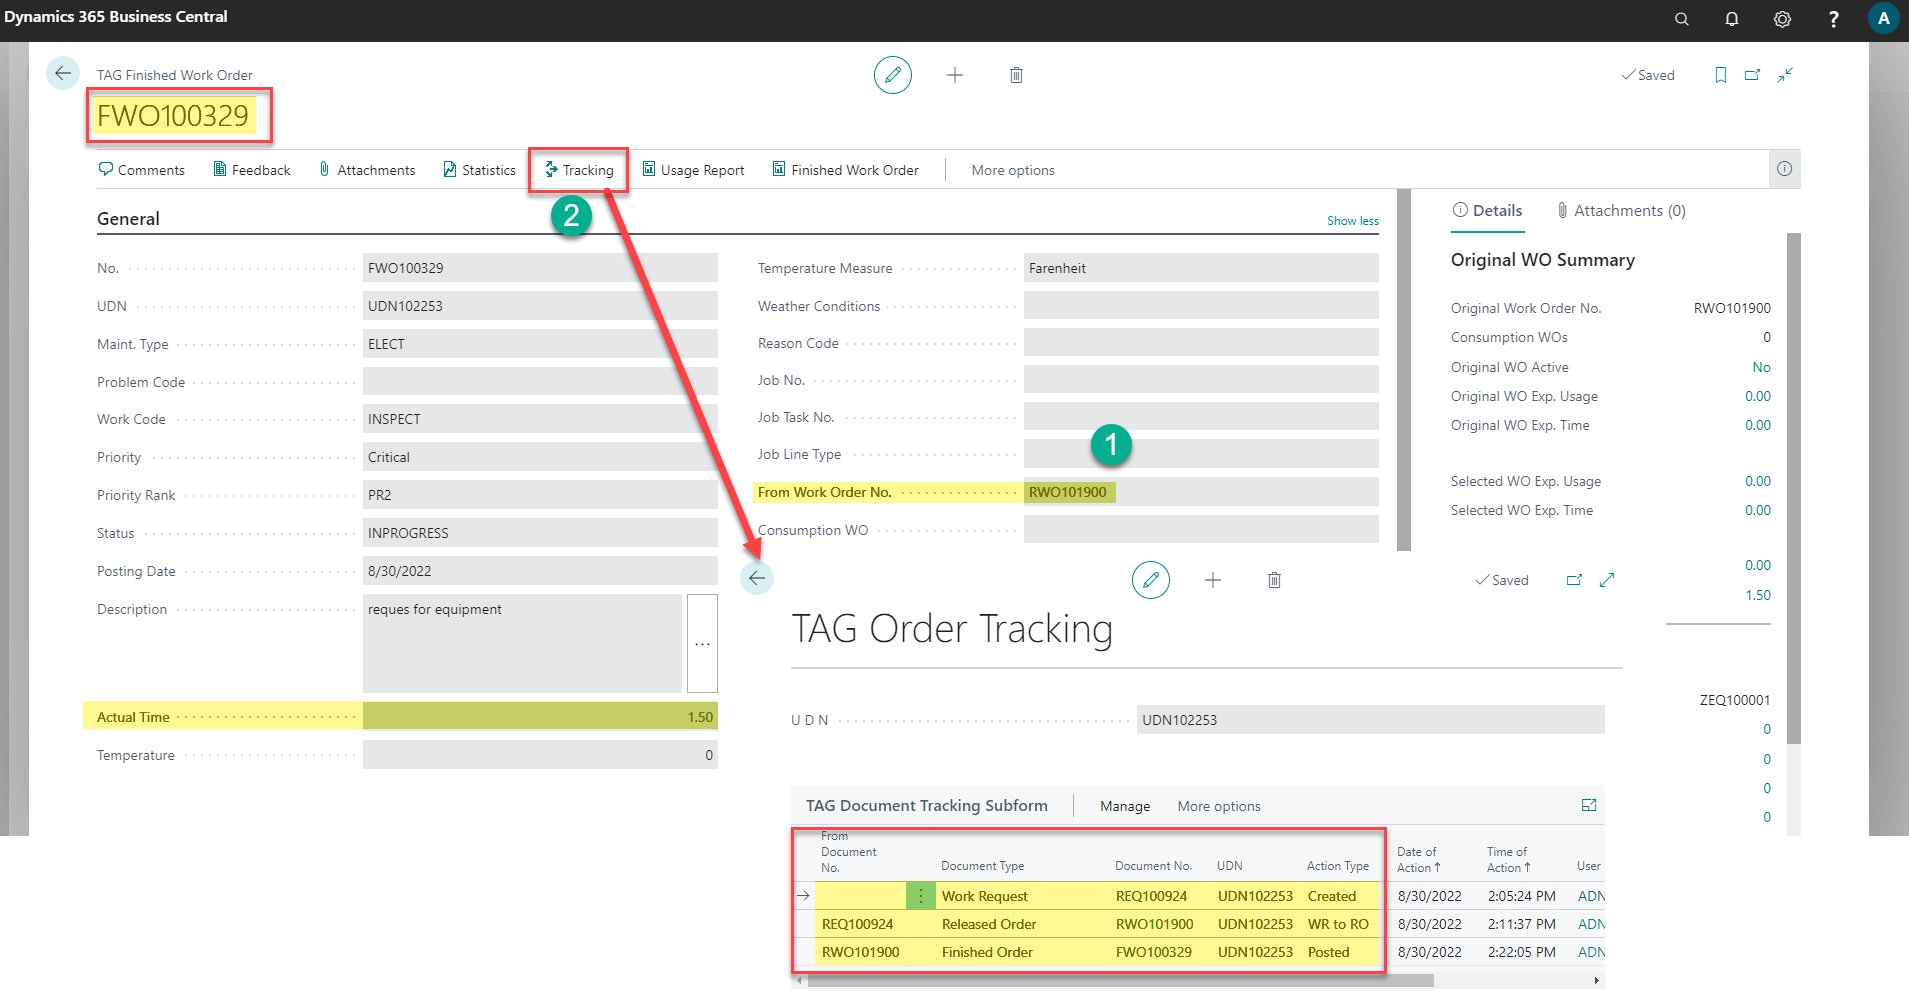
- Click tracking to see the life cycle of the request to RWO to FWO
- Note:
- When a RWO related to a request is posted complete a FWO is created and the original Request is considered Finished. The request record is filtered out of the active request list using WO type = finished. The original request may be found in the Finished Request list.
- Role center > TAG History > TAG Finished Work Request list
- Note:
- On Post Complete of the Work Order there are control validations that are performed depending on the configurations in TAG Controls. If TAG Default Data Setup was used the following are the expected validations that may cause an control validation message (error) if missing or incomplete data in the Work Order being posted.
- Below are a short list of validations and potential resolutions:
- Requirements check: every Usage line for requirements must be complete with a Type, No, and Description. To resolve … open Utilization or Usage and confirm the data.
- Technician on RWO header check: the Scheduled Fast tab must have a technician code. To resolve go to Scheduled FastTab and populate the Technician code.
- Technician on RWO line check: the Work Order line must have a technician code. To resolve go to the WO lines and check that each line has a technician code.
- Equipment on RWO header check: the General FastTab must have an Equipment ID populated. To resolve go to the General FastTab and select an equipment ID. (this will also populate the lines if yes is answered)
- Equipment on RWO lines check: the Work Order line must have an Equipment ID. To resolve go to the WO lines and check that each line has an Equipment ID.
Request Create RWO and complete to FWO

Create a Manual Released Work Order
Start from TAG Maint. Manager Role Center Profile.
Go to the TAG Tasks section and click on the TAG Released Work Orders menu.
Click on "New" button on the ribbon.
Tab over the No. field (or click on the Description field) to let TAG assign automatically a "No".
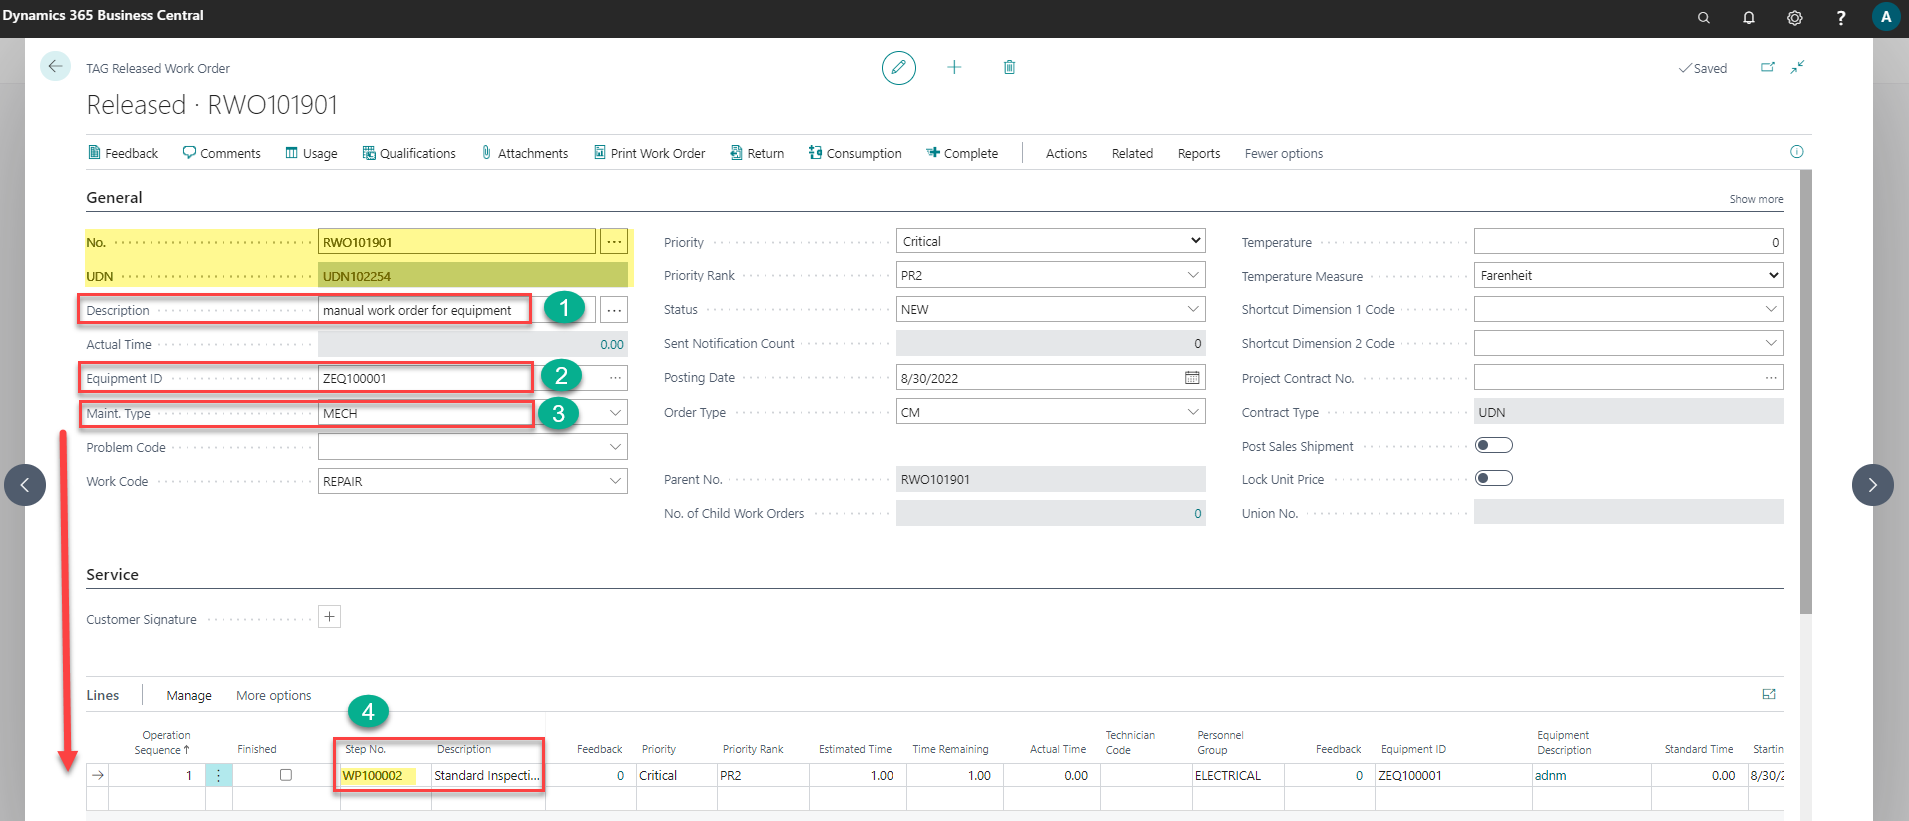
Enter the Description, Equipment ID, Maintenance Type and other desired fields for this Work Order.
Open the Line FastTab, select a work procedure standard task or enter a description task manually.
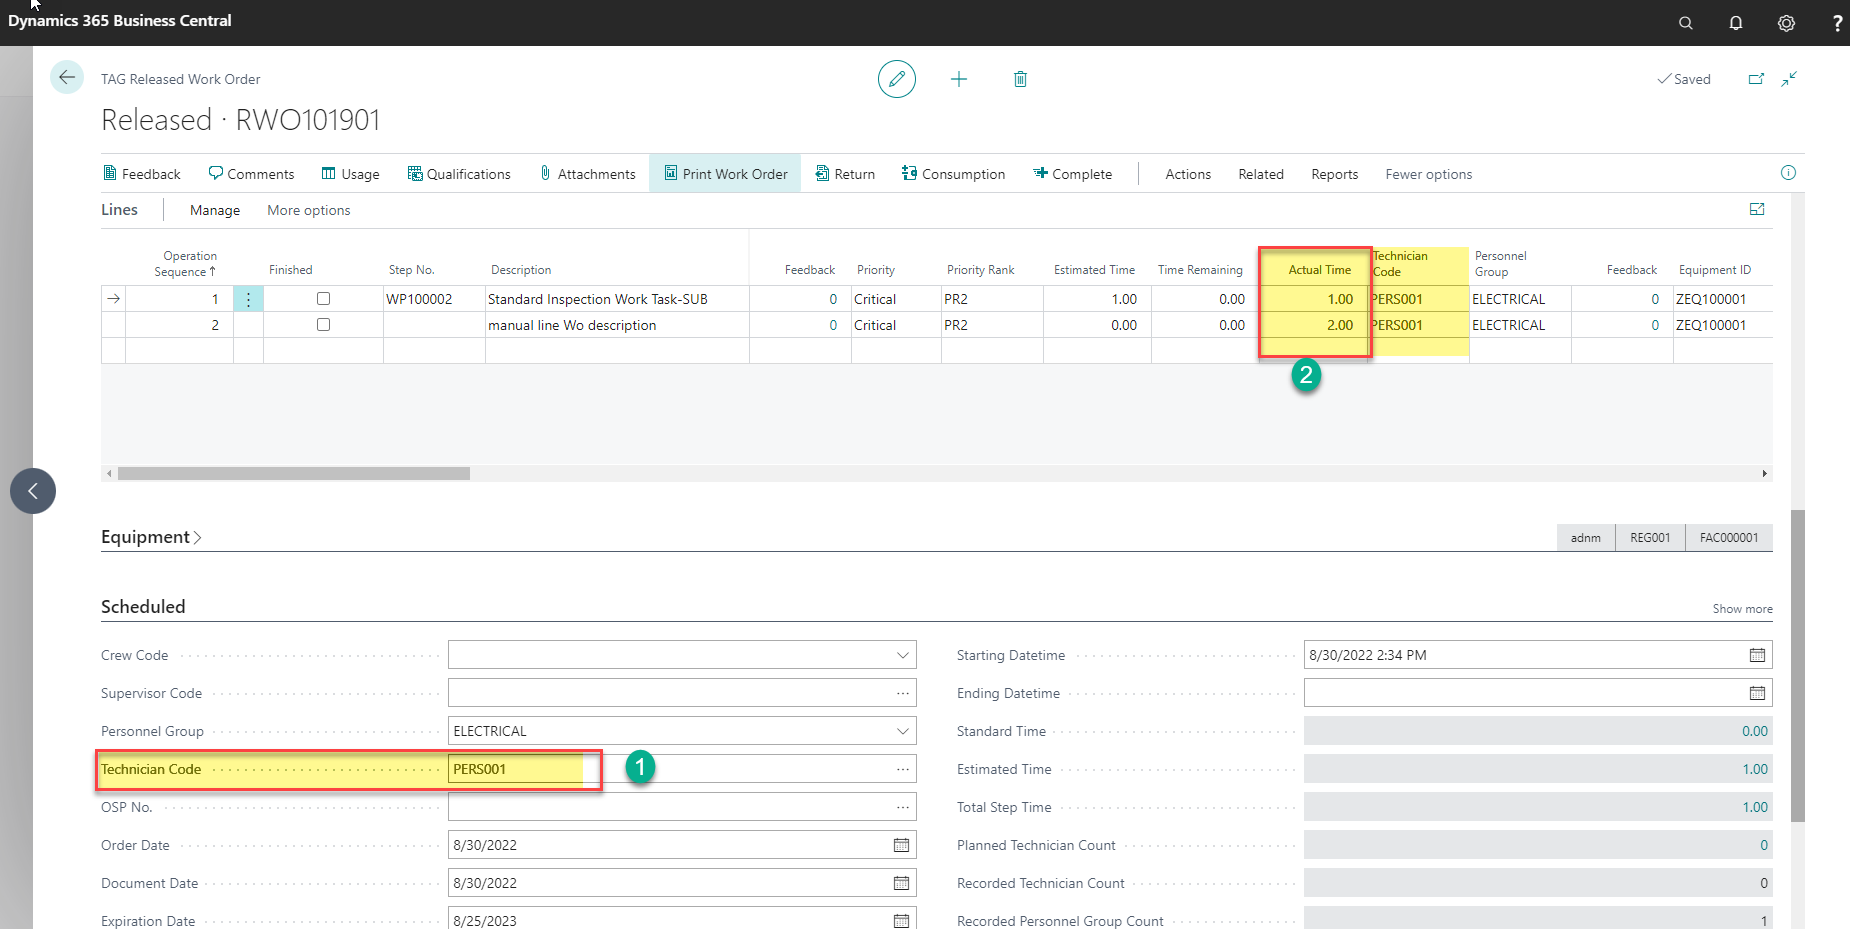
Scroll down to Scheduled FastTab and select a technician code for the Released Work Order (RWO)
- Answer "Yes" to apply technician code to all lines
Return to the Line FastTab, confirm the technician code and enter actual time
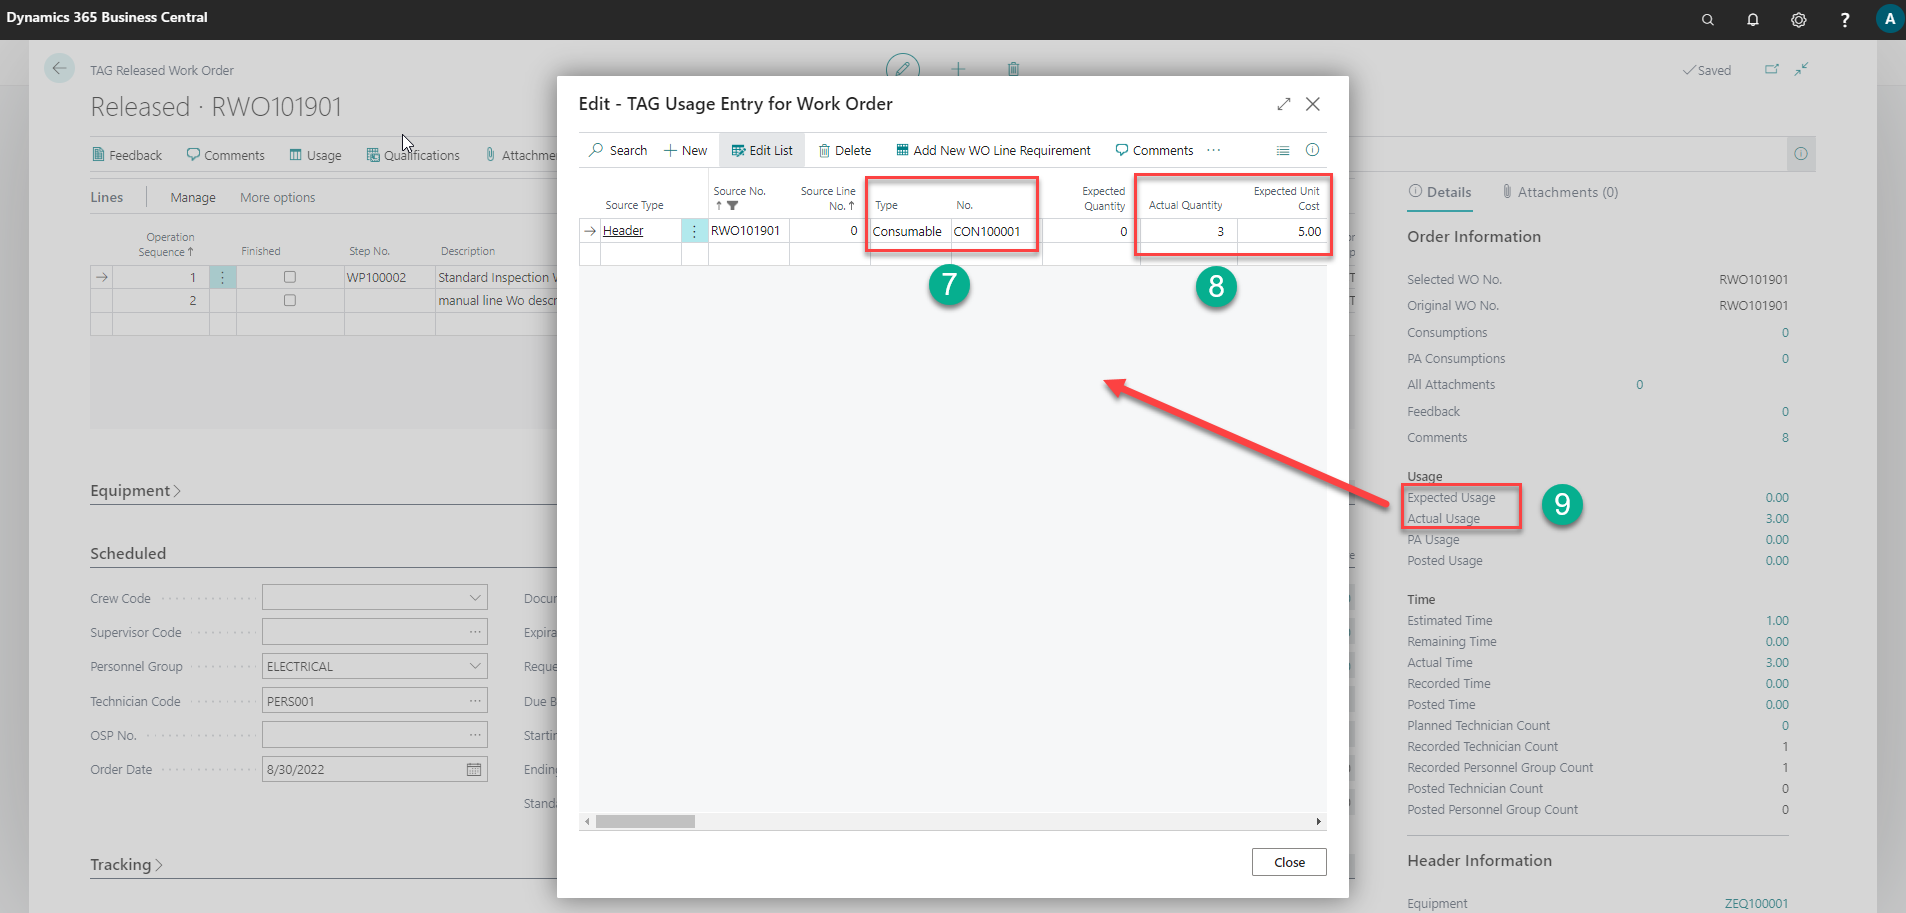
Add requirements usage (inventory):
- On the RWO ribbon, click on the "I" to open the fact box pane
- Factbox "order information" > find and click on field "Expected Usage" to open the Requirements Usage page (alternate: RWO ribbon > Navigate tab > usage action button)
- enter a requirement by:
- Change field "Type" to "Consumable"
- Select the Consumable No
- Enter an actual quantity
- Enter an expected cost
Expected result: a RWO with Work order task lines, technician and time, usage and quantity.
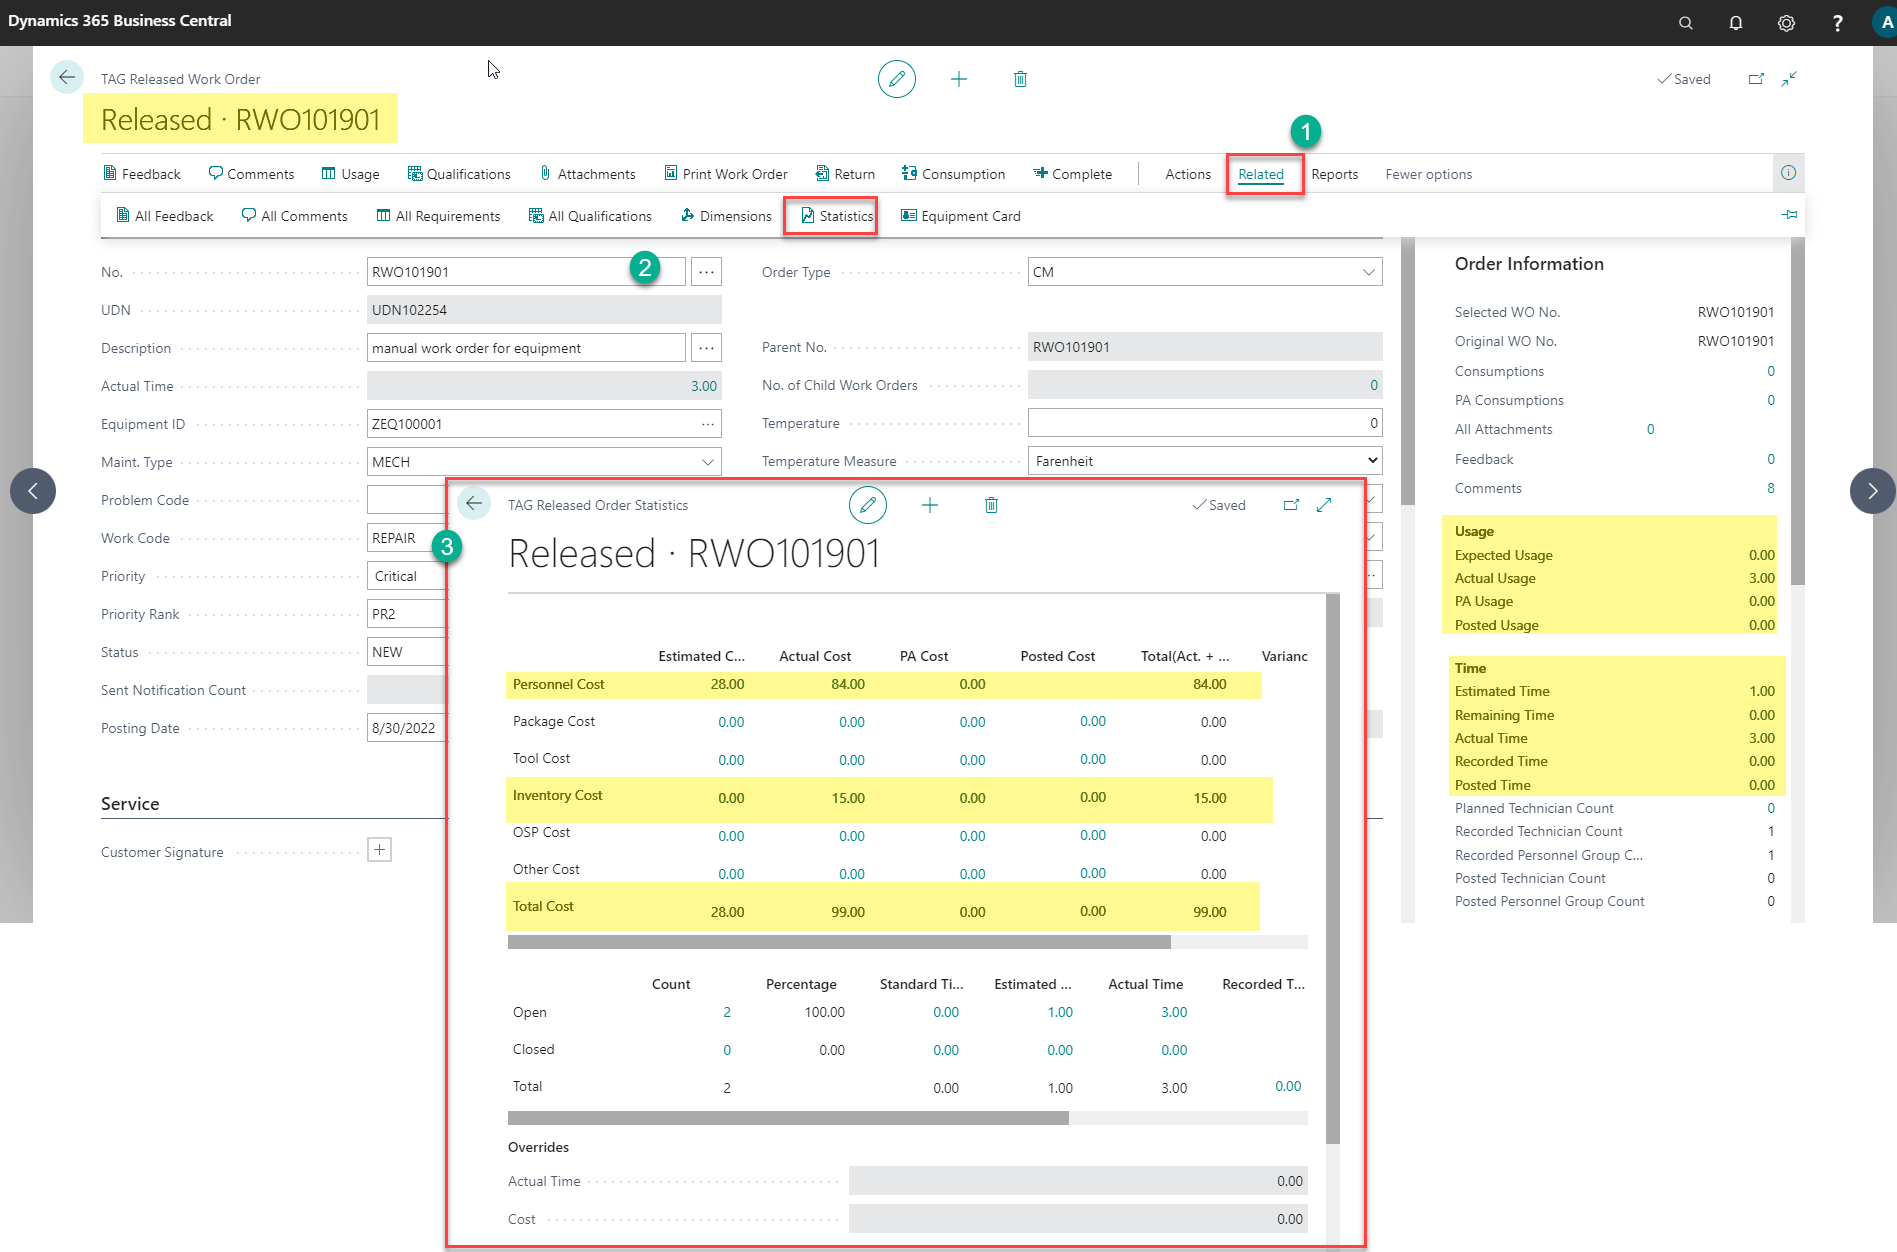
Confirmation: on the RWO ribbon select Navigate > Statistics action button to review the cost of time and inventory on the RWO.


Work Order Completion
- Start from TAG Maint. Manager Role Profile
- Go to the TAG Tasks section and click TAG Released Work Order menu.
- Select the desired Work Order, click on the first column (UDN) to open the Work Order card
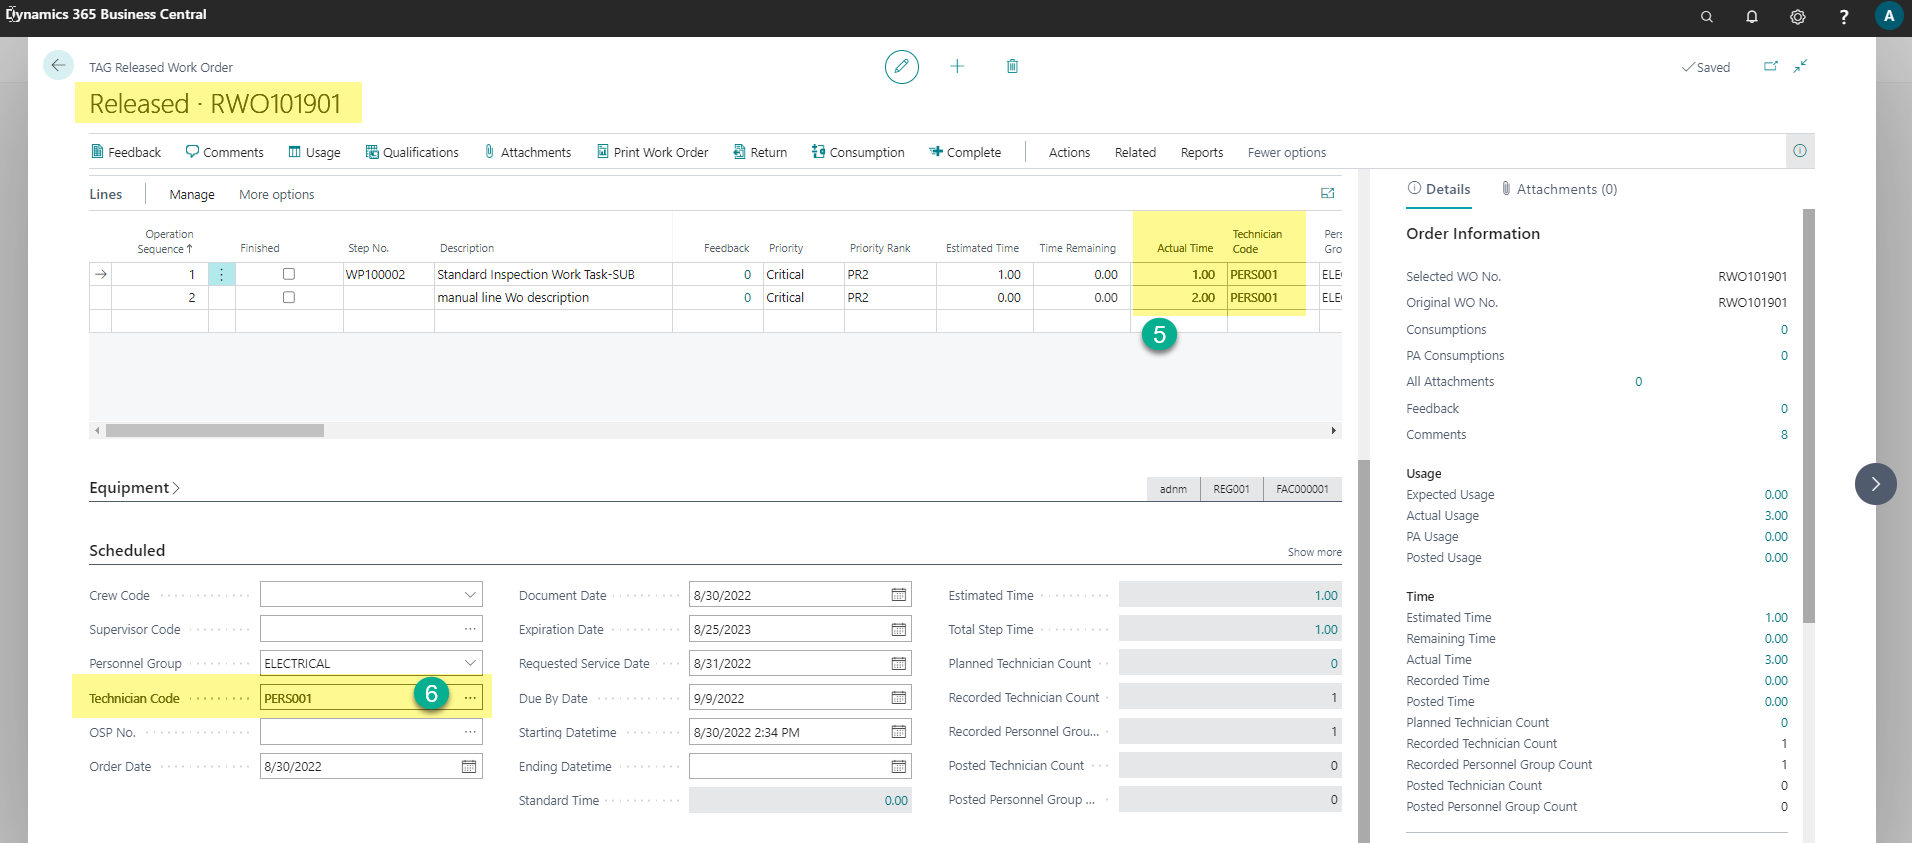
- Confirm the Technician on the Scheduled FastTab
- Confirm the Technician and actual time on the Work Order Lines FastTab
- Open "Usage" and confirm the requirements Type, actual Quantity, and Cost.
- Open "Order Information" fact box, click field Utilization drill through to open Usage page. • Click "Complete" to post and close the Work Order.
- Note: On Post Complete of the Work Order there are control validations that are performed depending on the configurations in TAG Controls. If TAG default data setup was used the following are the expected validations that may cause an control validation message (error) if missing or incomplete data in the Work Order being posted. Below are a short list of validations and potential resolutions:
- Requirements check: every Usage line for requirements must be complete with a Type, No, and Description. To resolve … open Utilization or Usage and confirm the data.
- Technician on RWO header check: the Scheduled FastTab must have a technician code. To resolve go to Scheduled FastTab and populate the technician code.
- Technician on RWO line check: the Work Order line must have a technician code. To resolve go to the WO lines and check that each line has a technician code.
- Equipment on RWO header check: the General FastTab must have an Equipment ID populated. To resolve go to the General FastTab and select an equipment ID. (this will also populate the lines if yes is answered)
- Equipment on RWO lines check: the Work Order line must have an Equipment ID. To resolve go to the WO lines and check that each line has an Equipment ID.
- This is not a complete list, however these are typical potential messages that may occur on post of a RWO with typical setup.
Complete a Released Work Order Steps


Preventive Maintenance : Date Meter Policies
- Note: the below steps to use Preventative Maintenance (PM) expect that TAG Data Initial Setup was run and a DMP was created as test data (DMP100001) as well as default master data.
- Note: If reviewing under TAG Plan = Express there is a limitation on number of DMP records (1) The limitation is removed when purchase TAG Plan CMMS or EAM. The intent is to allow testing review under Express.
- Start from TAG Maint. Manager Role Center Profile.
- Go to the TAG Planning section and click on the TAG Date Meter Policies menu.
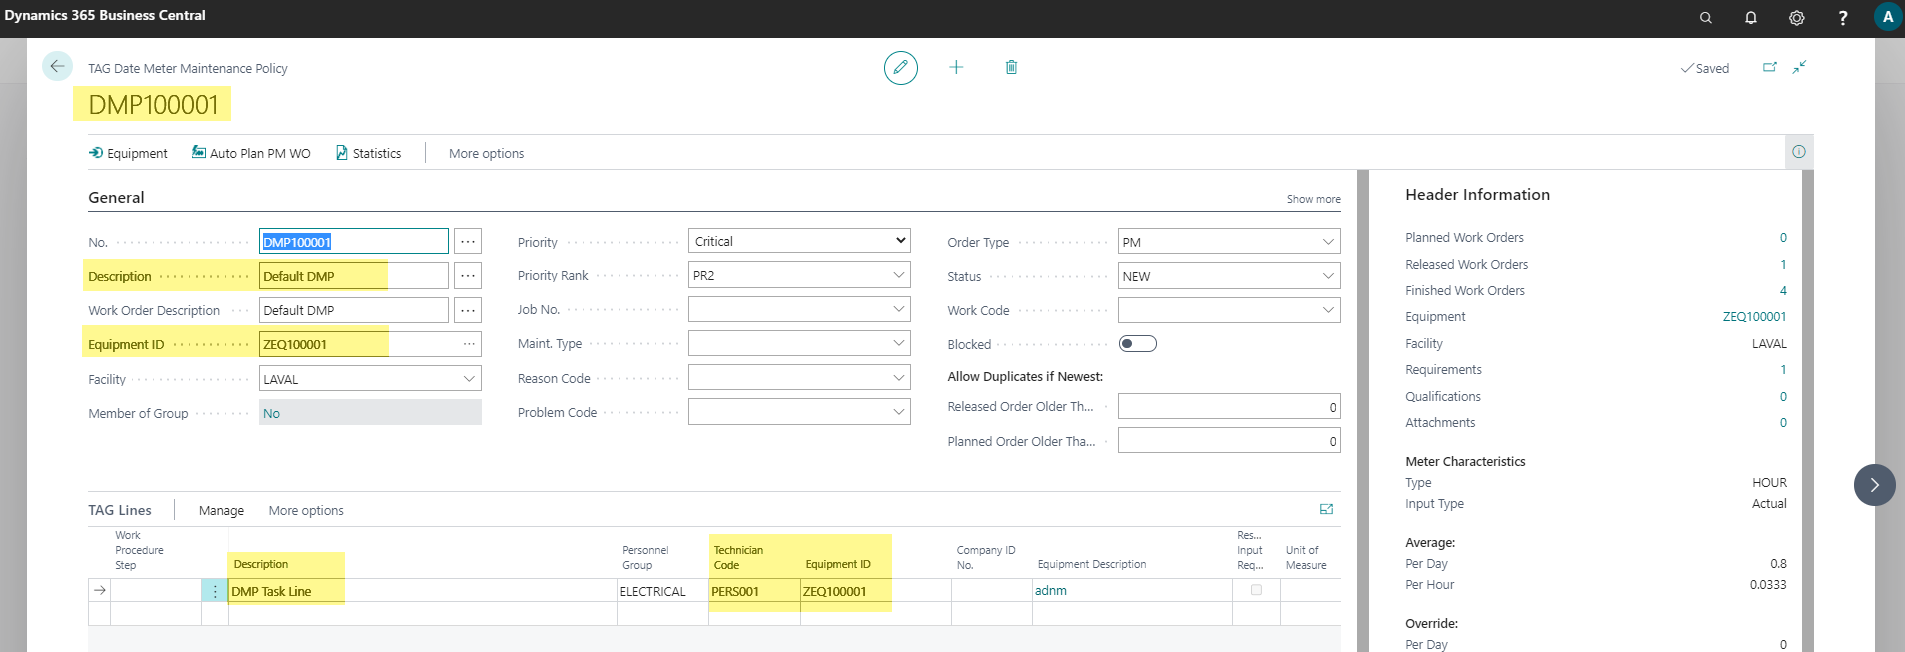
- Select the DMP record (DMP10001) from the list and open the card.
- Confirm the DMP record values:
Goto the General FastTab and confirm:
- Description has a value
- Equipment ID has a value
Goto the Lines FastTab and confirm:
- A DMP line exists with Description and Technician code
Goto the Schedule FastTab and confirm:
- A Technician is assigned to the DMP
Goto the Values FastTab and confirm:
- Type = Date
- Activate Date = yes
- Occurrence interval has a value (1W)
- Last service date has a value
- Next service date has a value
Confirm Date Meter Policy (DMP) Steps:


Preventative Maintenance:
Steps to create a PM WO from DMP and Complete
- Note: the below descriptive steps assume that Data Initialization was run and therefore master file data exists in the database. (equipment, personnel, codes)
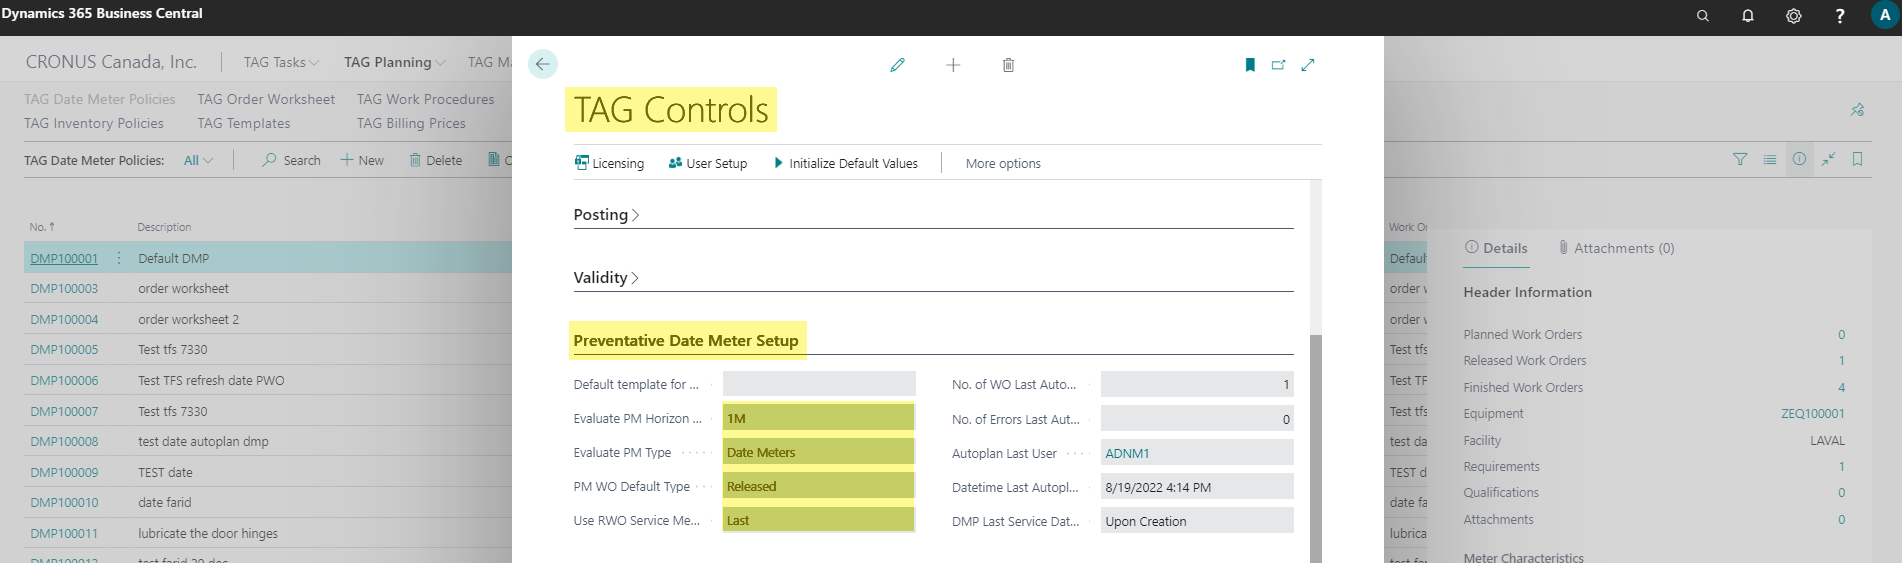
- Note: the default values for PM WO generation are setup on the TAG Controls page, Preventative Date Meter Setup FastTab. The below steps assume that these are the values in use.
Steps to create a Preventative Maintenance WO from DMP record and Complete
AutoPlan PM WO from DMP Card
Start from TAG Maint. Manager Role Center Profile.
Go to the TAG Planning Section and click on the TAG Date Meter Policies menu.
- Select a Date Meter Policy Record (DMP) and open the card.
Confirm the DMP Record values as in previous step.
Go to Tracking FastTab on the target DMP card
- Check field Released WO to confirm a WO does not exist for this DMP.
- (the fields are a flow field to the WO list)
- Note: If a WO does exist, resolve by Completing or Deleting the record.
- If a WO does not exist, proceed to autoplan
- Check field Released WO to confirm a WO does not exist for this DMP.
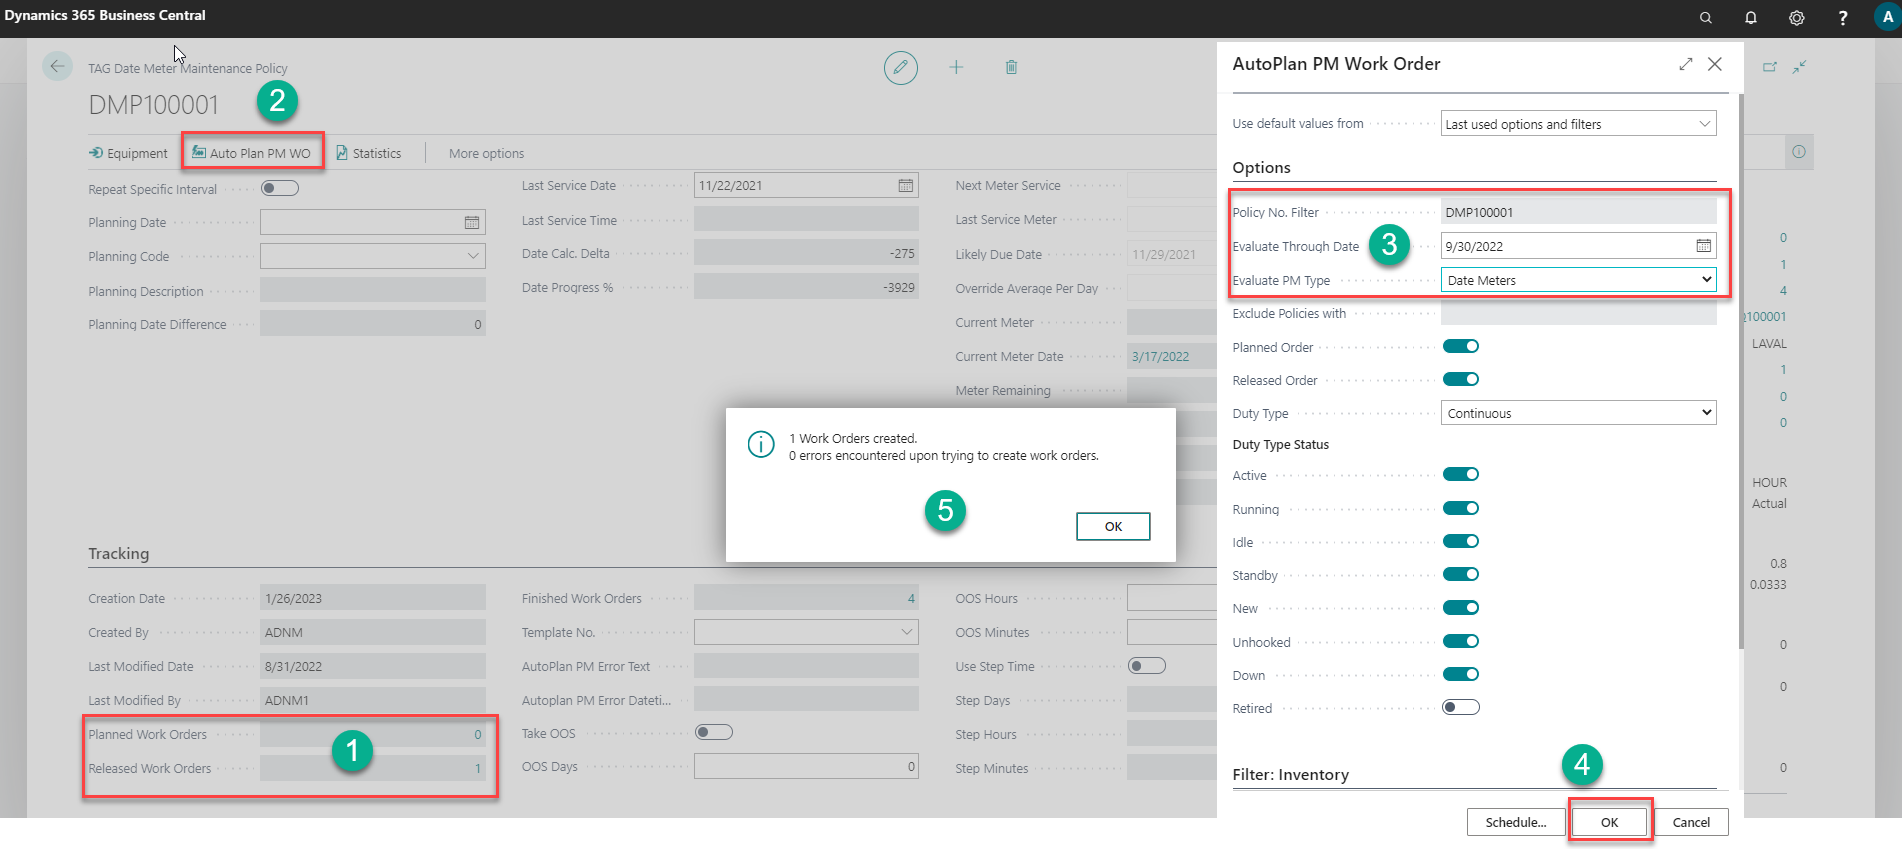
On the Ribbon for the DMP card click on action button "Autoplan PM WO"
- On Autoplan PM WO dialogue box check that
- The policy No is the same as your target DMP
- The Evaluate through date is later than Next service date on the DMP
- Evaluate PM type = Date Meters
- Click "Ok" on the Autoplan PM WO dialogue box
- On Autoplan PM WO dialogue box check that
A message will show indicating that a Work Order has been created. Default configuration is a Released Work Order.
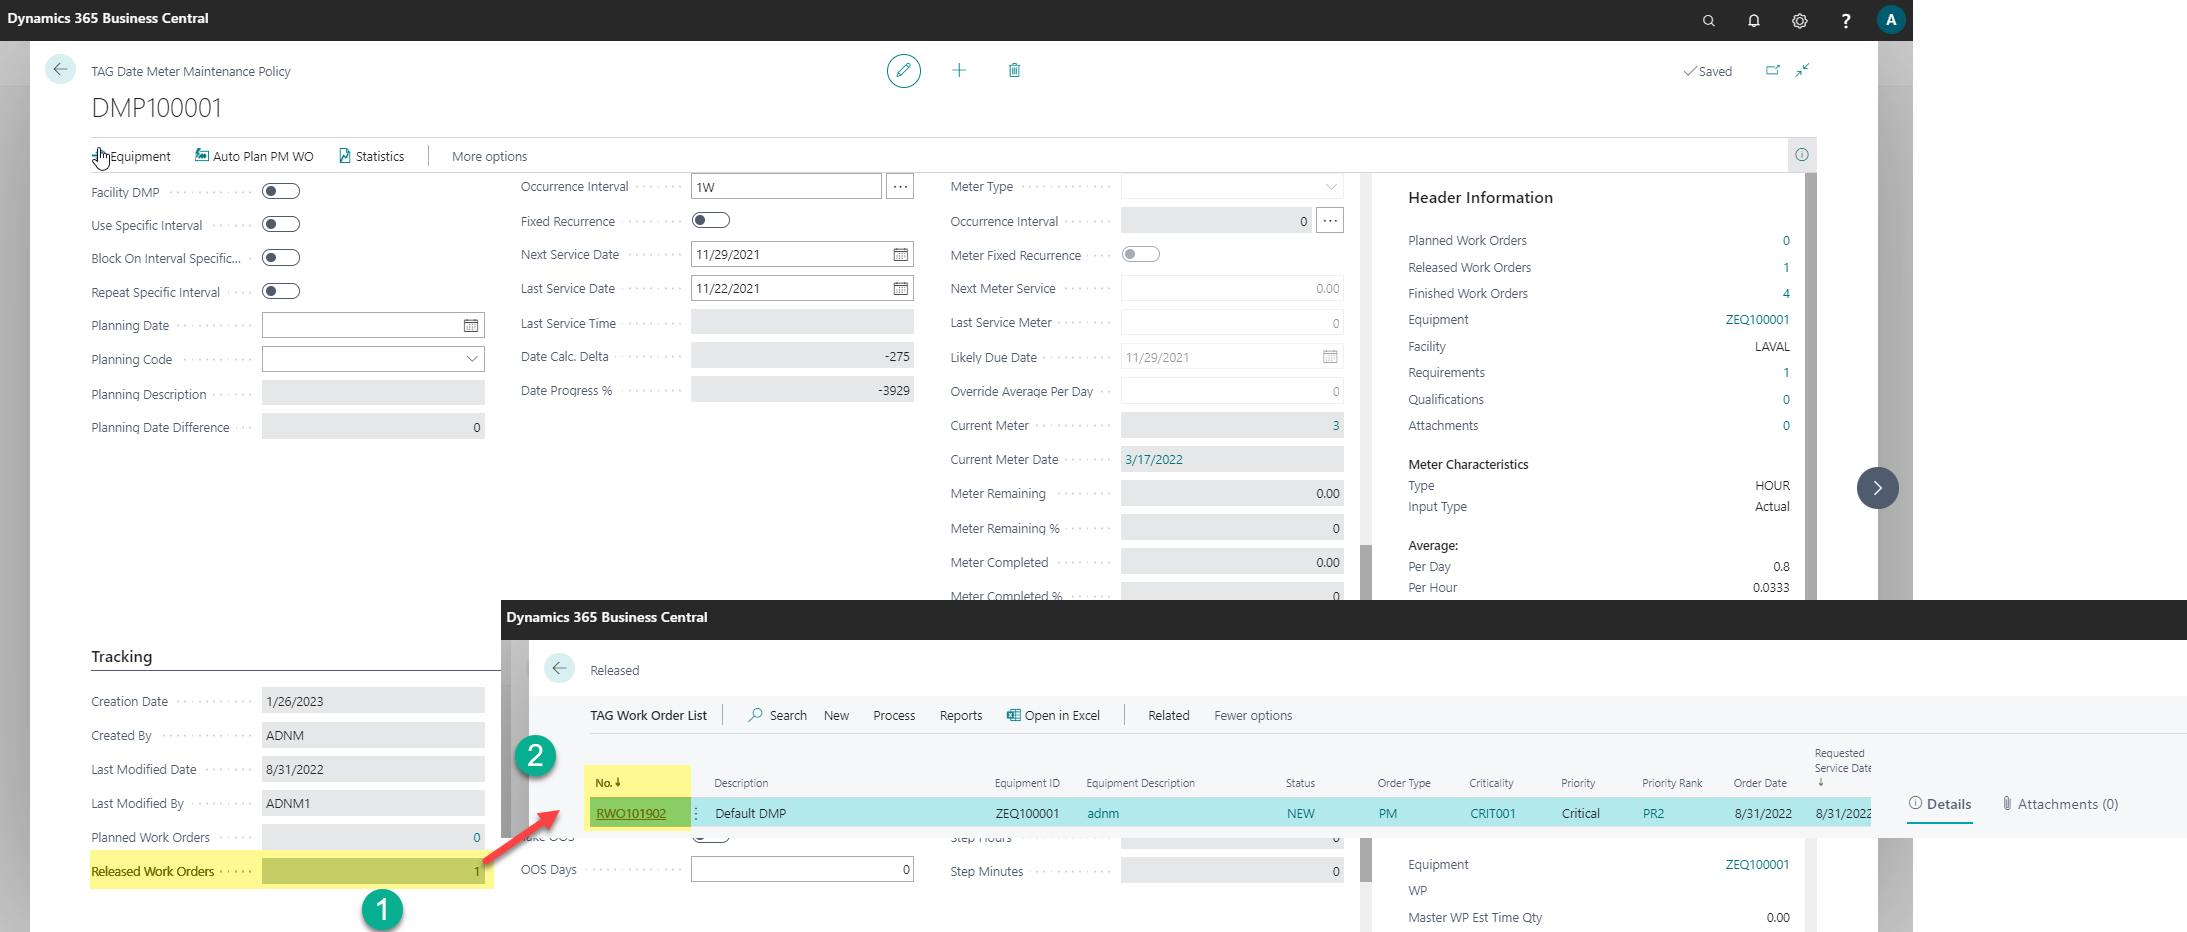
Return to the Tracking FastTab on the target DMP record and refresh the page. Check Released WO field to confirm a WO now exists for this DMP record. (the fields are a flow field to the WO list)
Drill into the WO list and open the WO card specific to the DMP
- The Description and Equipment should be the same as the source DMP
- In Tracking FastTab the field Policy no should be the same as the source DMP
Complete the Released WO by clicking action button "Complete" in the WO ribbon.
- This action will delete the RWO and create a FWO
- This action will update the DMP field "Last service date" from the completed RWO
- Update of the last service date will calculate the next service date on the DMP.
Return to the target DMP record
- Scroll down to the Values FastTab and confirm the last service date and next service date are updated
- Scroll down to the Tracking FastTab and confirm the finished Work Order.
- Note: the above steps are designed to minimize validation errors. Alternative and more advanced setups and generation methods can be configured for different results. There is a brief description of other generation methods in section additional detail. Contact **VSD **for more information.
- Note: if the message shows that 0 work orders were created, and there was an error. Check the DMP record> Tracking FastTab> field Autoplan PM error Text. Resolve the error if related to setup or config.If the message is "you are not a licensed TAG user" check your user setup at the beginning of this document.
- Note: if the message shows that 0 work orders were created, it means that the system calculates that the PM is not due. Some typical reasons:
- Activate Date on the DMP = no or Blocked = yes
- To resolve change the field values on the DMP
- A PWO or RWO Work Order already exists for that DMP
- To resolve you can go to Tracking FastTab as described and complete or delete the WO found.
- The target DMP equipment field values do not match the dialogue box filters
- Open the DMP Equipment
- Check that the equipment fields Duty Type and Duty Status are as expected
Create PM WO from DMP and Complete Steps

Reference Finished Work Order (FWO) Statistics
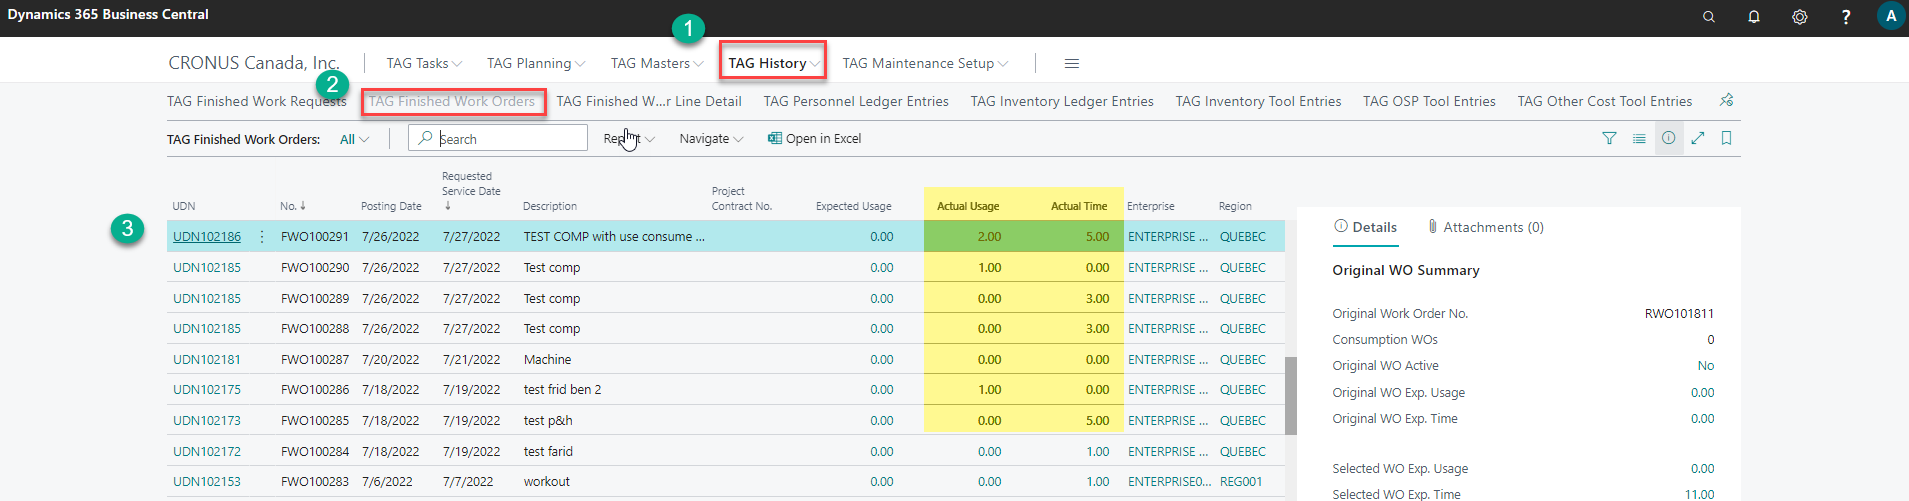
- Start from TAG Maint. Manager Role Center Profile.
- Go to the TAG History section and click on the TAG Finished Work Order menu.
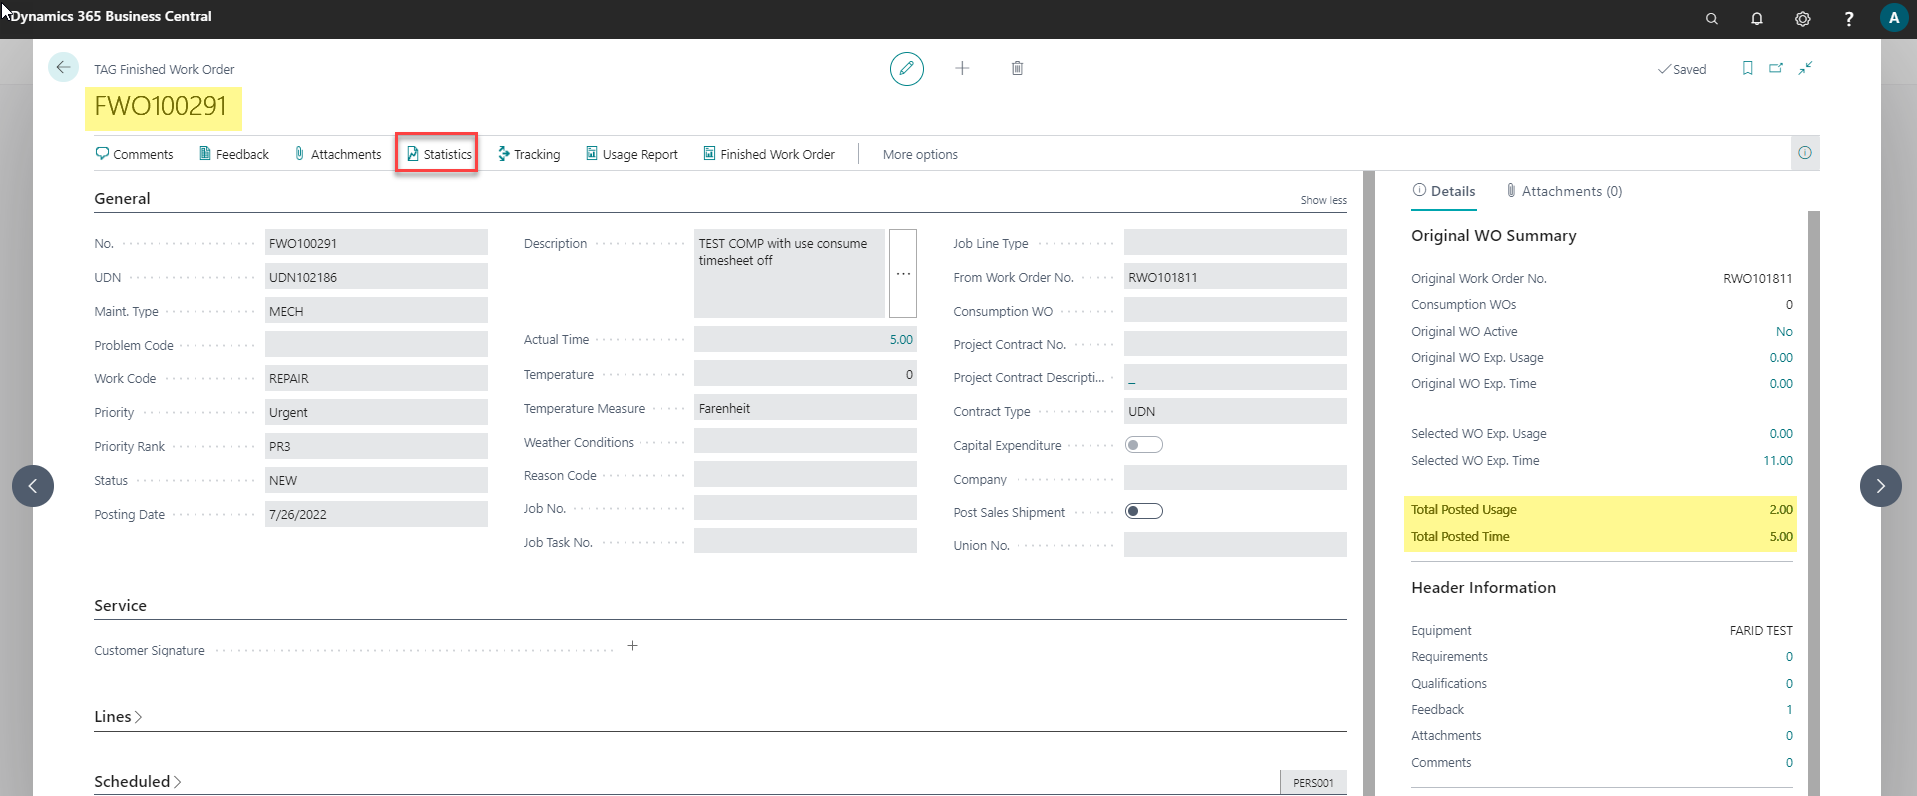
- Select one Finished Work Order and click on the UDN field to open the card.
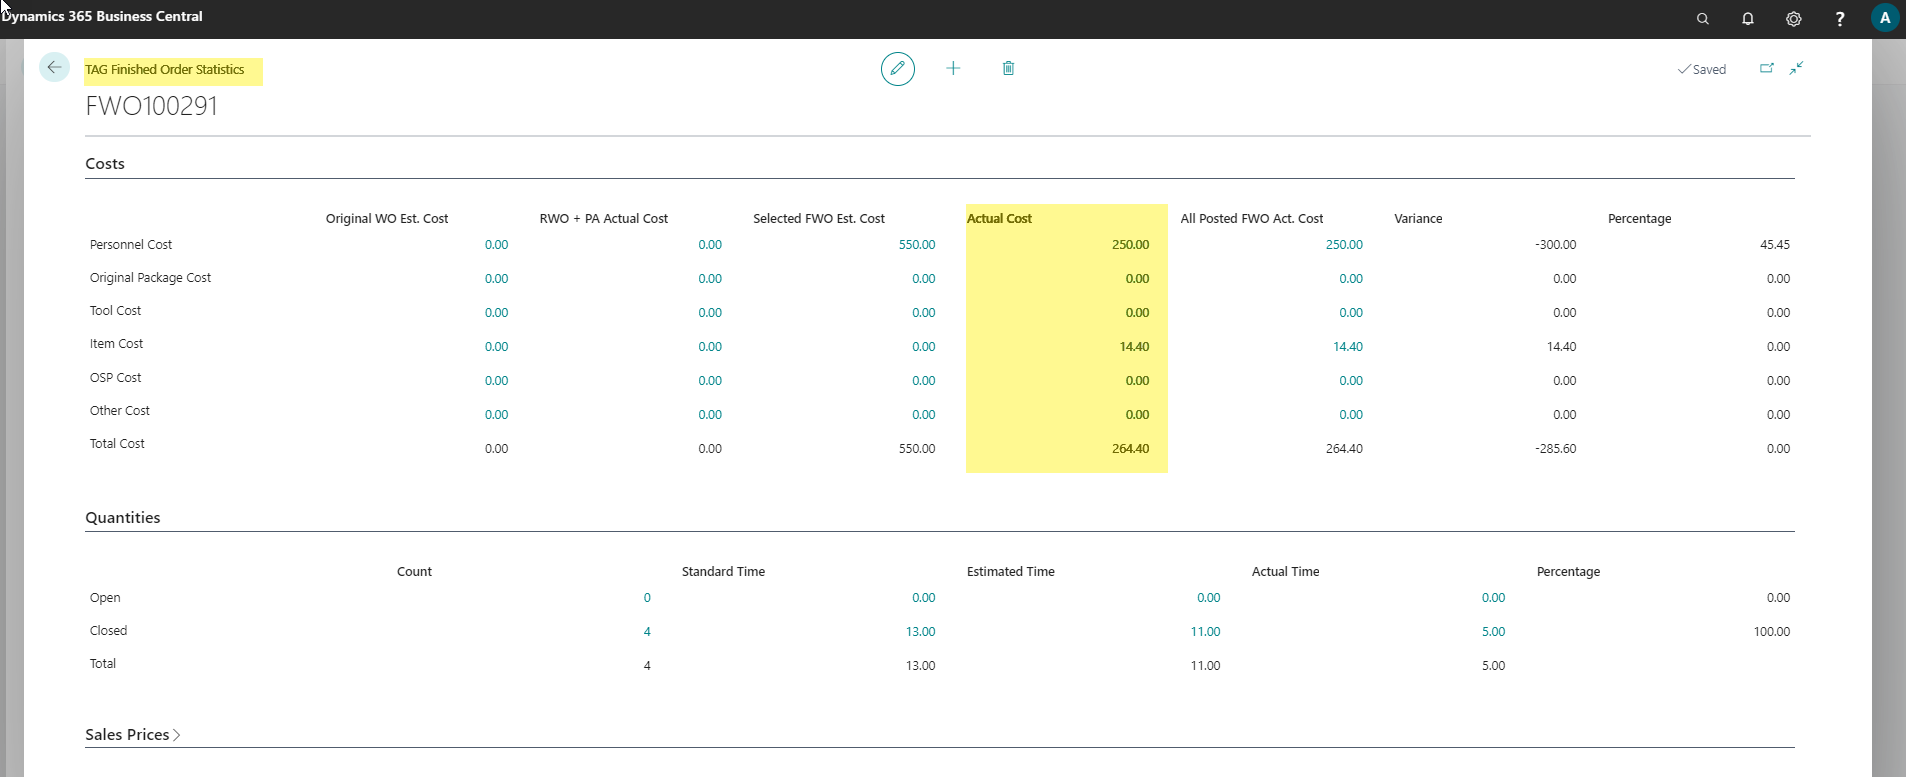
- In the ribbon, click on the "Statistics" button to open the statistics card.
Steps:
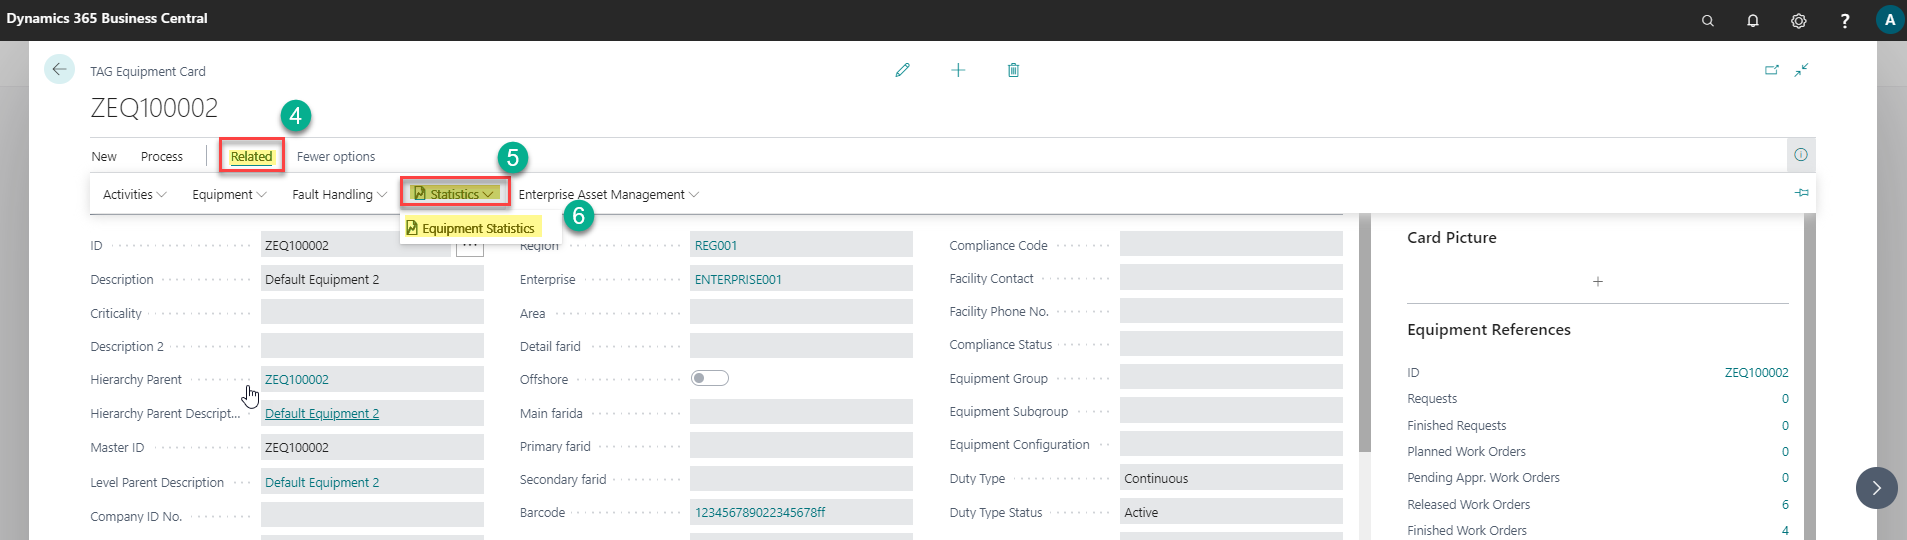
Reference Equipment Statistics
- Start from TAG Maint. Manager Role Center Profile.
- Go to the TAG Masters section and click TAG Equipment Overview menu.
- Click on the ID field to open the equipment card.
- In the ribbon, click on Navigate and then on Statistics->Equipment Statistics menu to open the Equipment Statistics card.
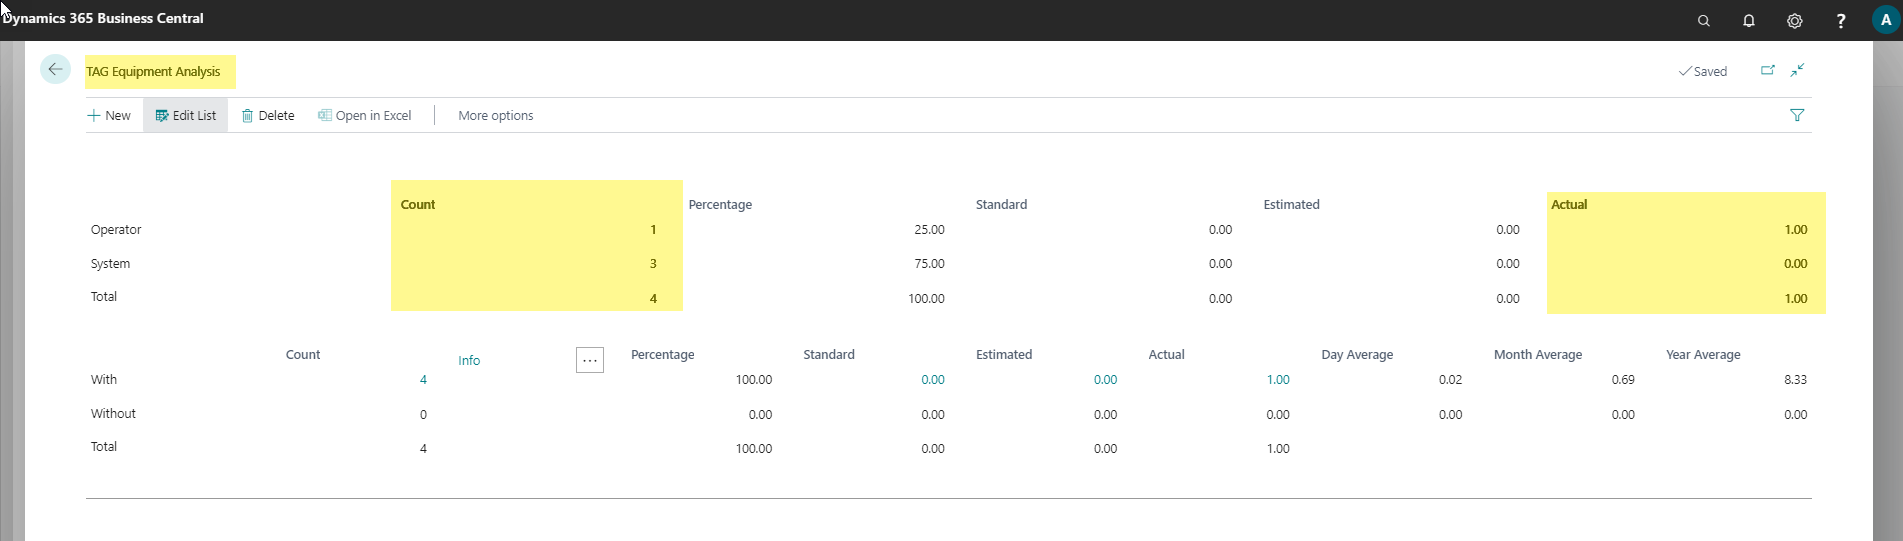
- Click on the "Equipment Analysis" button to get work code maintenance analysis.
Steps:
Select Equipment

Open Equipment statistics:
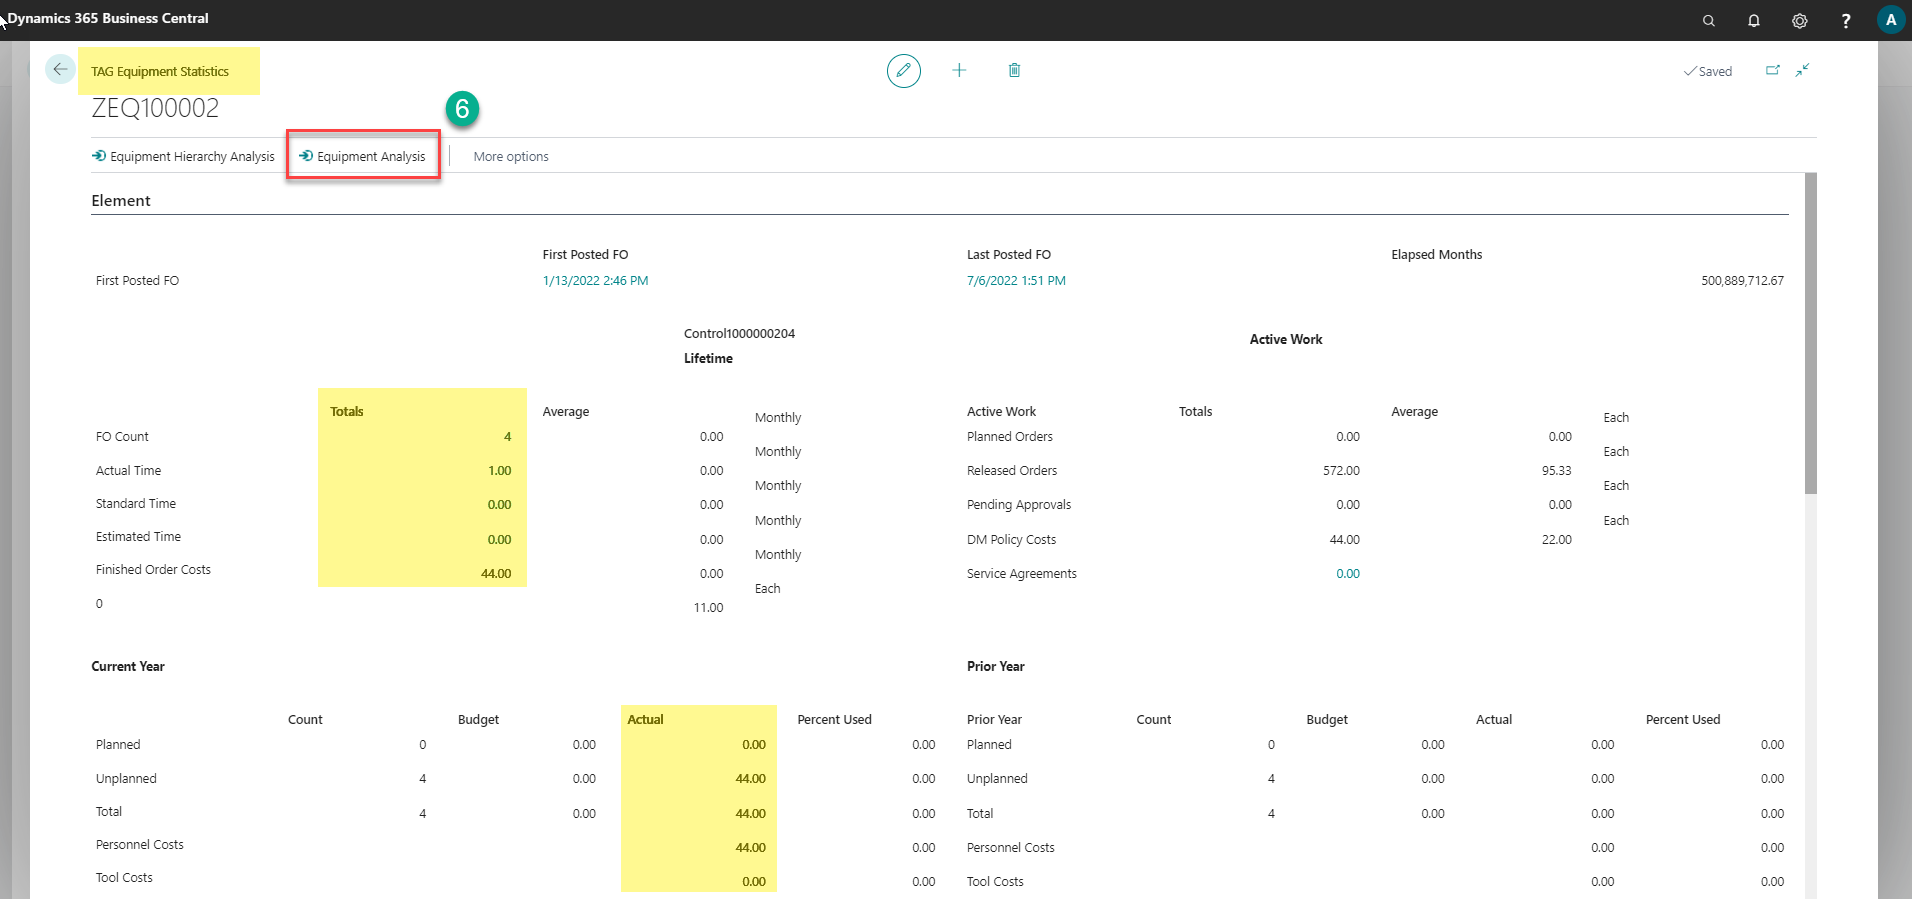
Equipment Analysis: