TAG Portal
TAG Portal | Techician Portal navigation bar pages
Dashboard
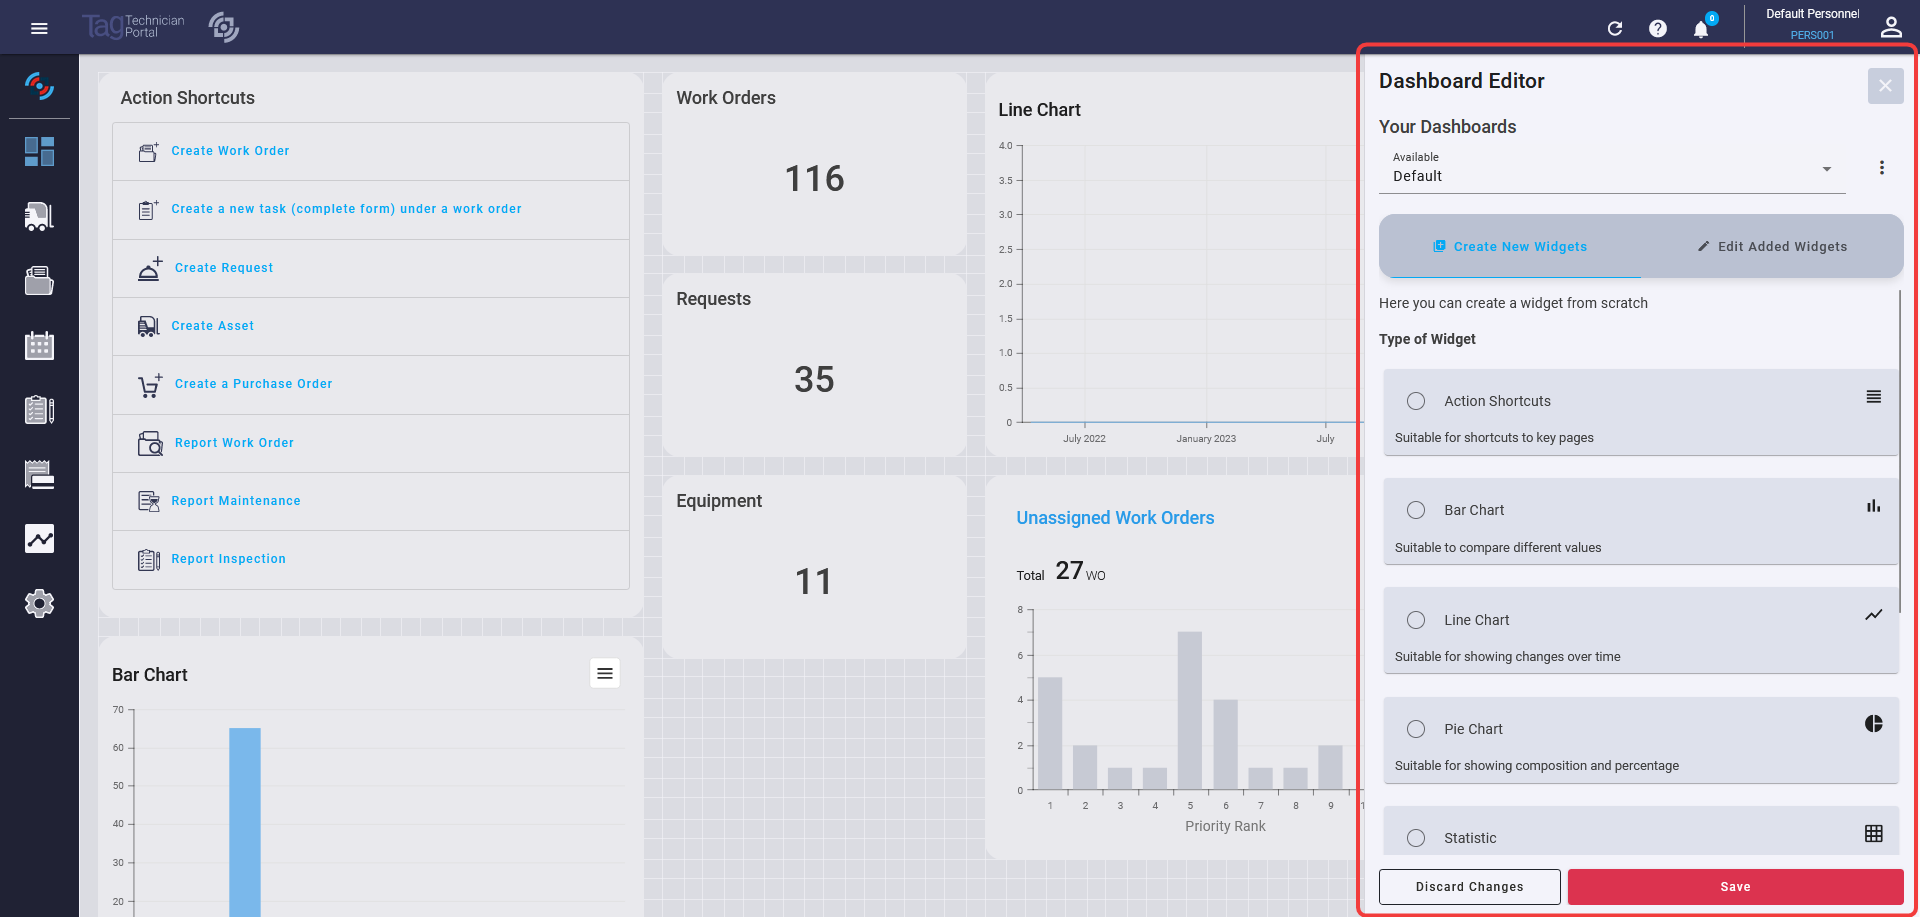
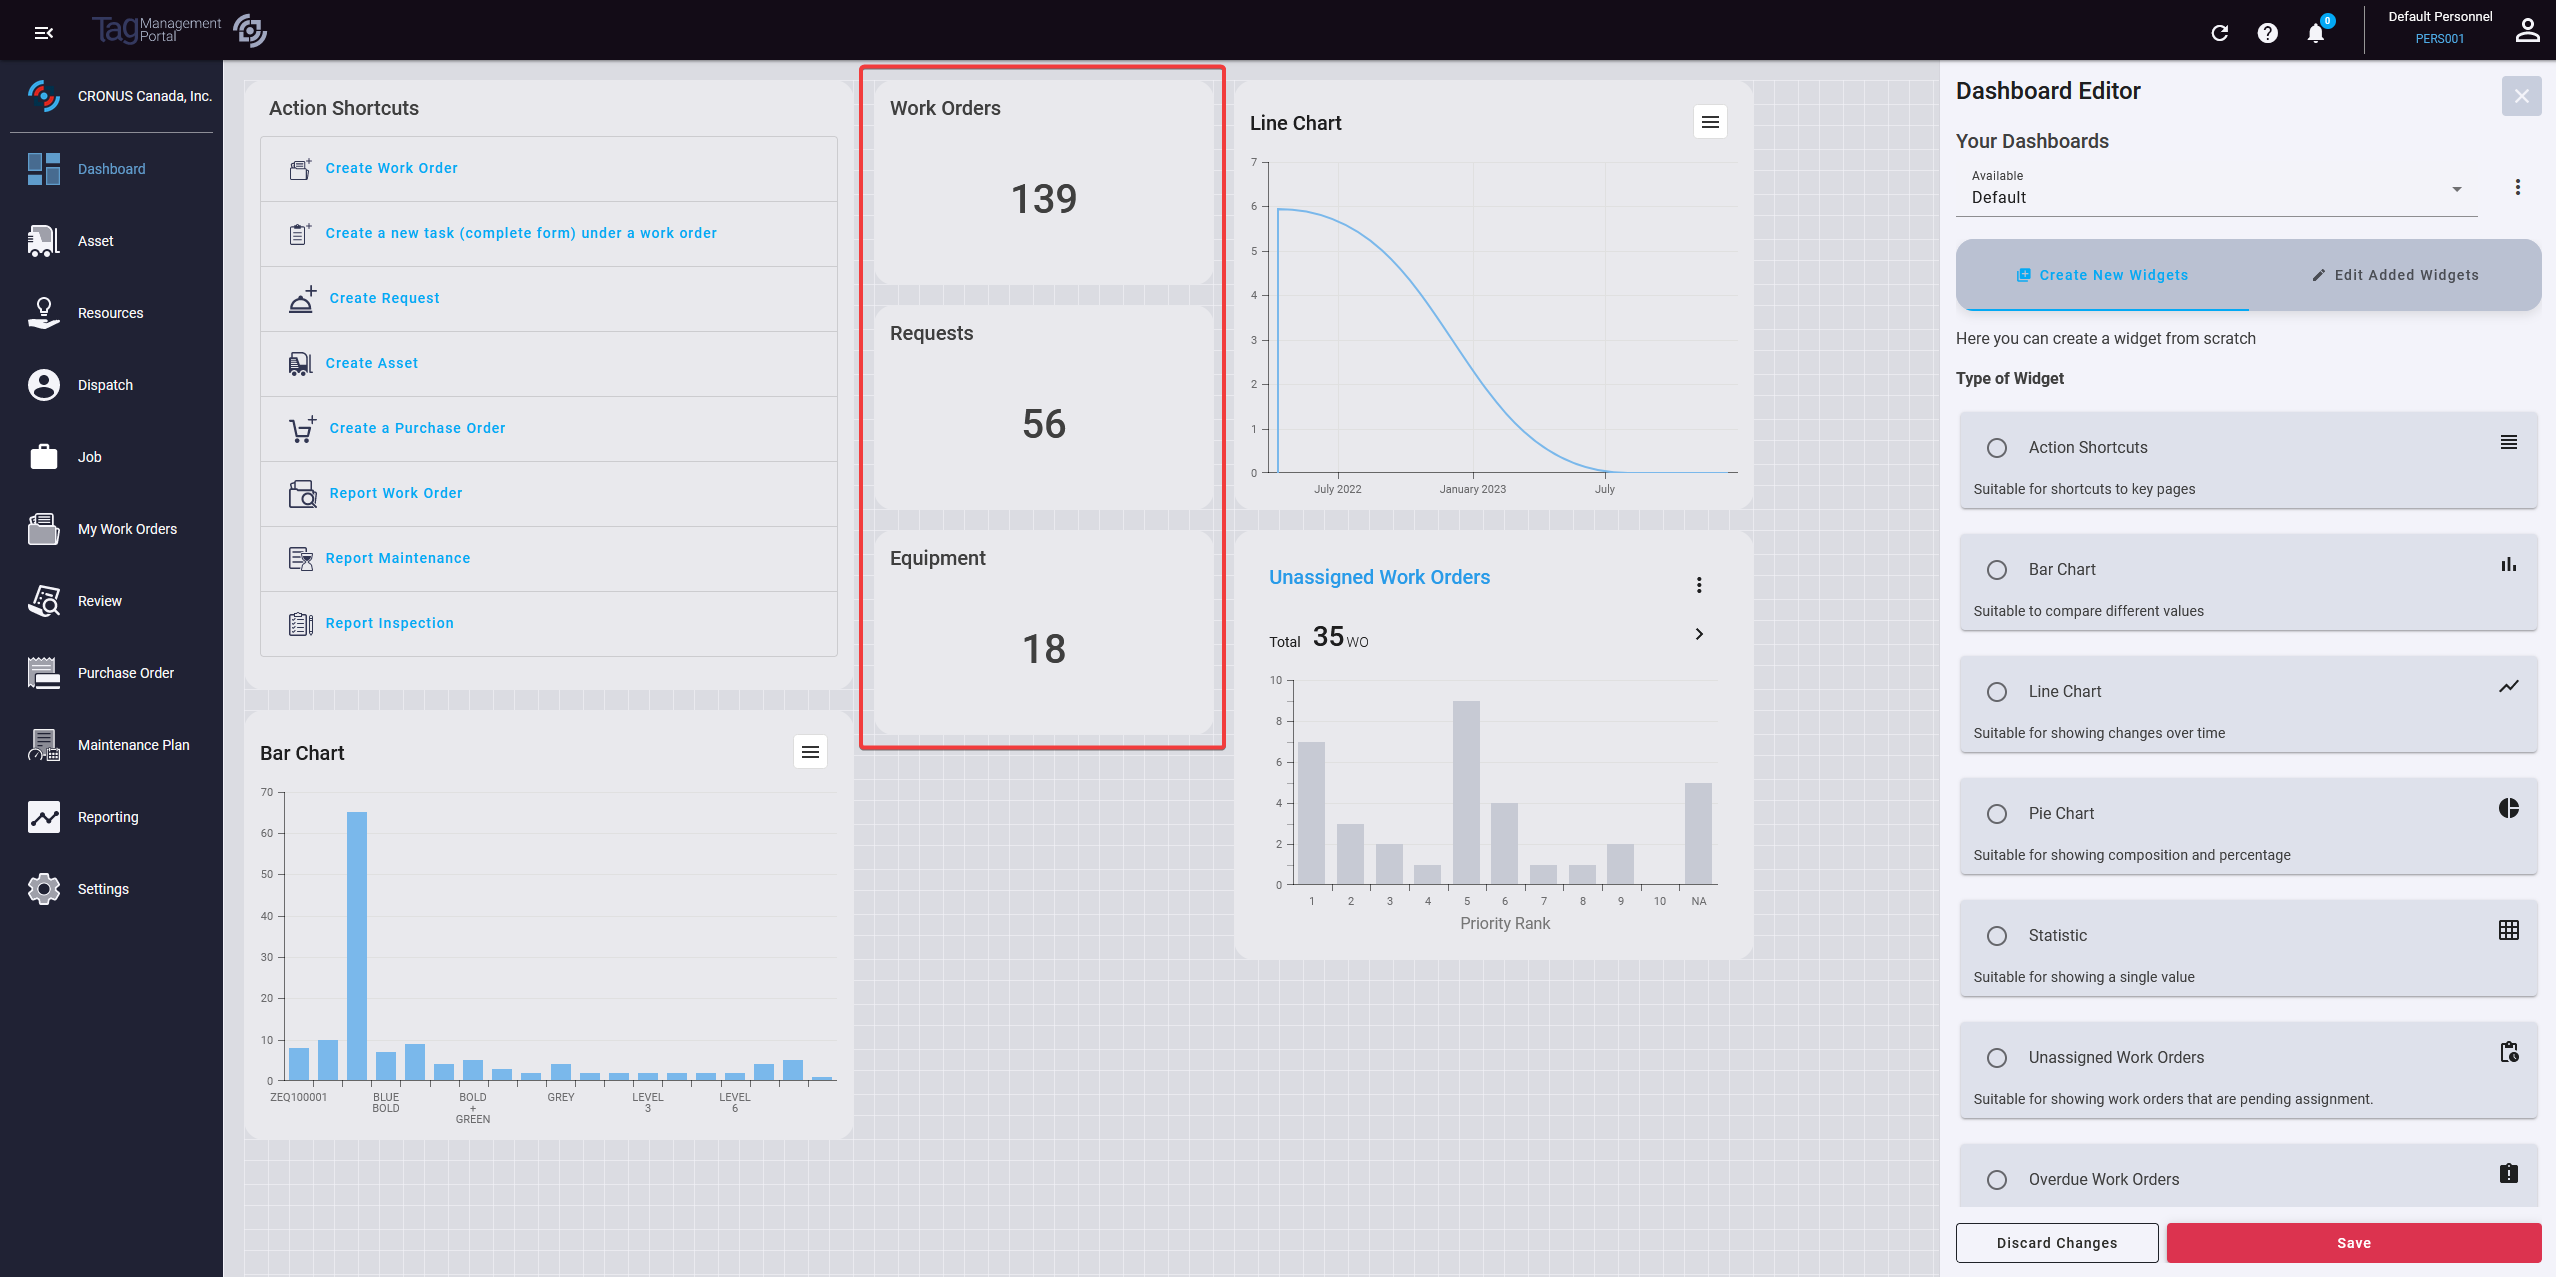
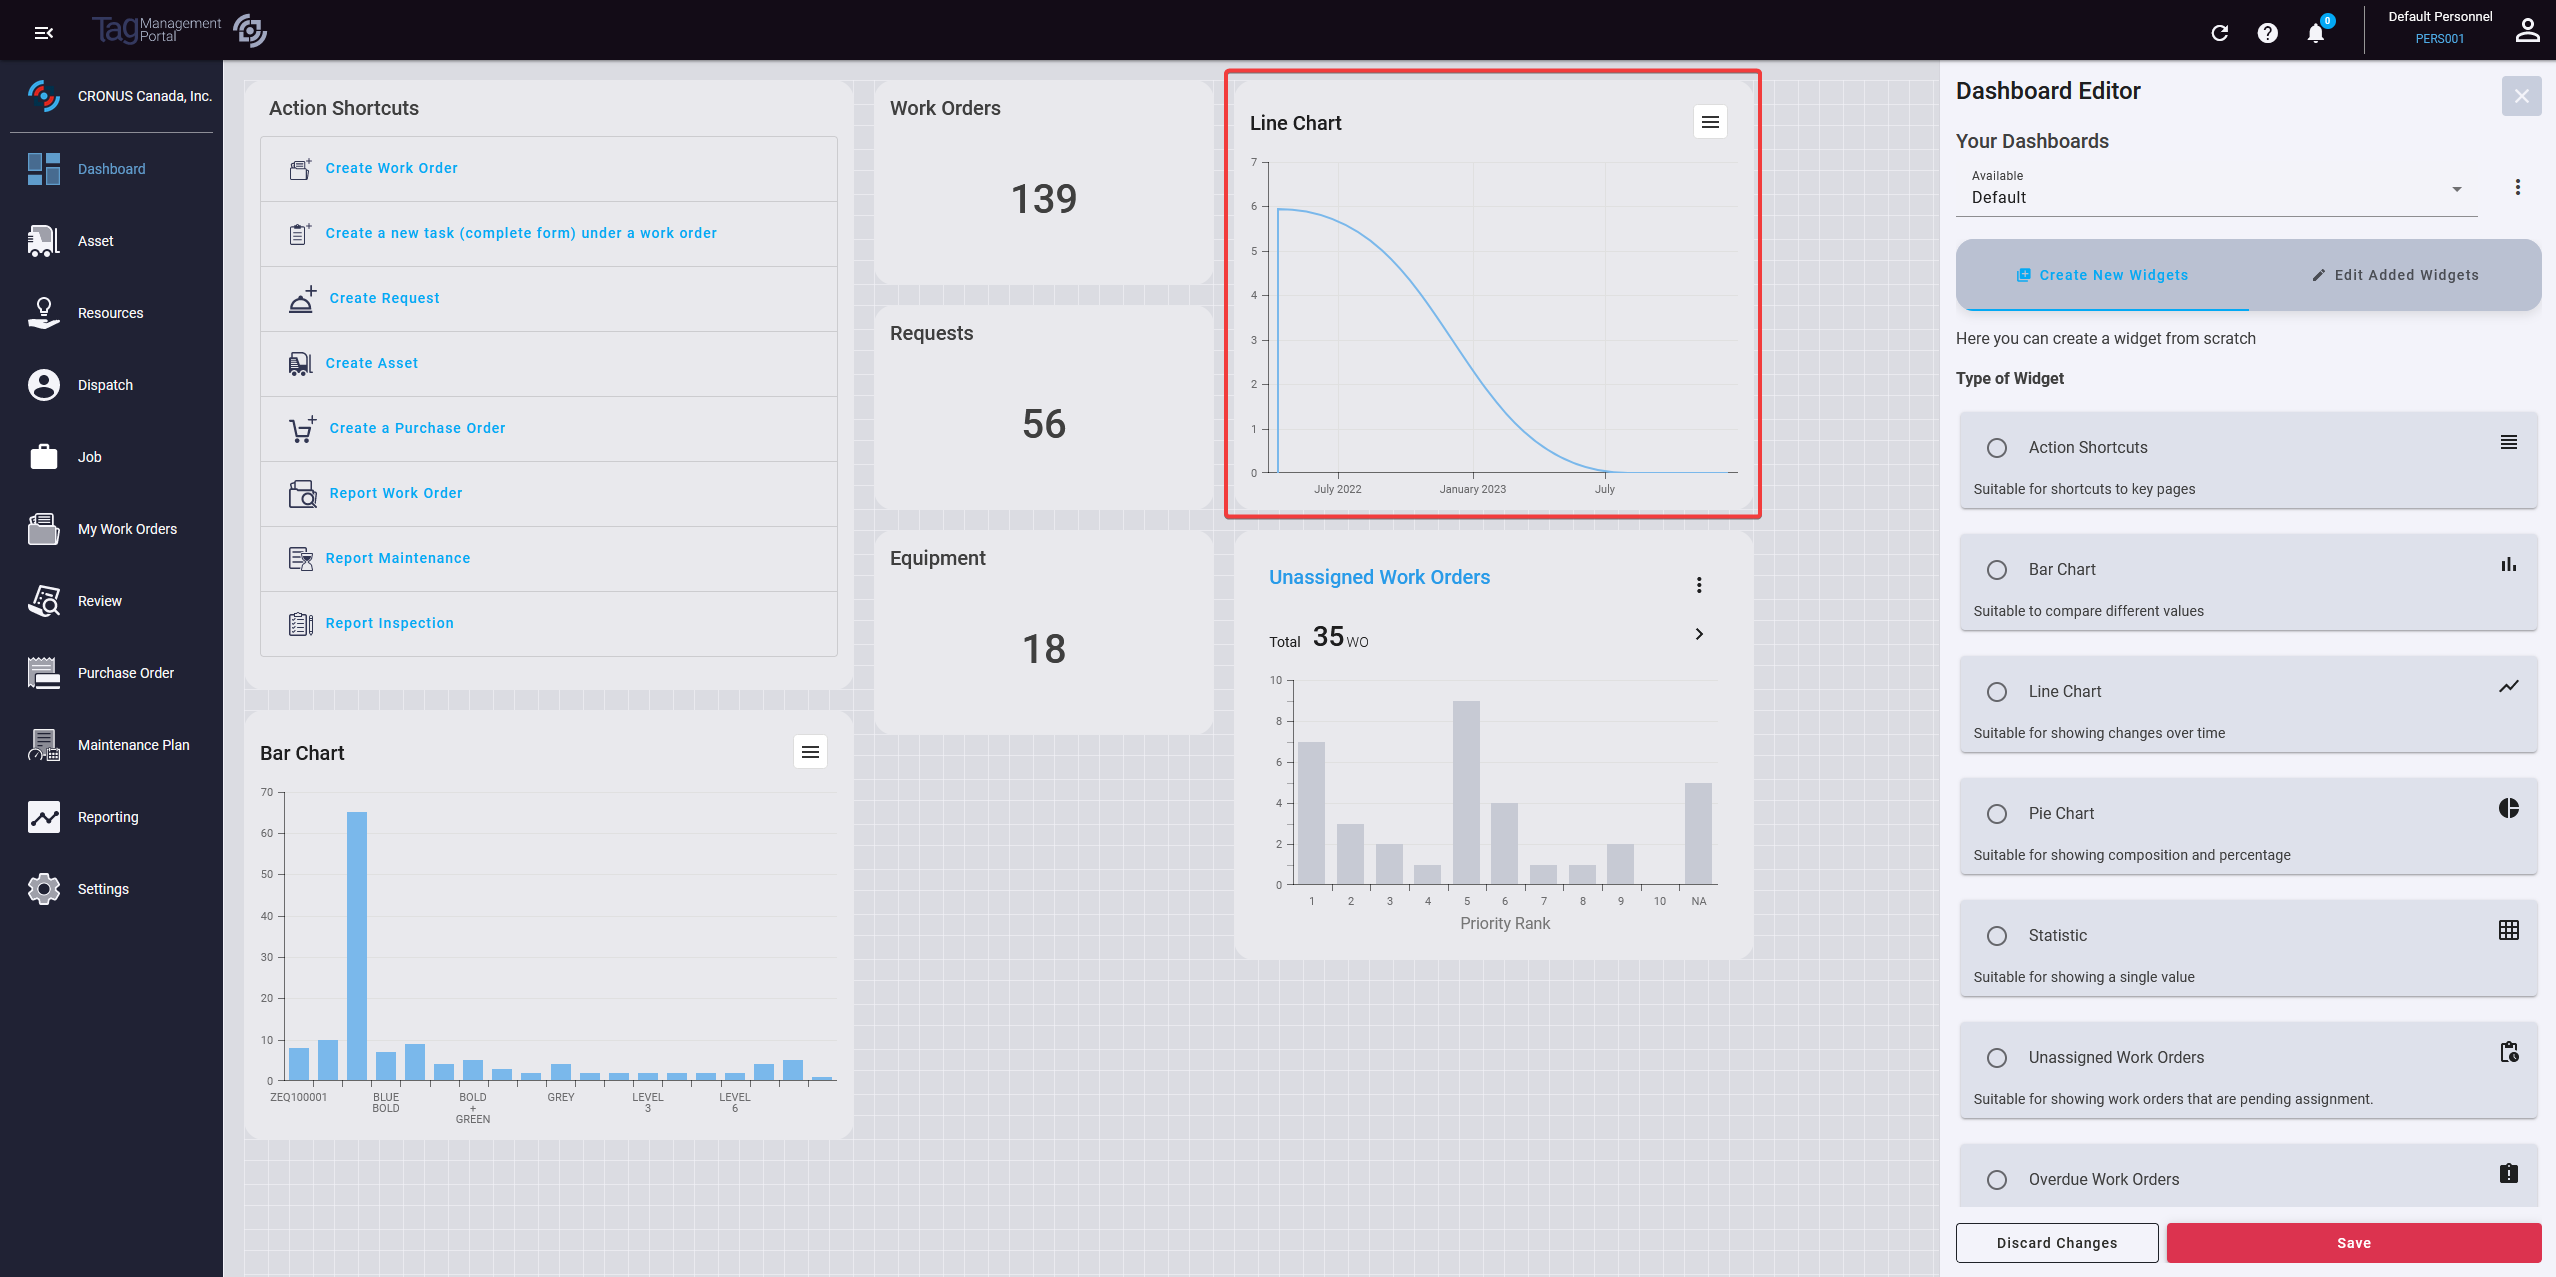
The Dashboard Editor allows users to customize and manage their personal dashboards. With a user-friendly interface, it provides options to create and modify various types of widgets for diverse data representation needs.
Your Dashboards
In the top section of the editor, you have the flexibility to manage your dashboards:
- Add New Dashboards: Easily clone your current dashboard to a new one, saving time and avoiding starting from zero.
- Select & Edit: Choose the desired dashboard for editing.
- Delete Dashboards: Remove any unnecessary dashboards with ease.
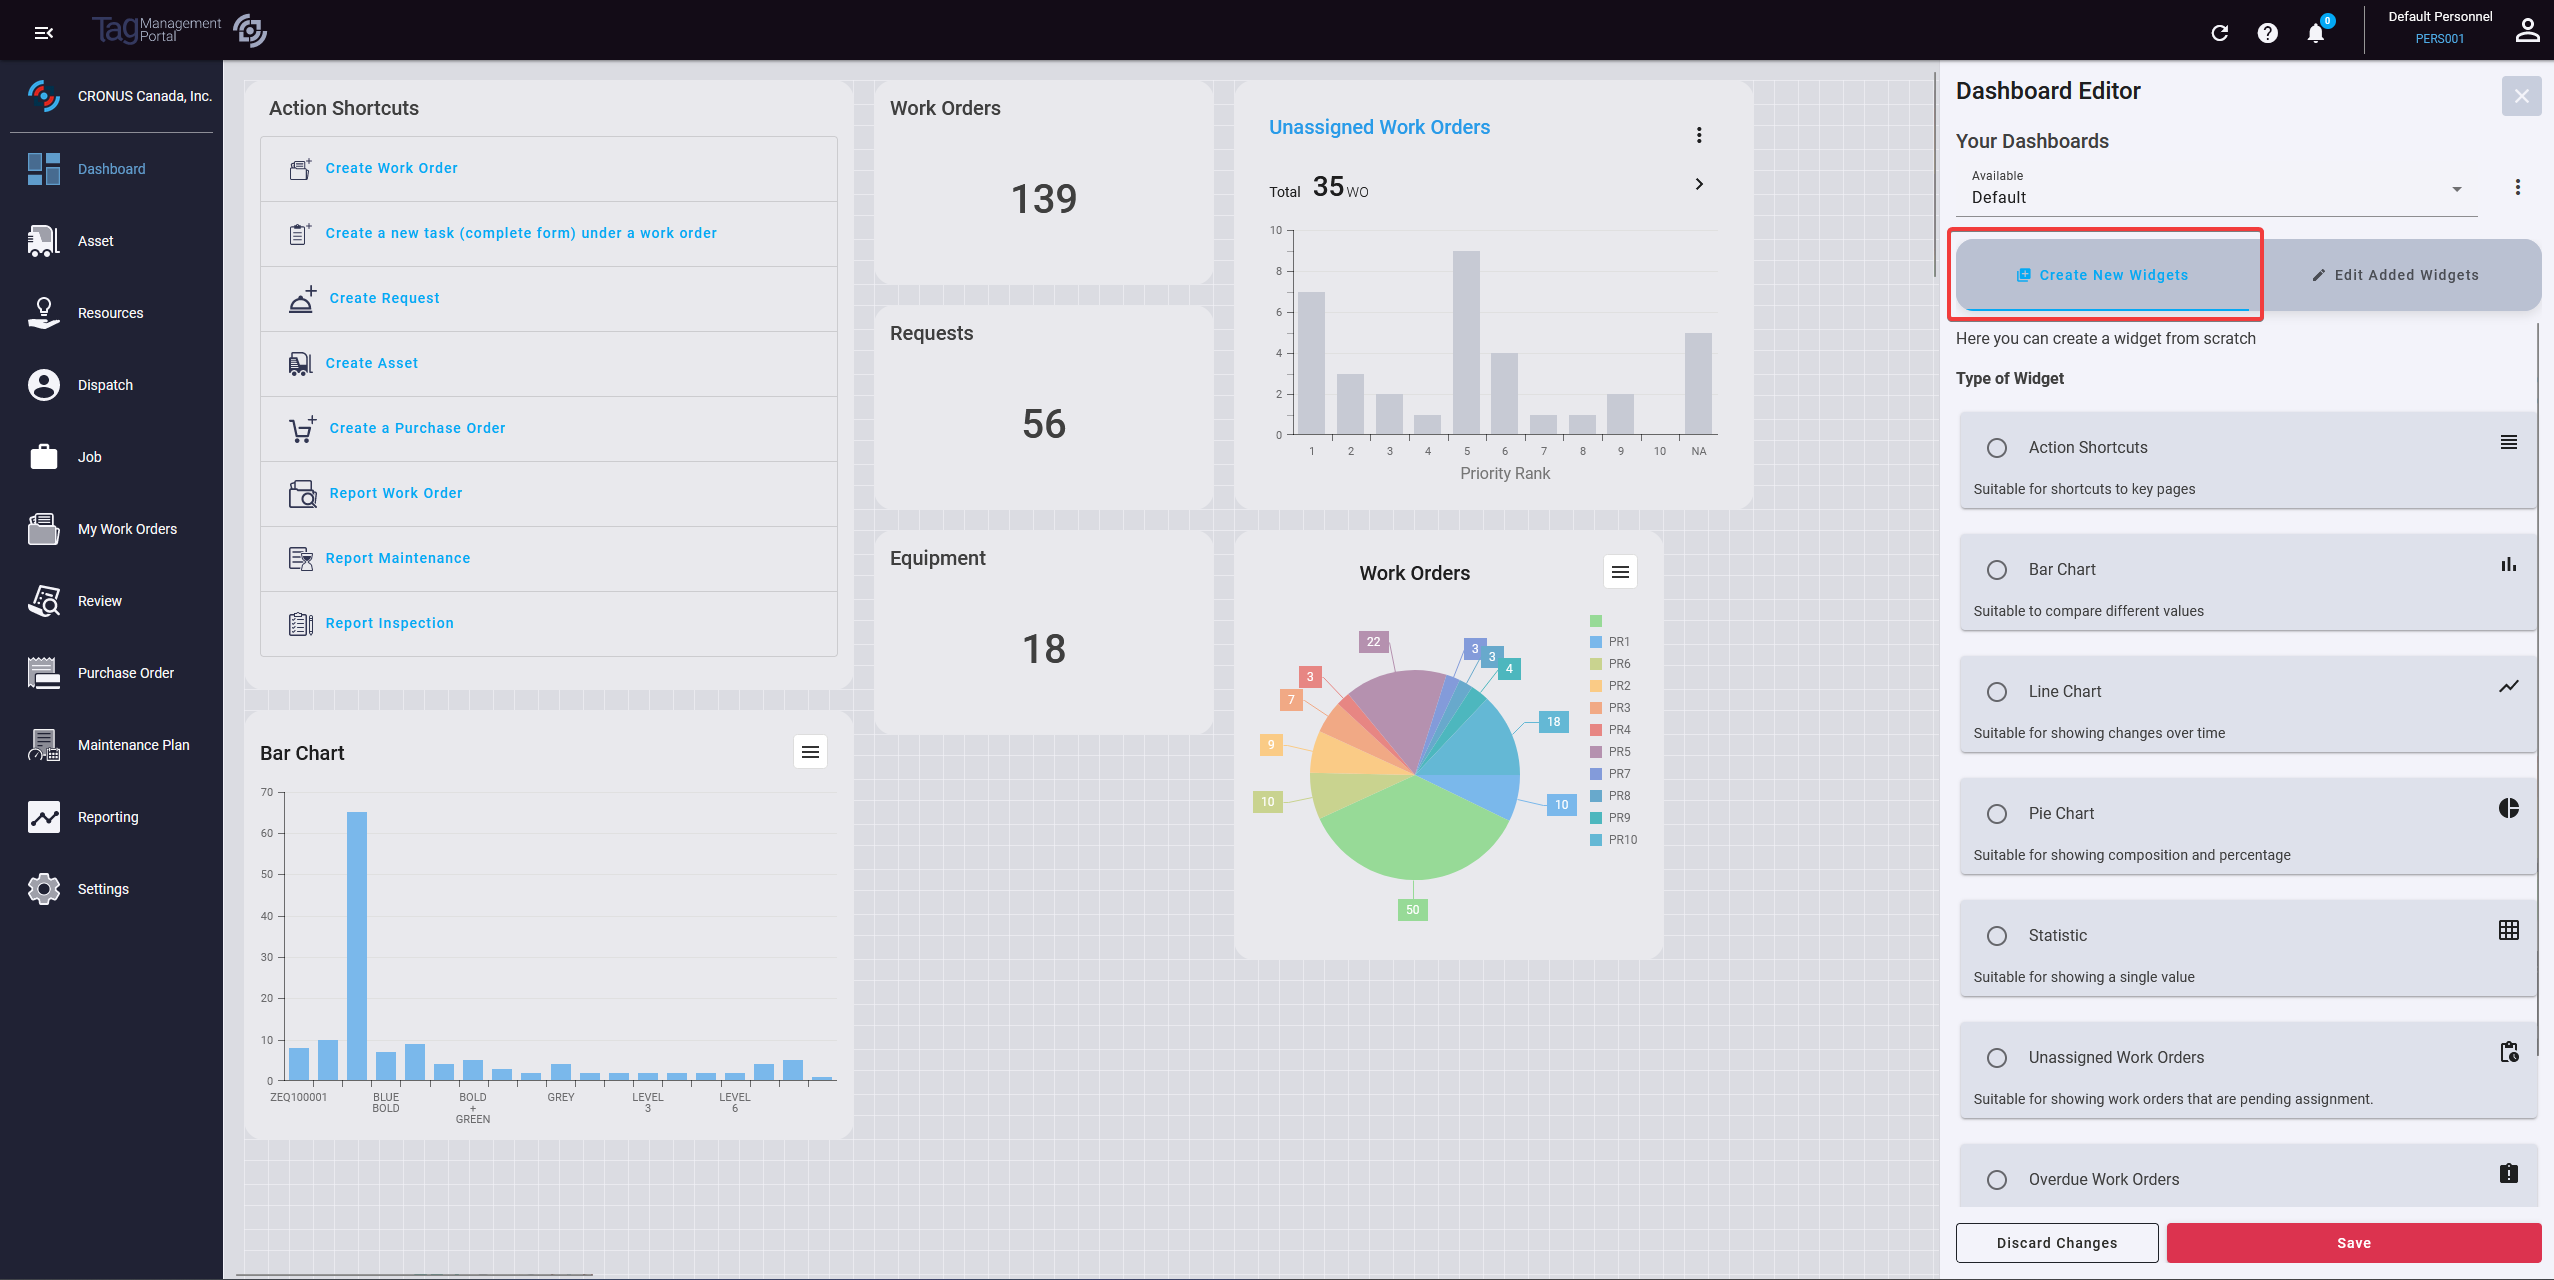
Creating New Widgets
- Click on the Create New Widgets tab.
- Choose the type of widget you want to create from the available options.
- Customize the widget based on your requirements.
- Save the widget to add it to your dashboard.
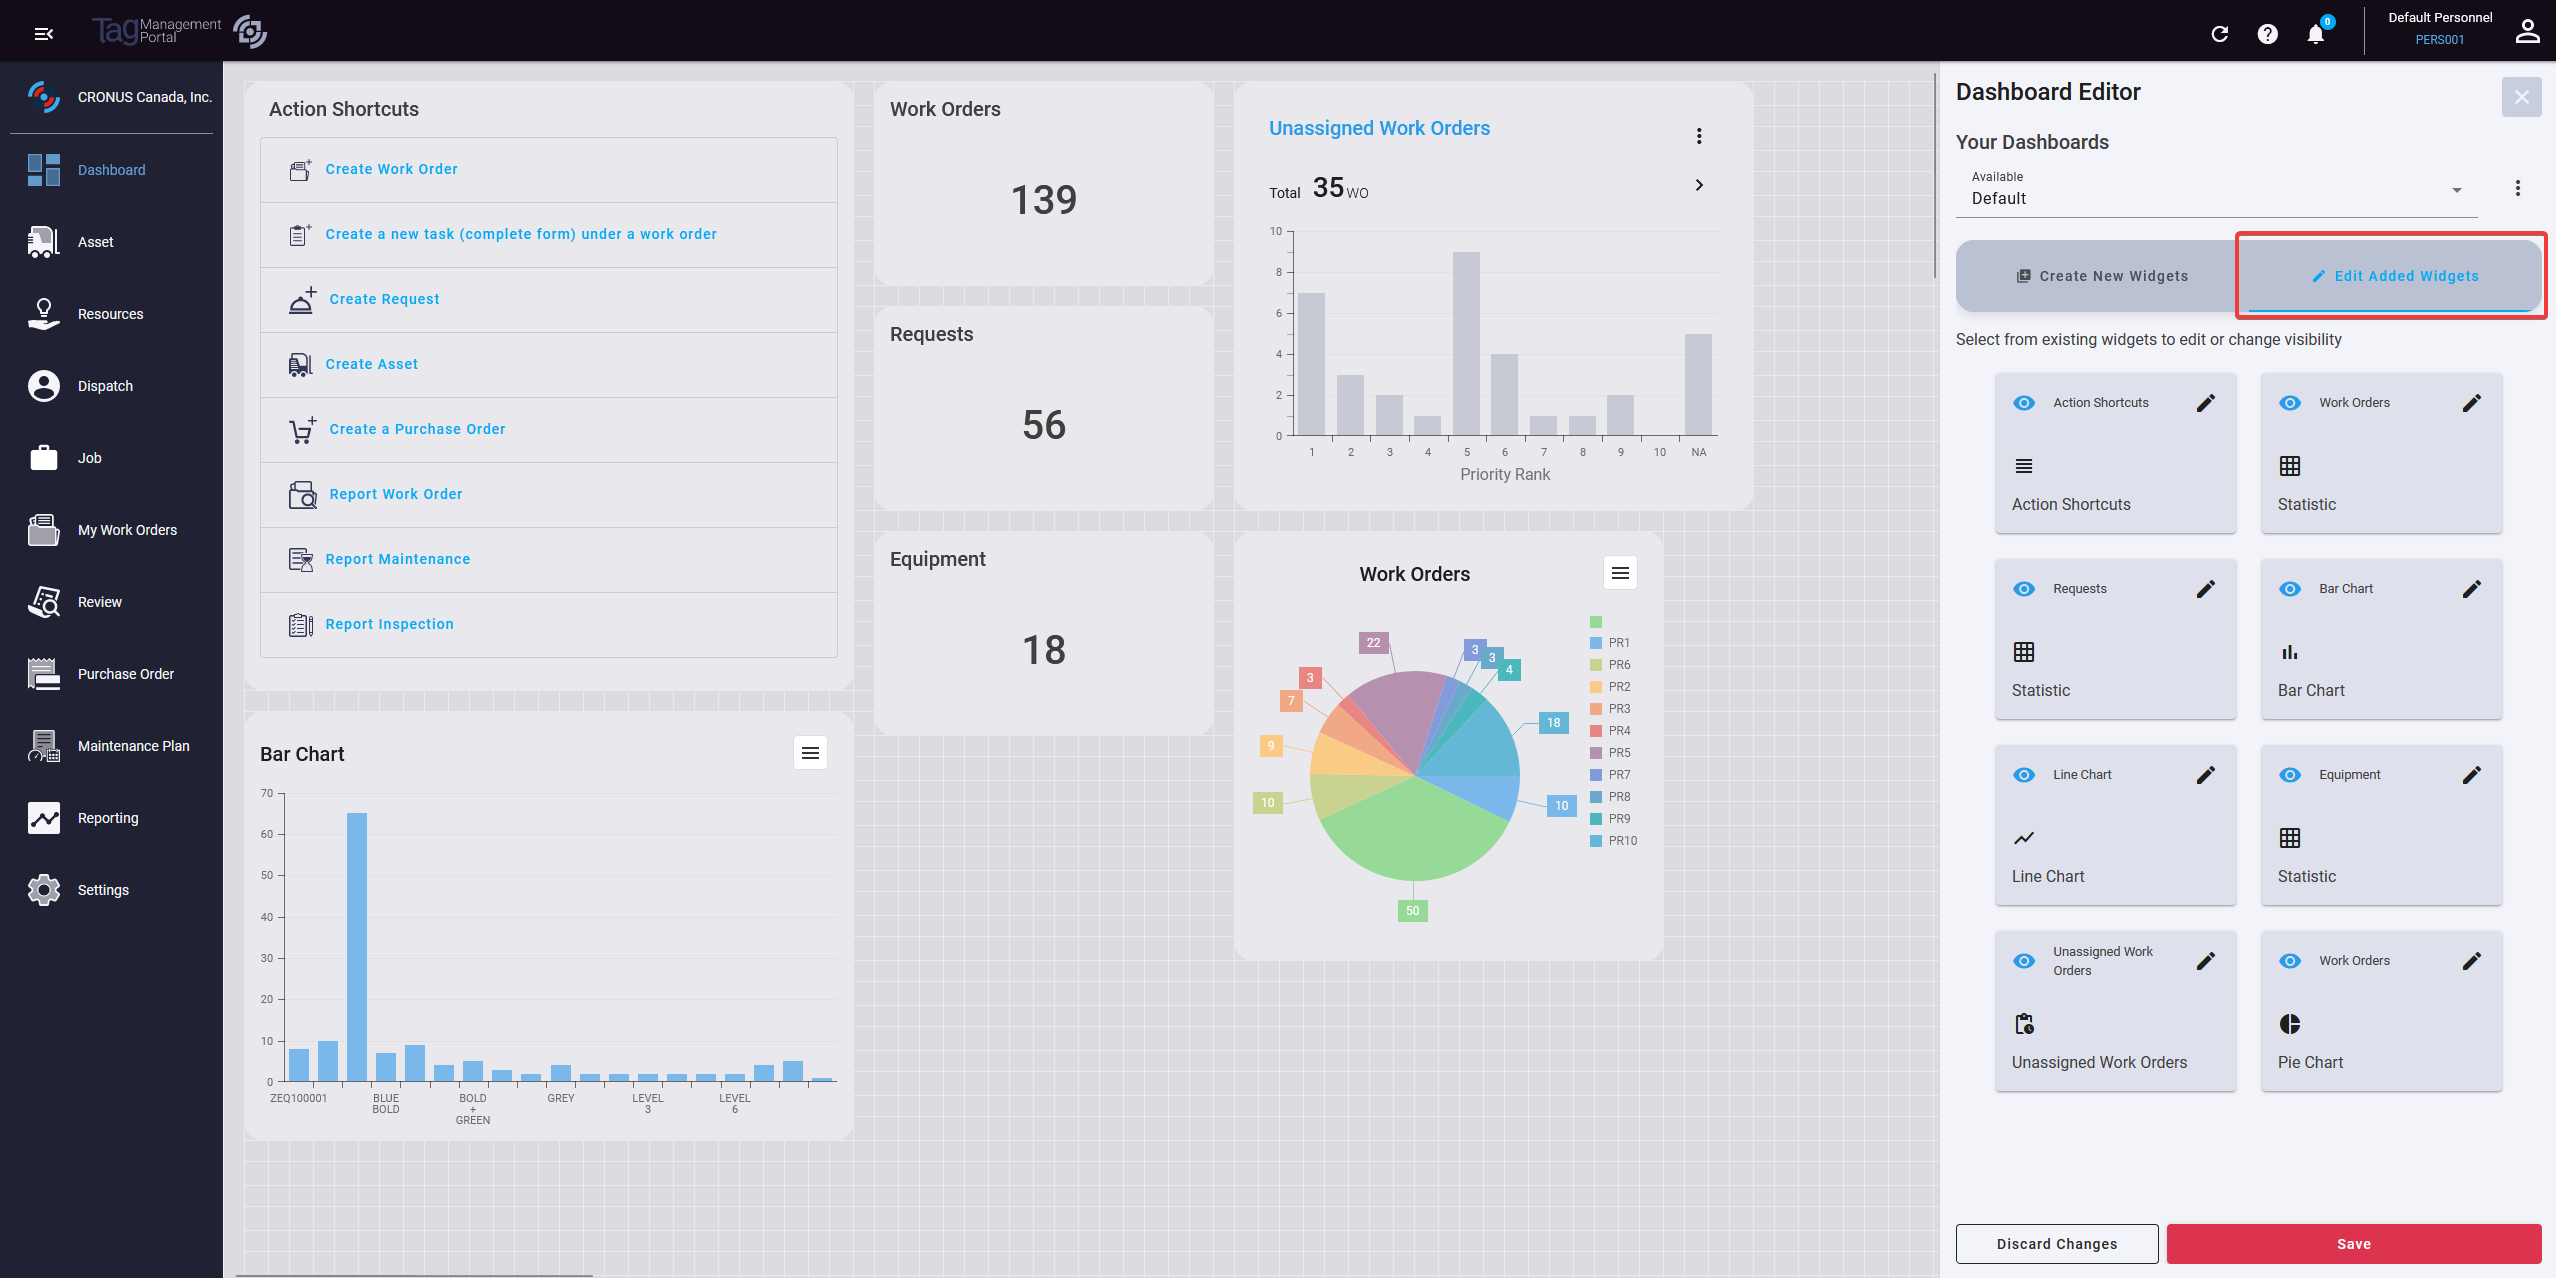
Editing Widgets
- Click on the Edit Added Widgets option.
- Choose the widget you want to edit.
- Make the necessary modifications.
- Save the changes.
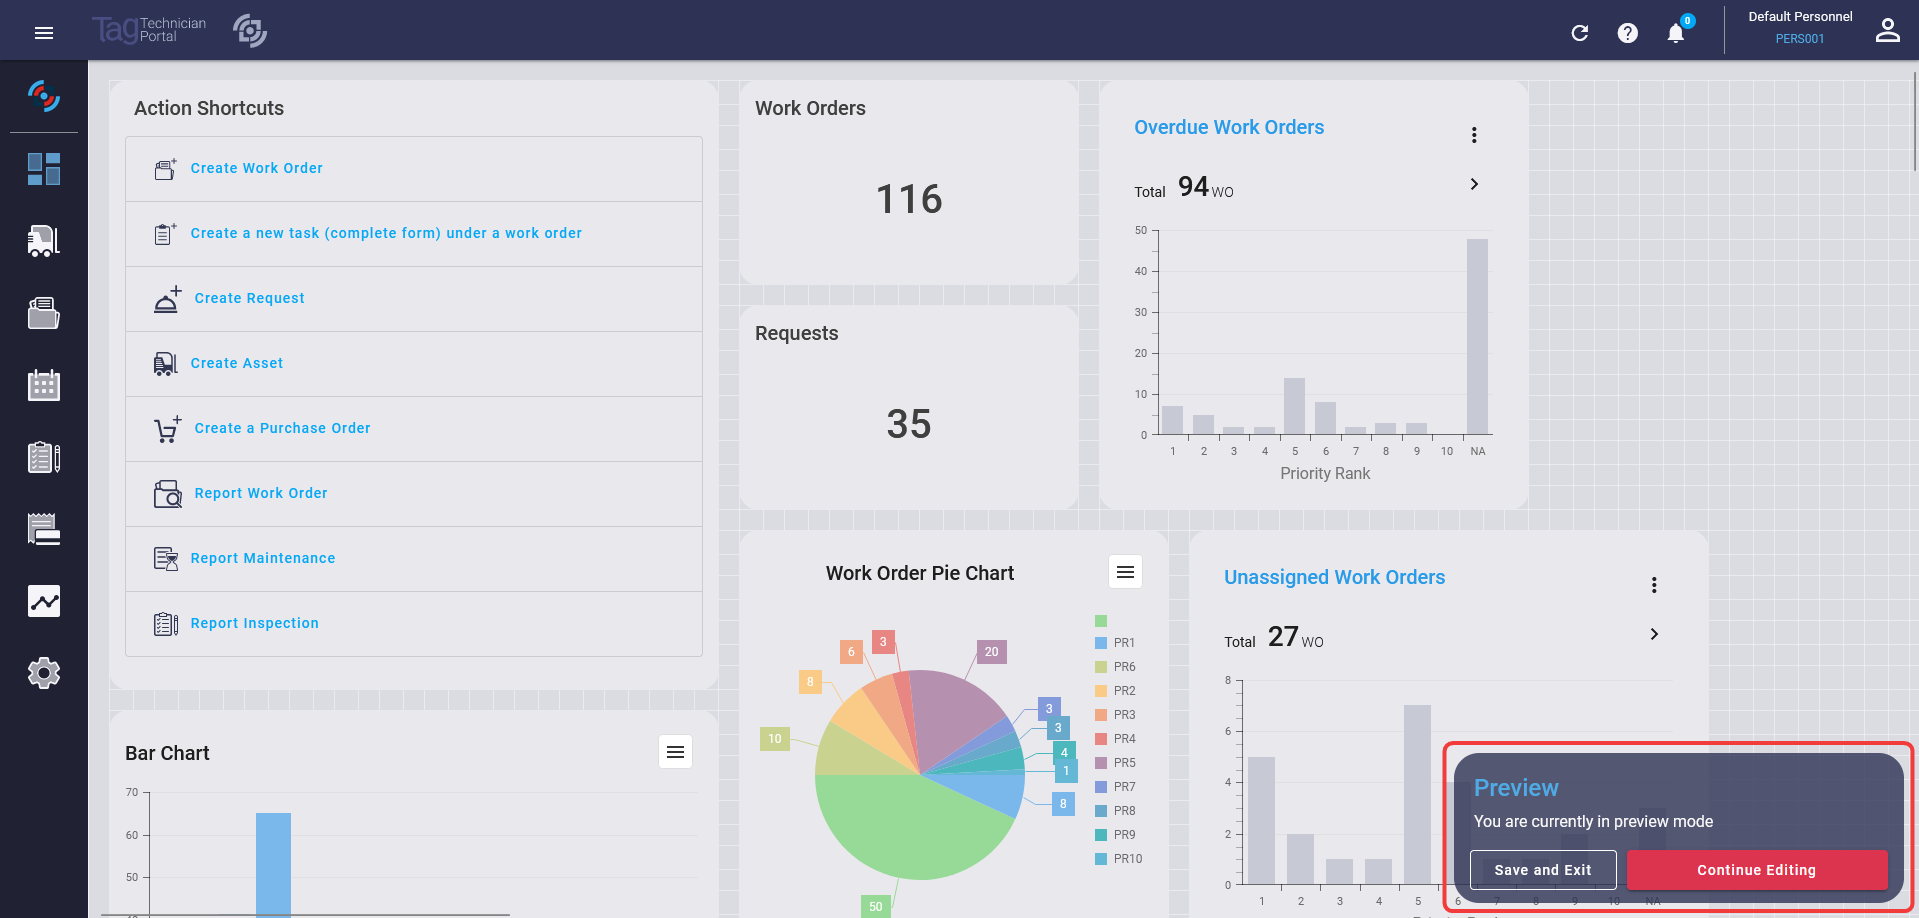
Preview Mode
Once you have created and edited your widgets, you can preview them before saving them to your dashboard. To preview your widgets, click on the Preview button. To save your widgets, click on the Save and Exit button. To continue editing your widgets, click on the Continue Editing button.
Widgets
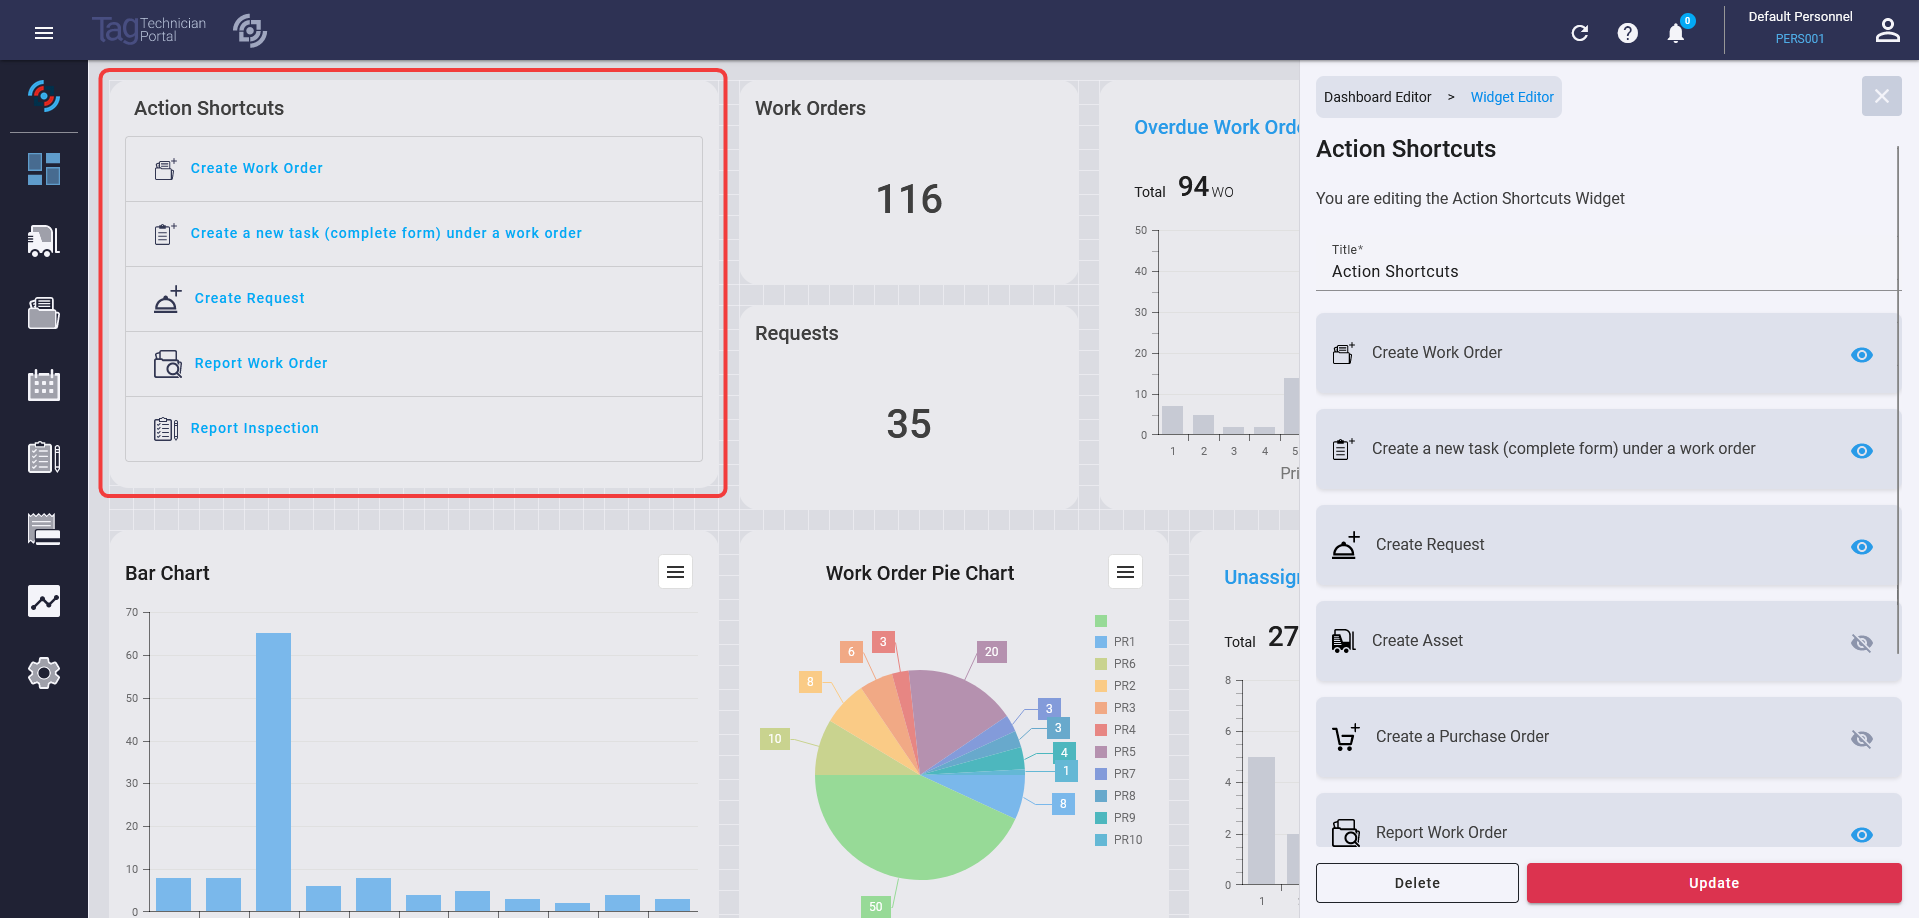
Action Shortcut
Allows quick navigation to various sections of the application. Users can configure shortcuts to frequently accessed areas for efficiency.
Statistic
Displays crucial numerical data like the number of work orders, requests, and purchase orders.
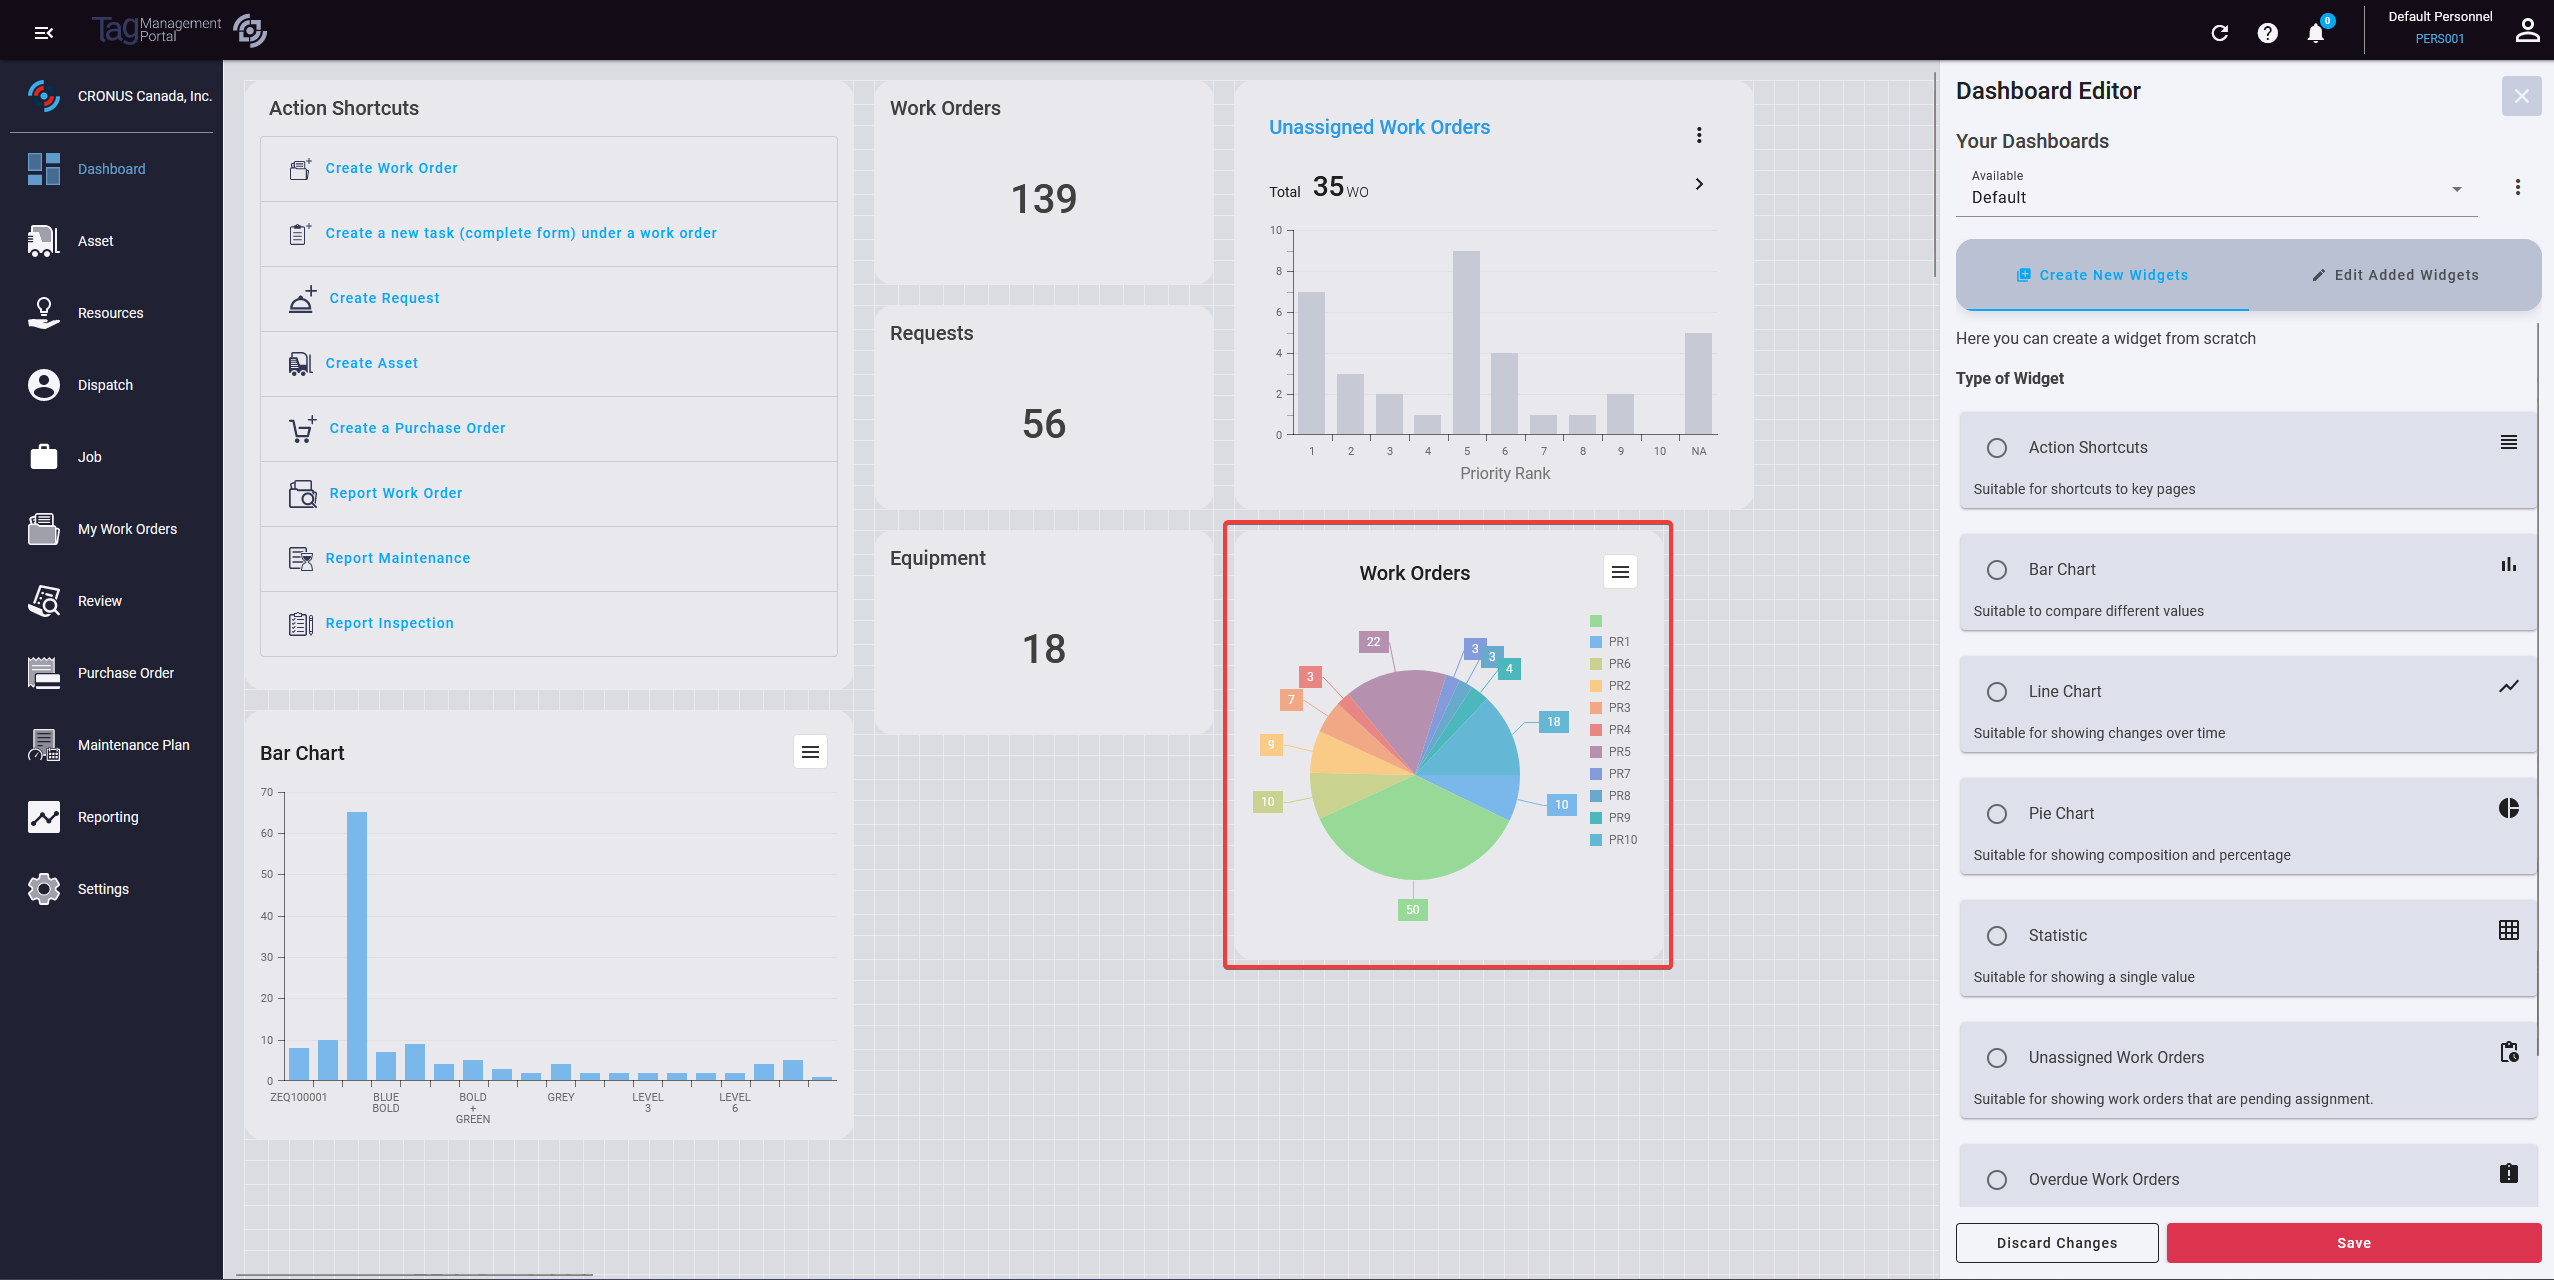
Pie Chart
Used for representing data in a pie chart, ideal for showing data distribution. Users can select the data source and customize the pie chart's appearance.
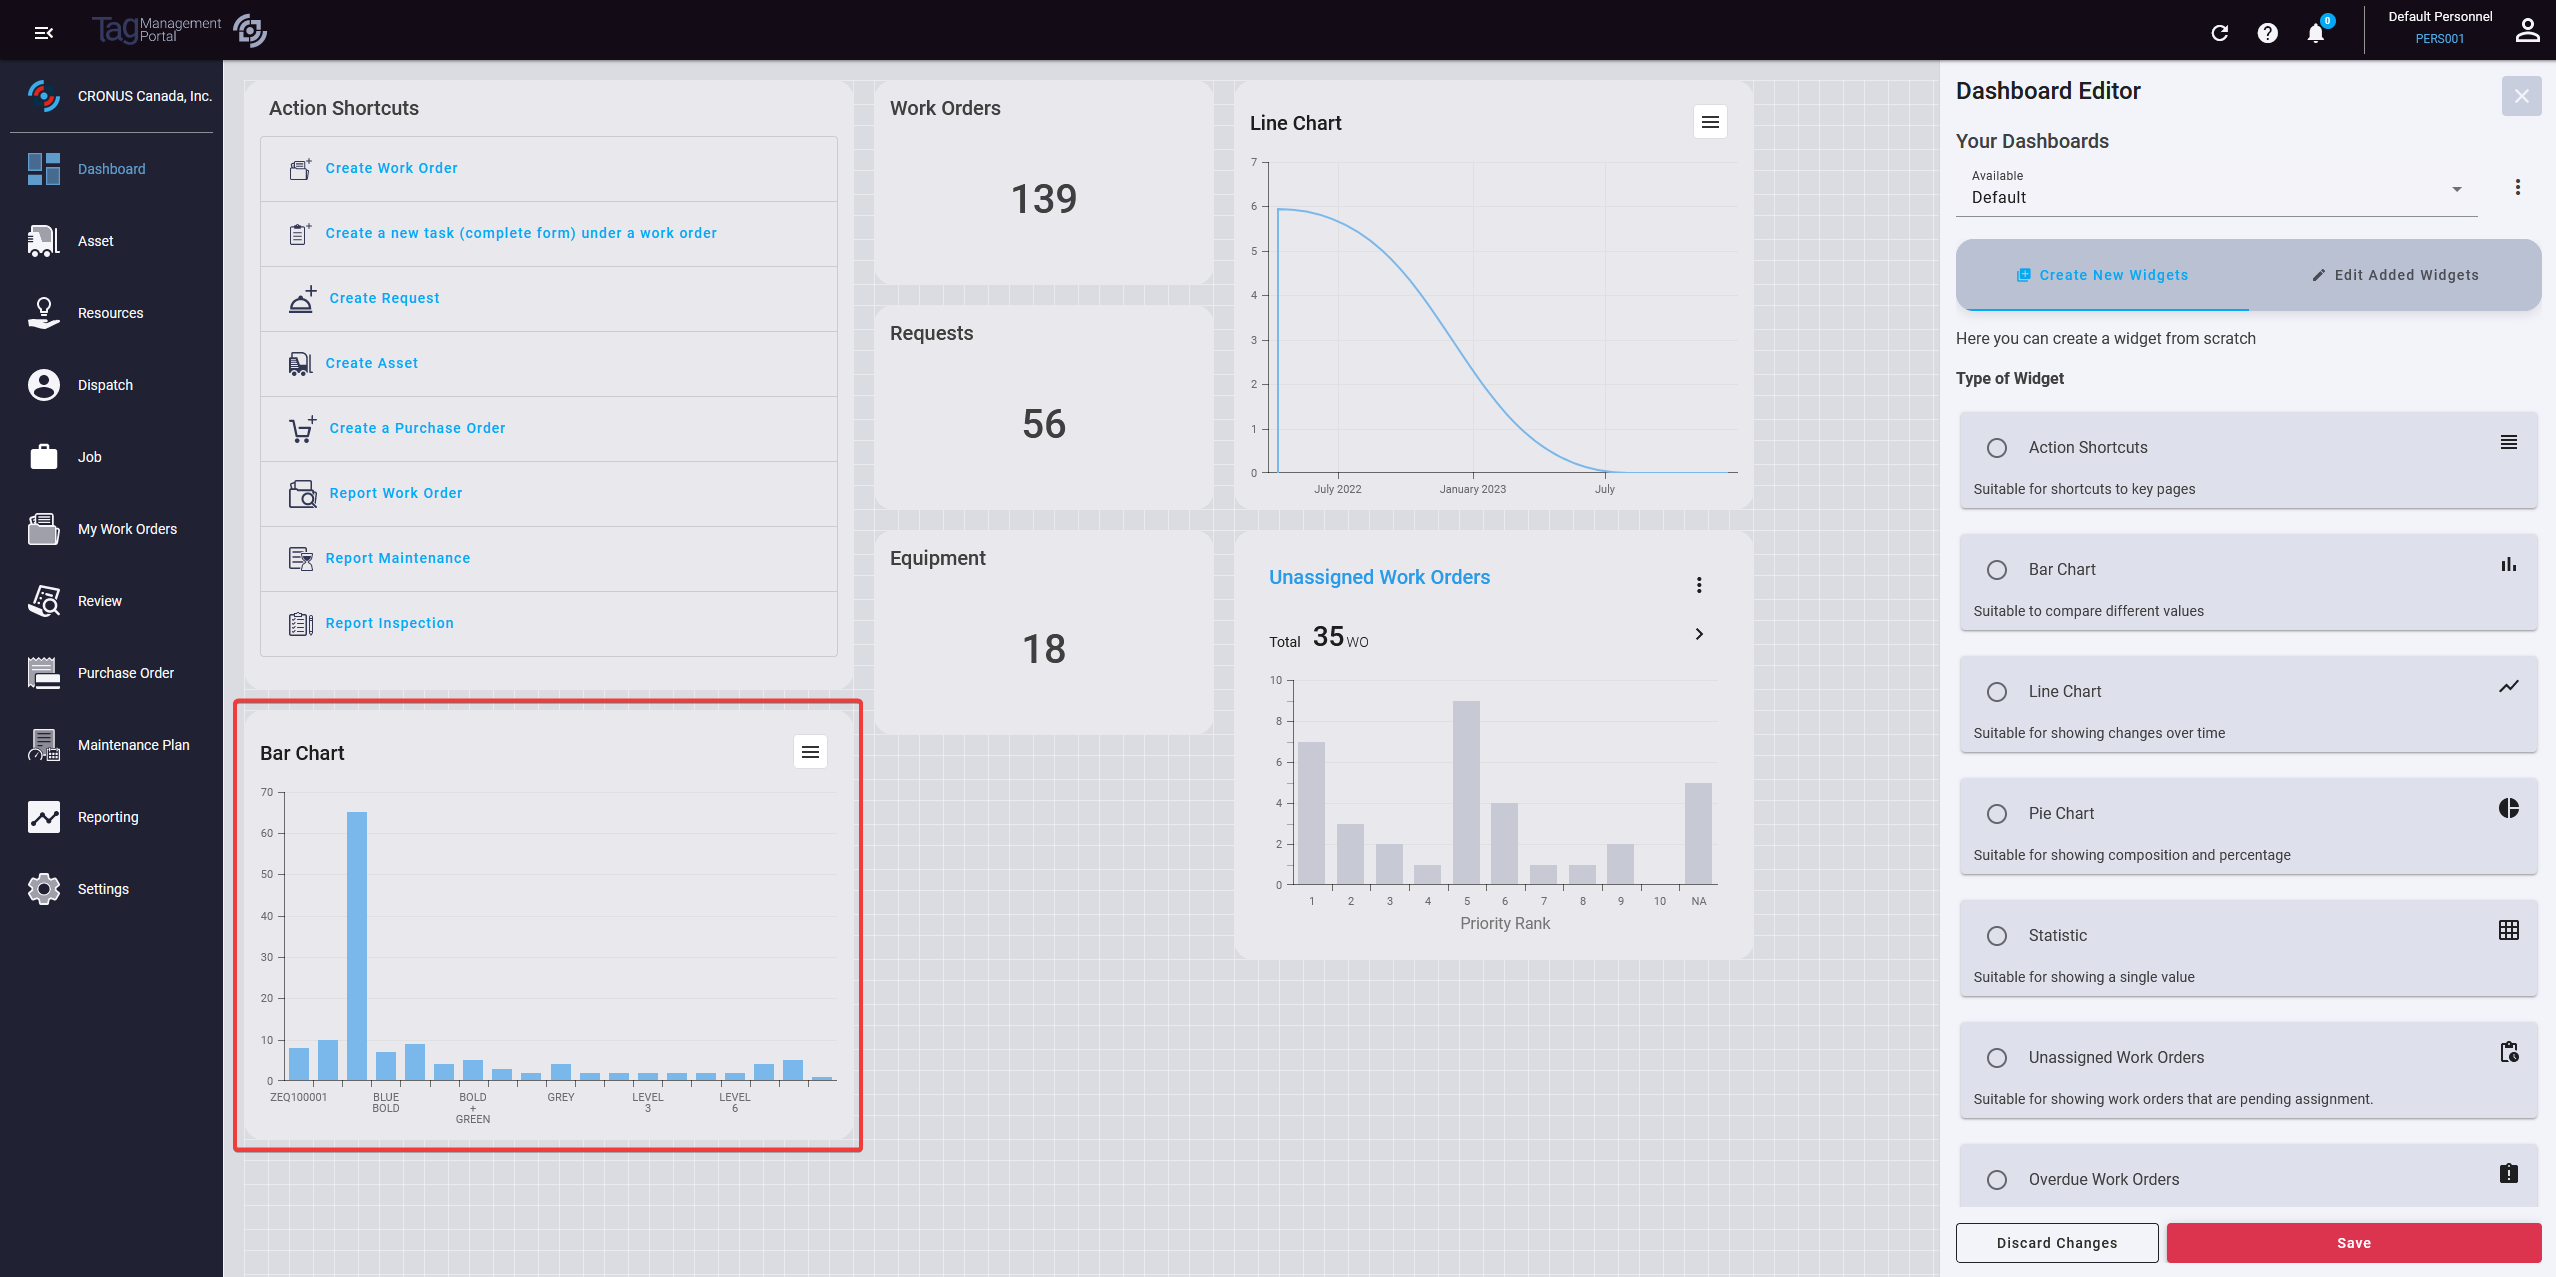
Bar Chart
Visualizes data in a bar chart format. This widget is versatile and can be used for a variety of data types.
Line Chart
Perfect for displaying data trends over time, the line chart widget can be used to track metrics.
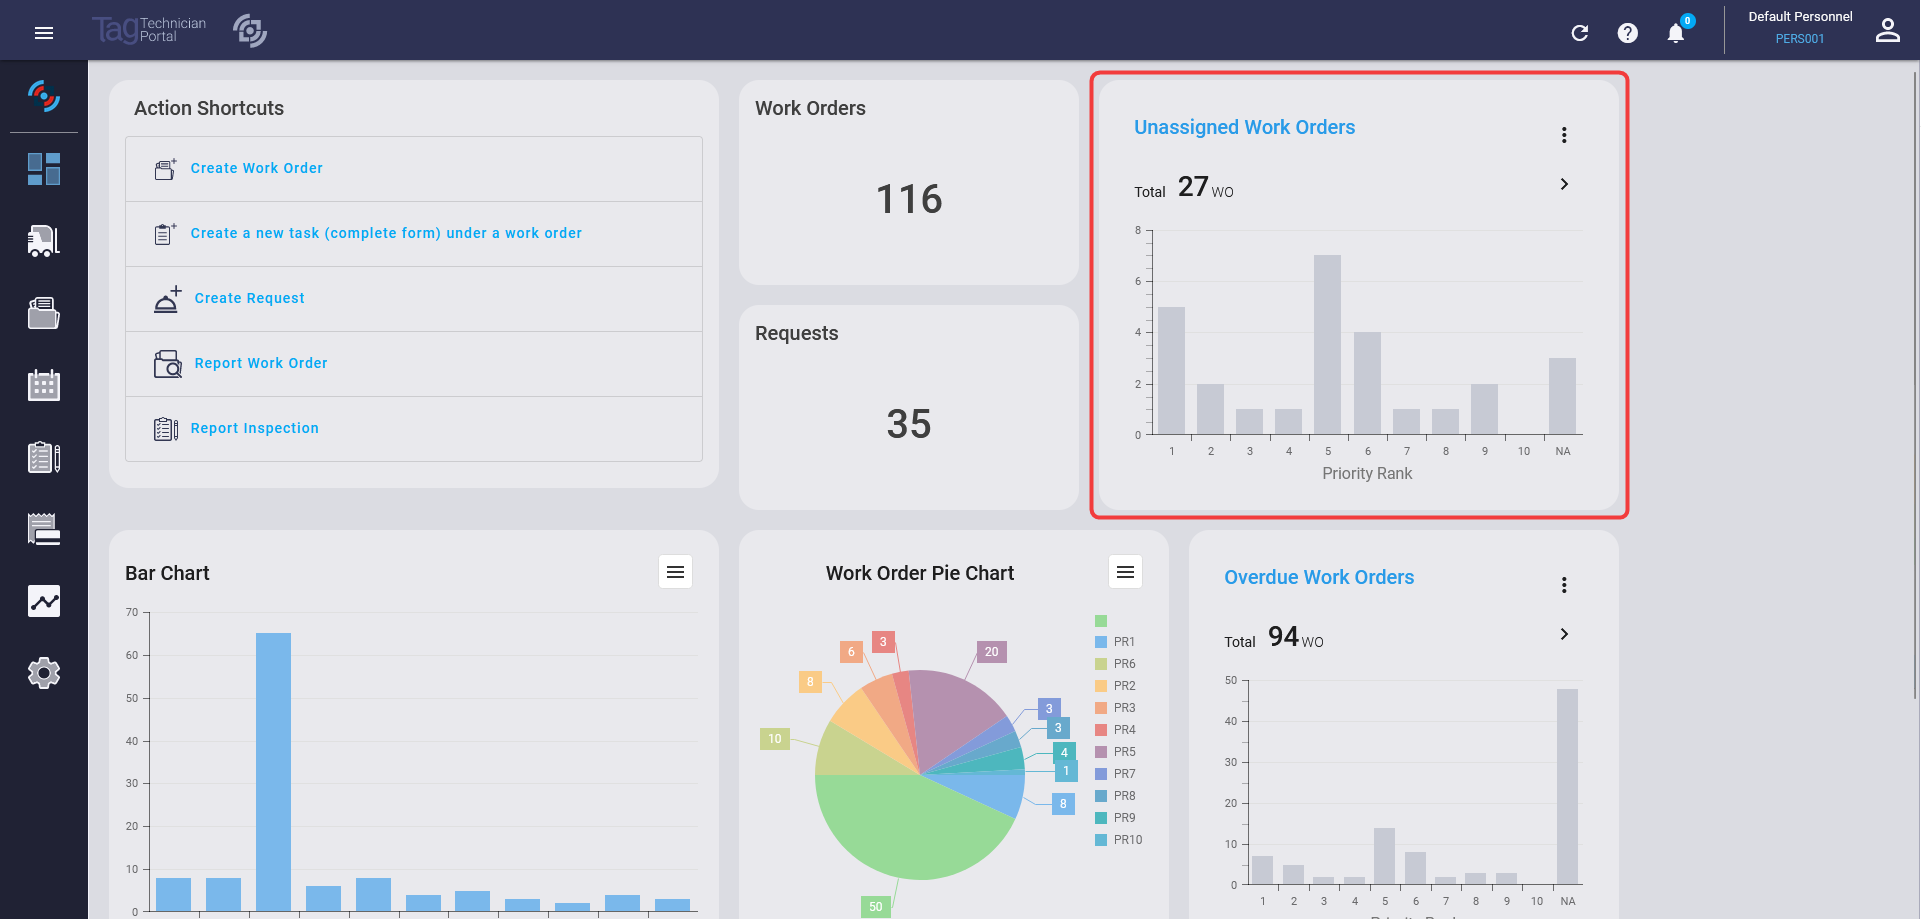
Unassigned Work Orders
Specifically shows a bar chart of all unassigned work orders, helping to identify bottlenecks and manage workload distribution.
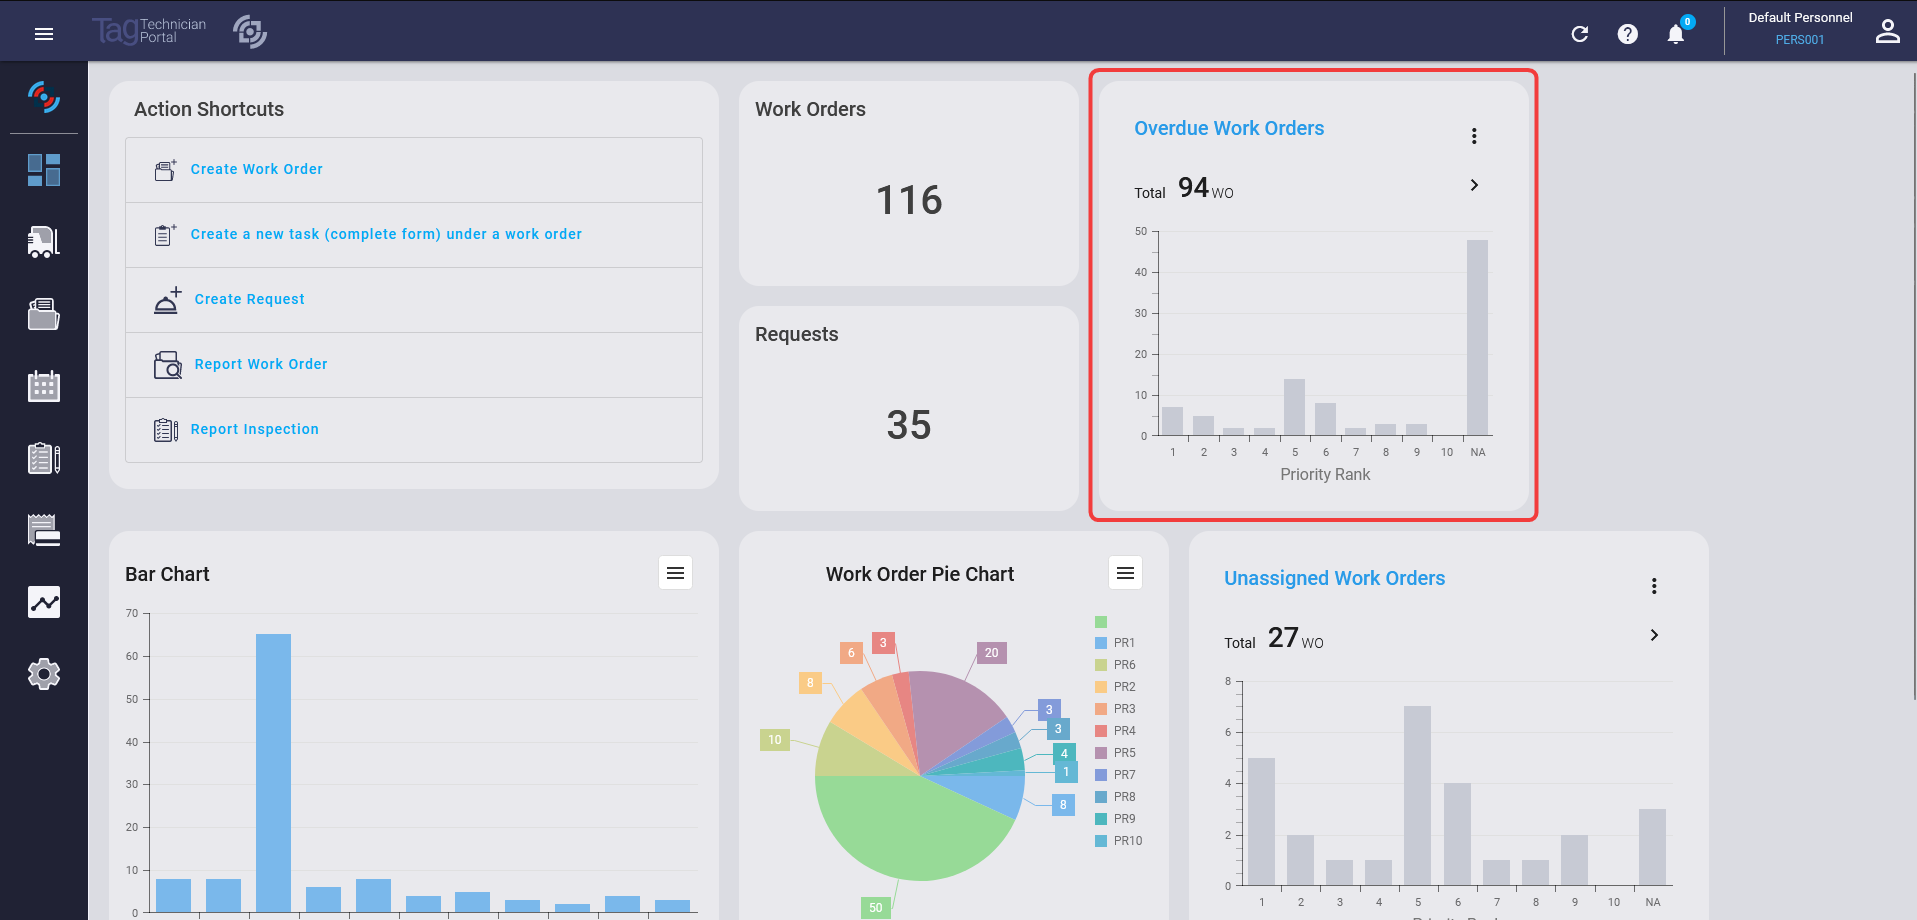
Overdue Work Orders
Displays work orders that are pending review in a bar chart, assisting in prioritizing tasks and managing workflows.
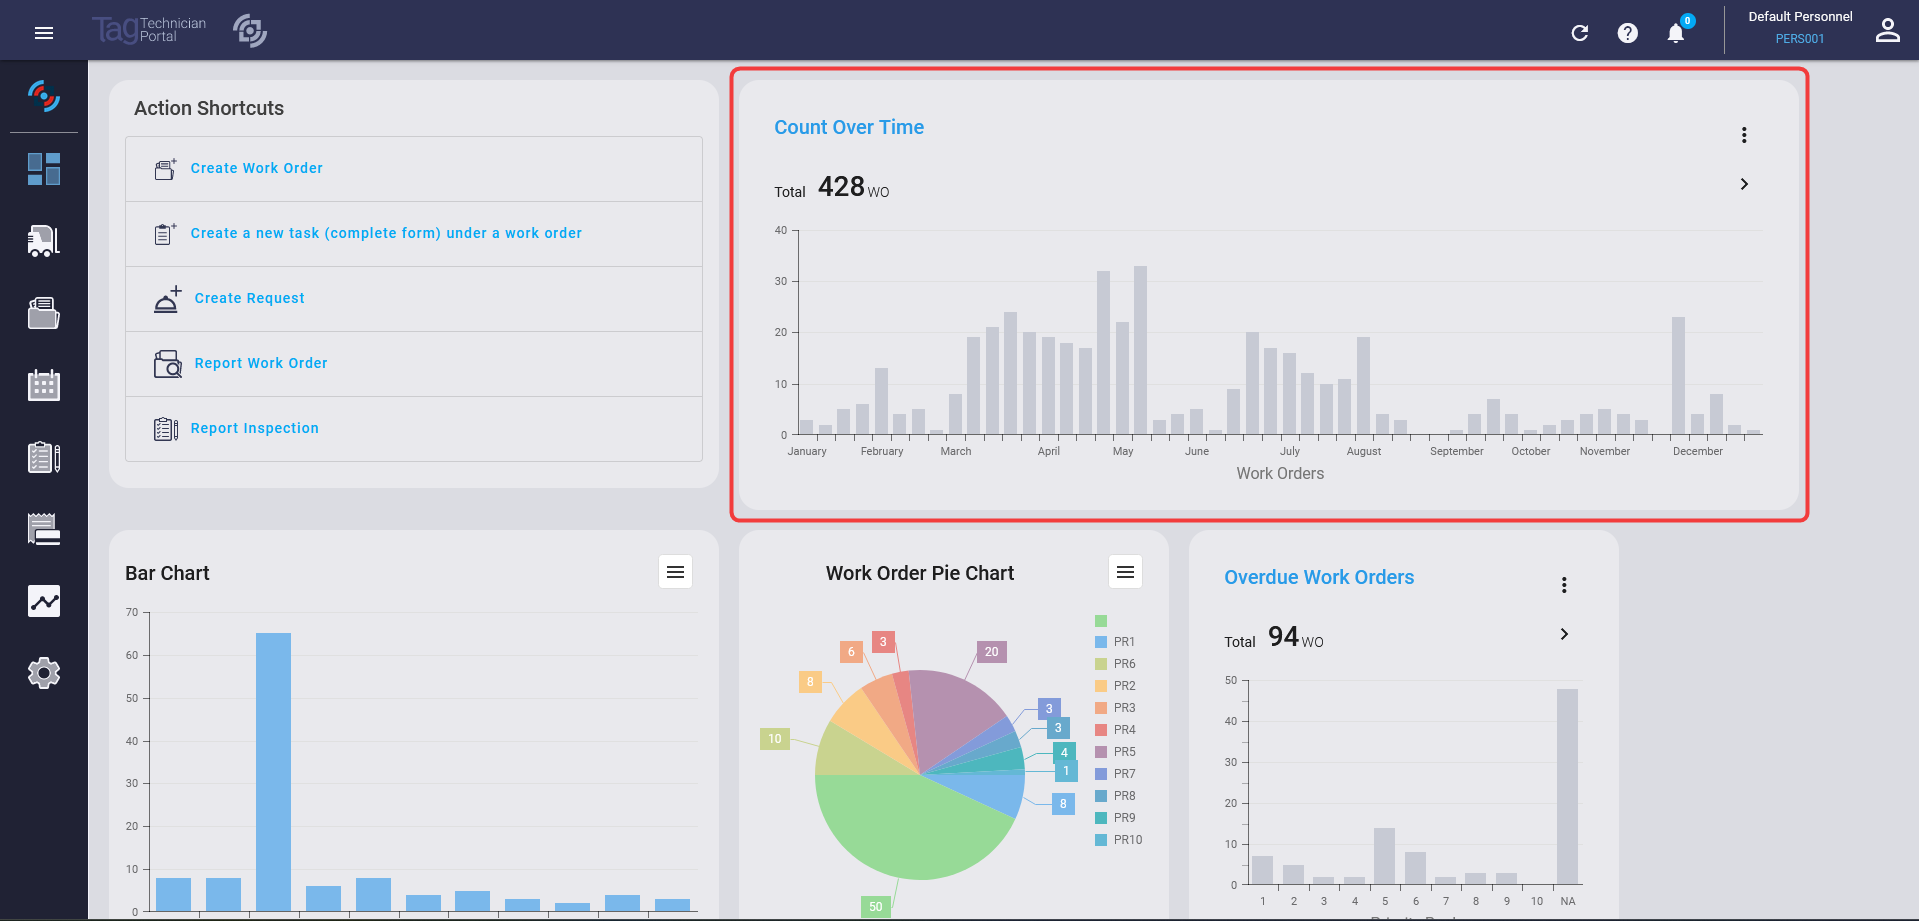
Count Over Time
Tracks the amount of work orders over the calendar year, providing insights into seasonal trends or overall workload changes.
Equipment List
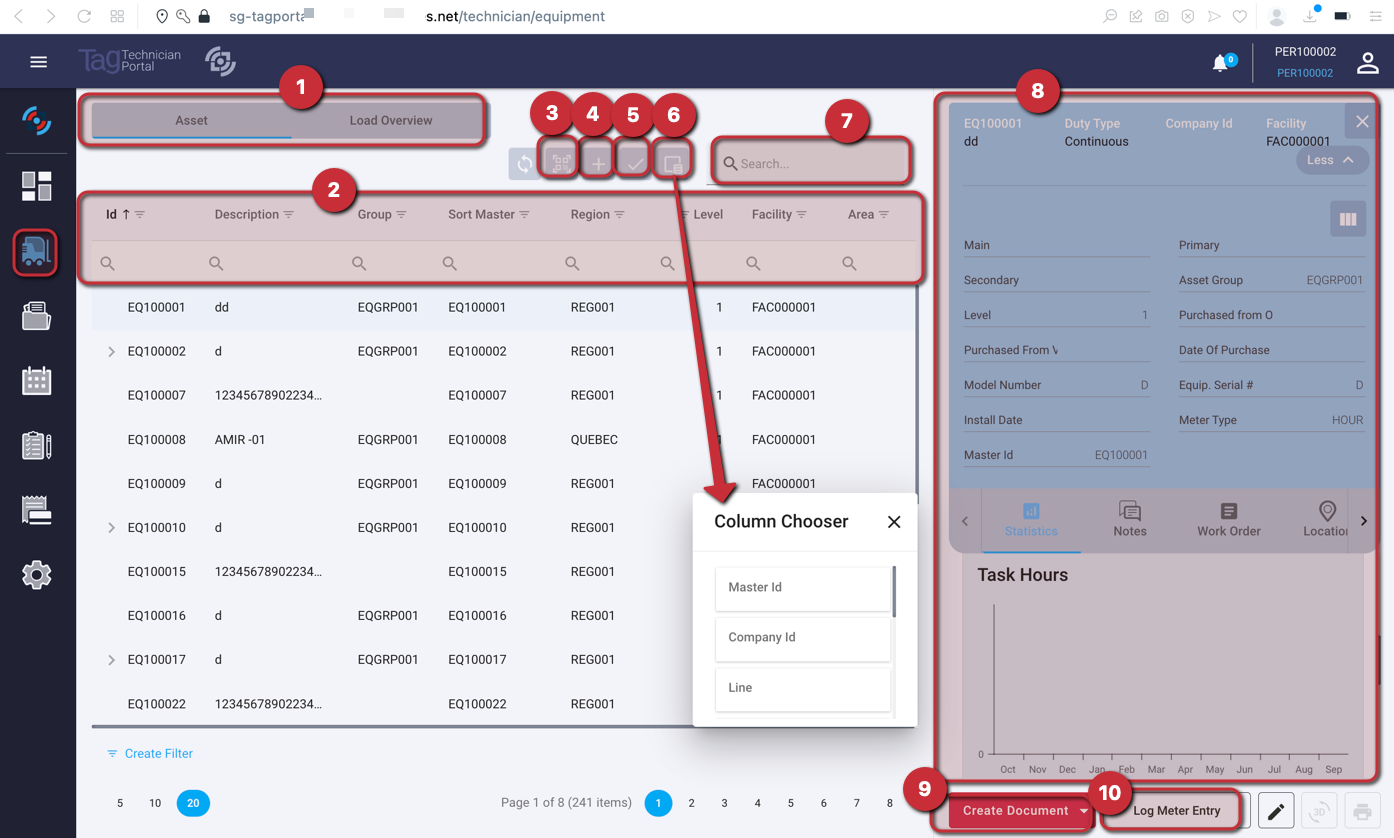
- Tab between equipment list and equipment load overview
- Change column order and filter column
- Bar-code equipment
- Create equipment
- Multi-select equipment for load overview and request
- Select hidden columns
- Quick search for any value, any column
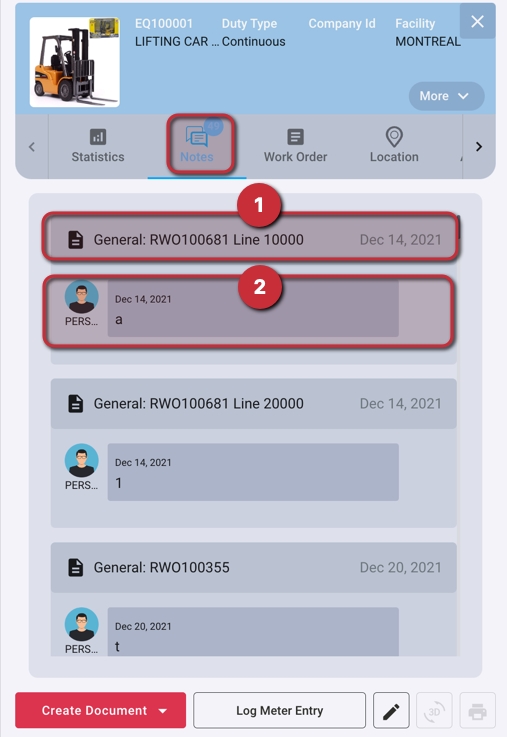
- Equipment card with:
- Statistics
- Notes
- Upcoming work order and work order history
- Location of equipment
- Create a request or work order for equipment
- Log meter entry of the equipment
Load Overview
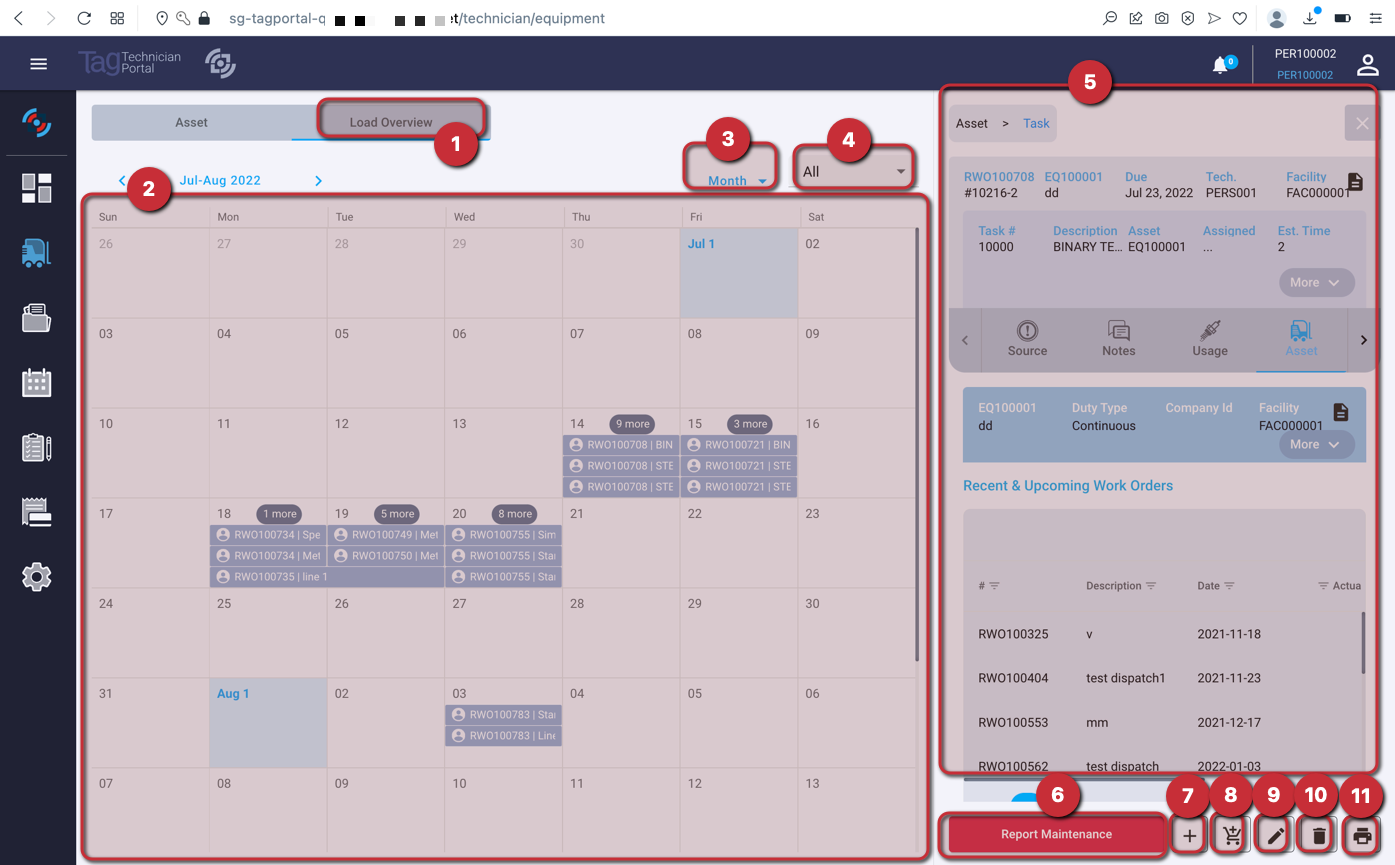
- Select equipment on the list
- Review load for work order
- Choose calendar by period
- Tasks Select the type of work order
- Review work order scheduled task
- Submit report maintenance
- Create a book entry
- Create a purchase order
- Edit work order line
- Delete record
- Print work order
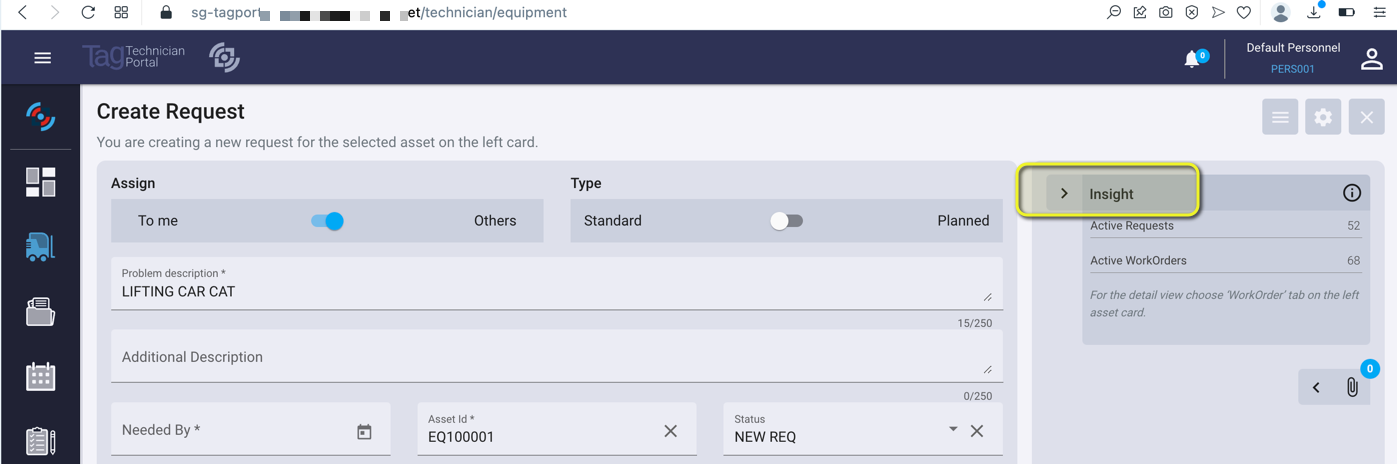
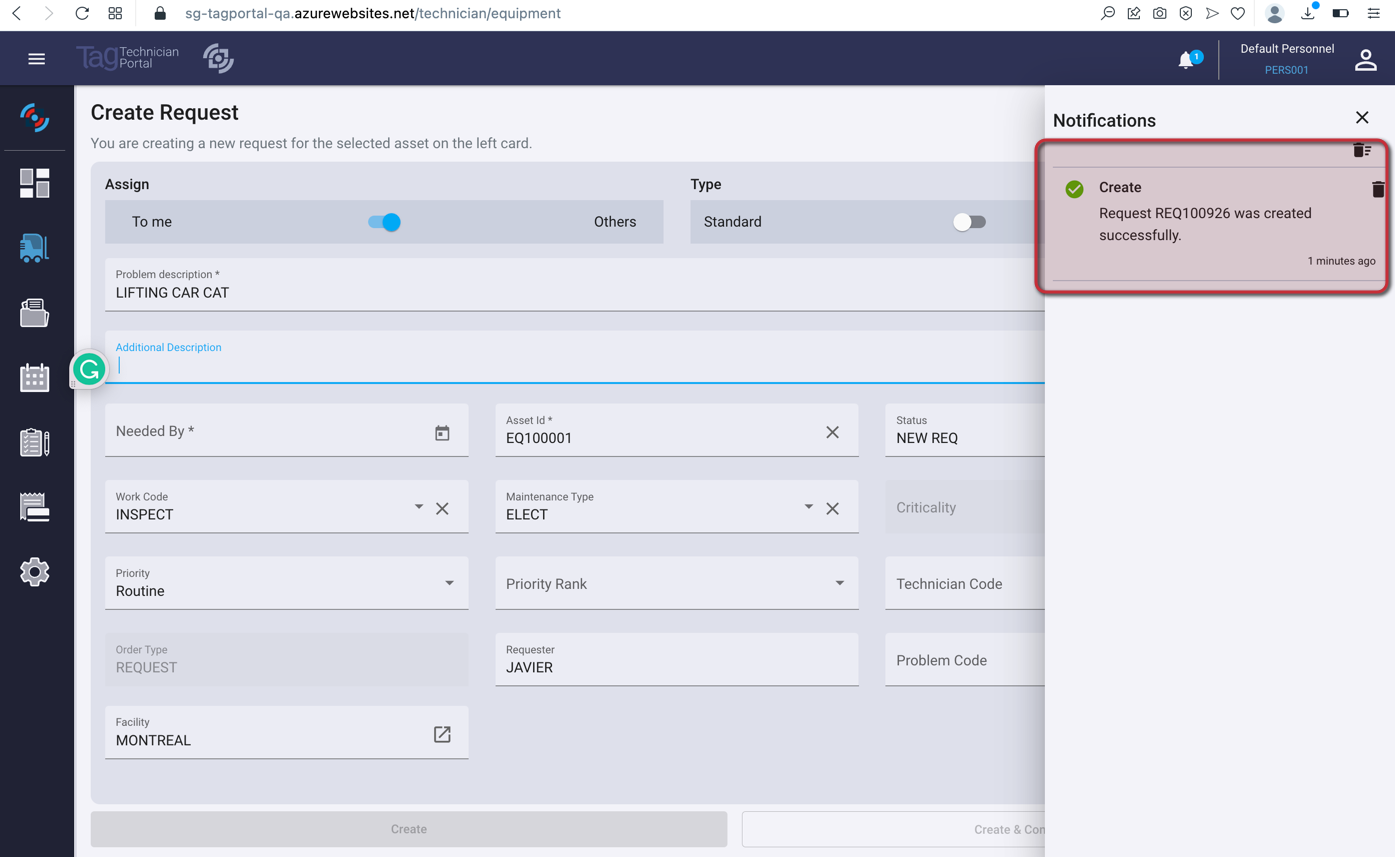
Create Request From Equipment
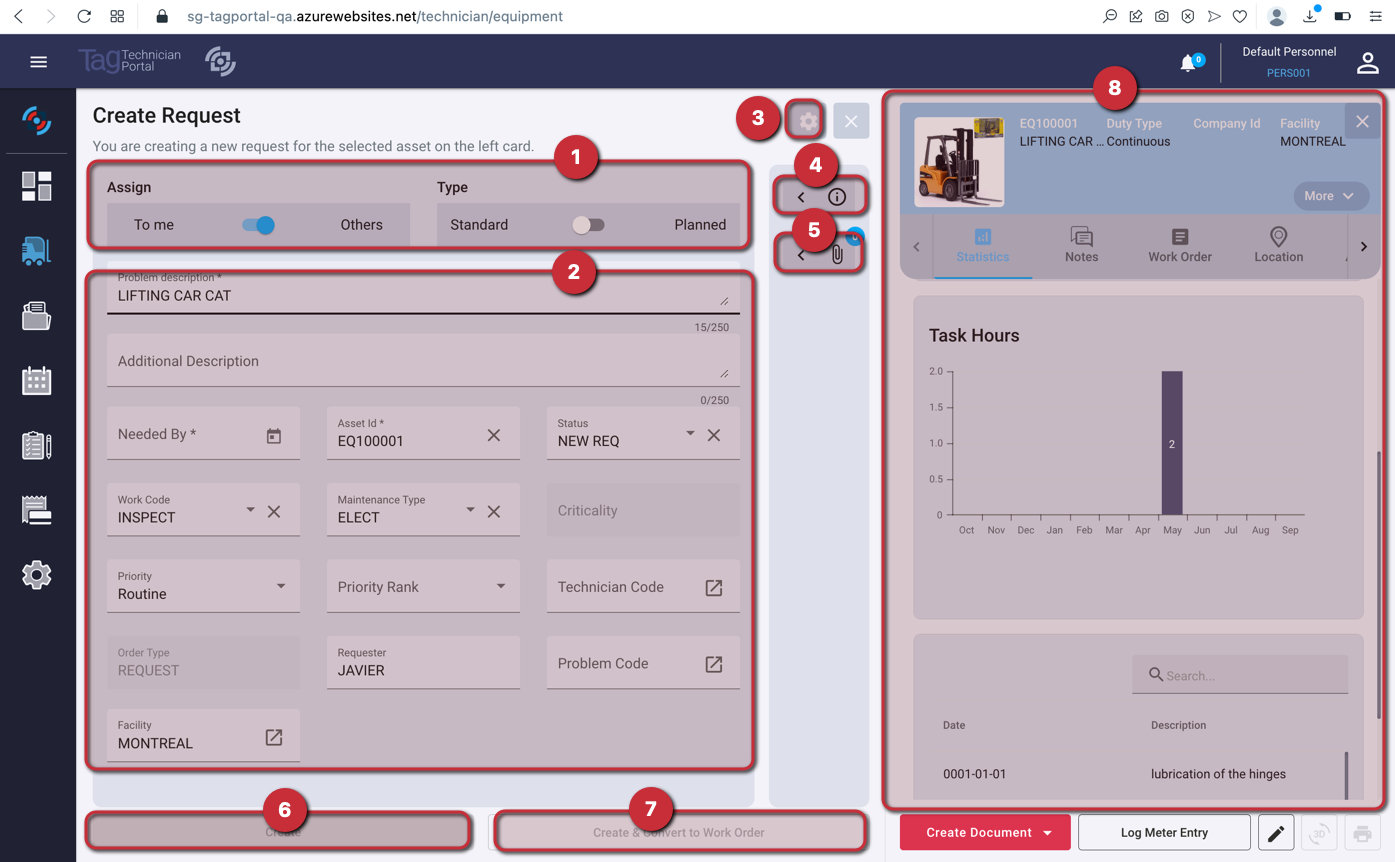
1 - The first Toggle allows assign WO to me or to other technician, the second one allows to select the type of the request.
2 - Create request by populating fields and submit request
3 - View setting to choose the desired captions in the request form
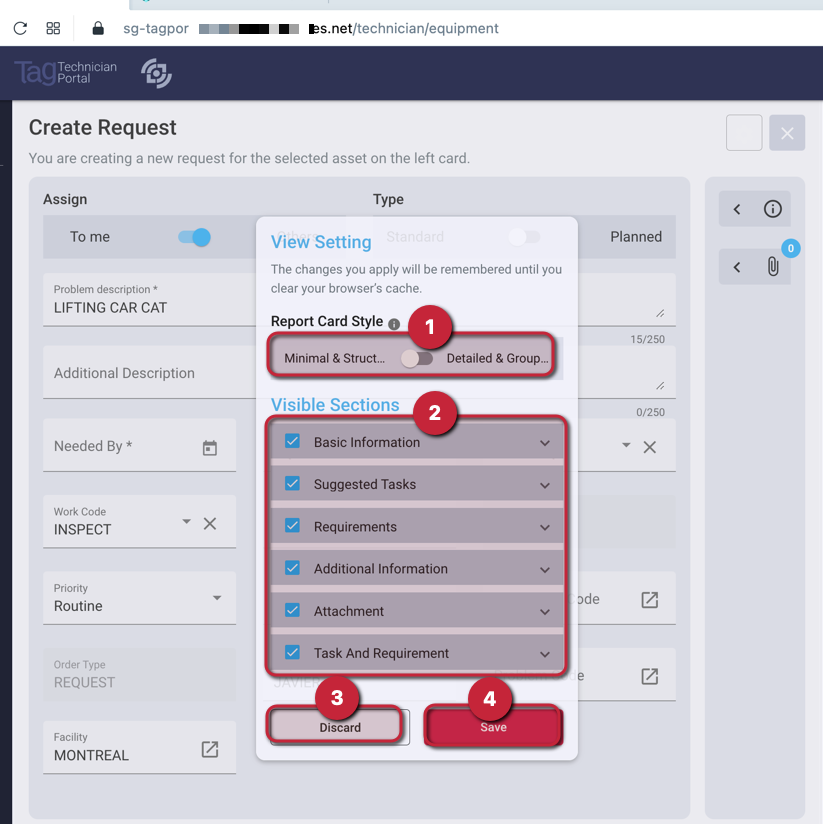
- 3.1: Select the report card style
- 3.2: Chose the desired captions of each sub-tab in the request form:
- Basic information
- Task and requirement
- Additional information
- Attachment
- 3.3: Discard without saving
- 3.4: Save it
4 - Insight of the related request and WO
5 - Take a photo and add attachments (Picture, File, URL address.)
6 - Create a request. This button will be available only if the user has added all the required fields that contain the star, like needed by date and equipment ID.
7 - Create and convert to WO
8 - Equipment card with statistics, notes, attachments, locations, upcoming WO and WO history
Create Work Order From Equipment
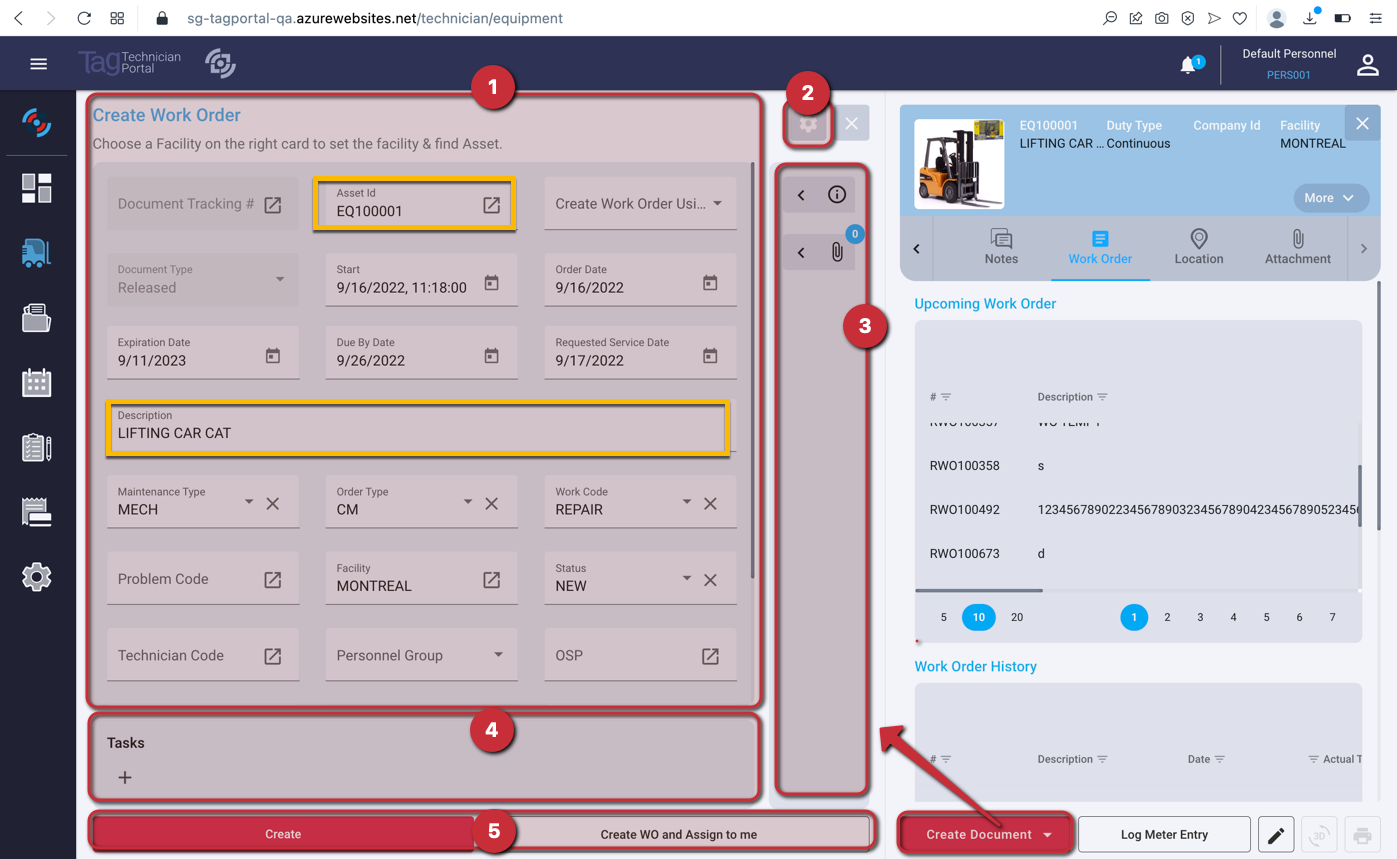
Create WO by populating the field and selecting create button
*Note: Fields in yellow are mandatory for creating the work order
- Work order header
- View setting
- Insight panel and attachment
- Work order line options
- Create a work order or create and assign it to me
Equipment Tabs
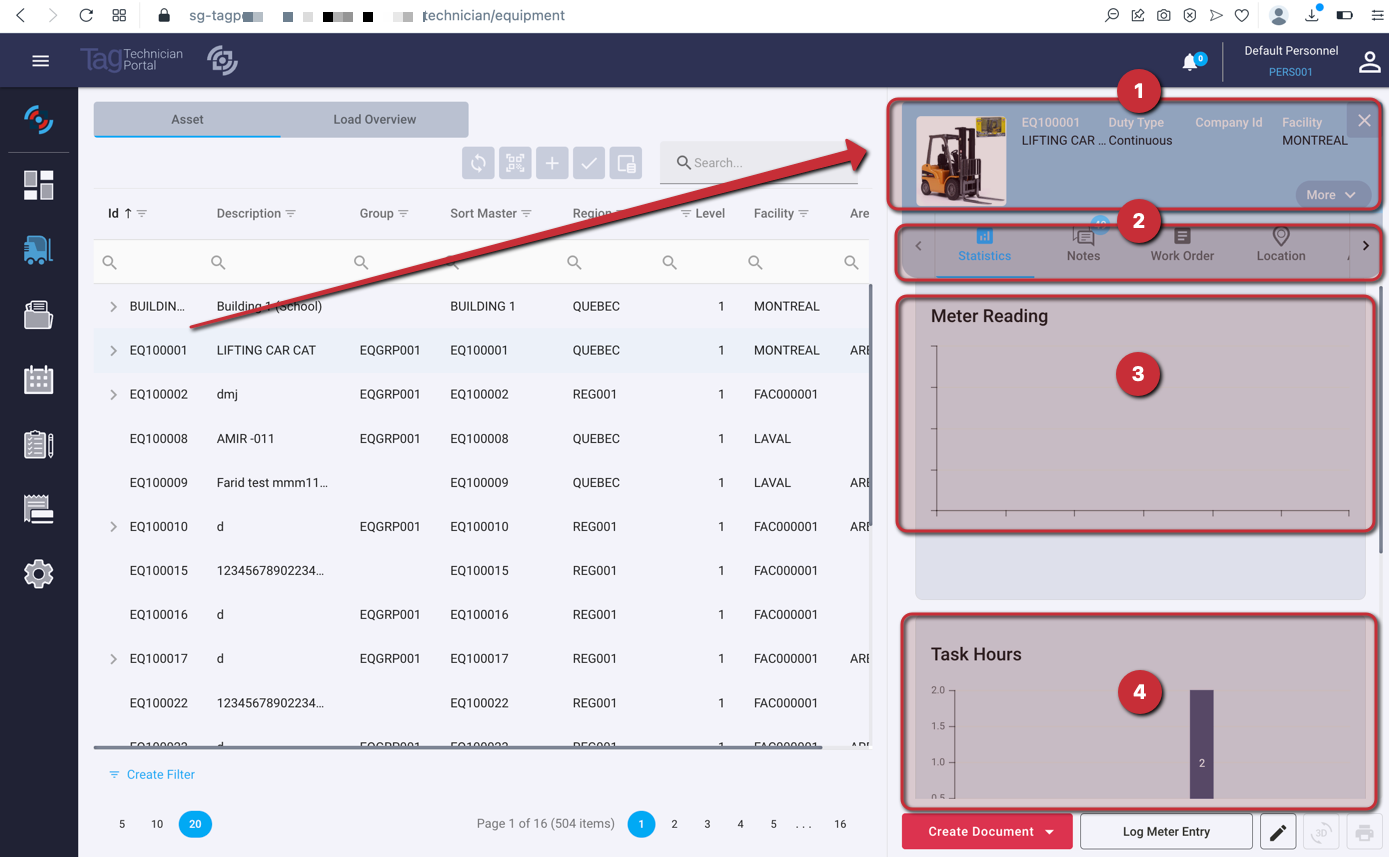
Select equipment
- View the equipment card and view the setting to choose more desired captions
- Select the equipment tab to show more details
- Summary meter history
- Summary of work order tasks hours
Equipment Feedback
- Feedback type, WO No., Line No., Date
- Technician name and feedback notes
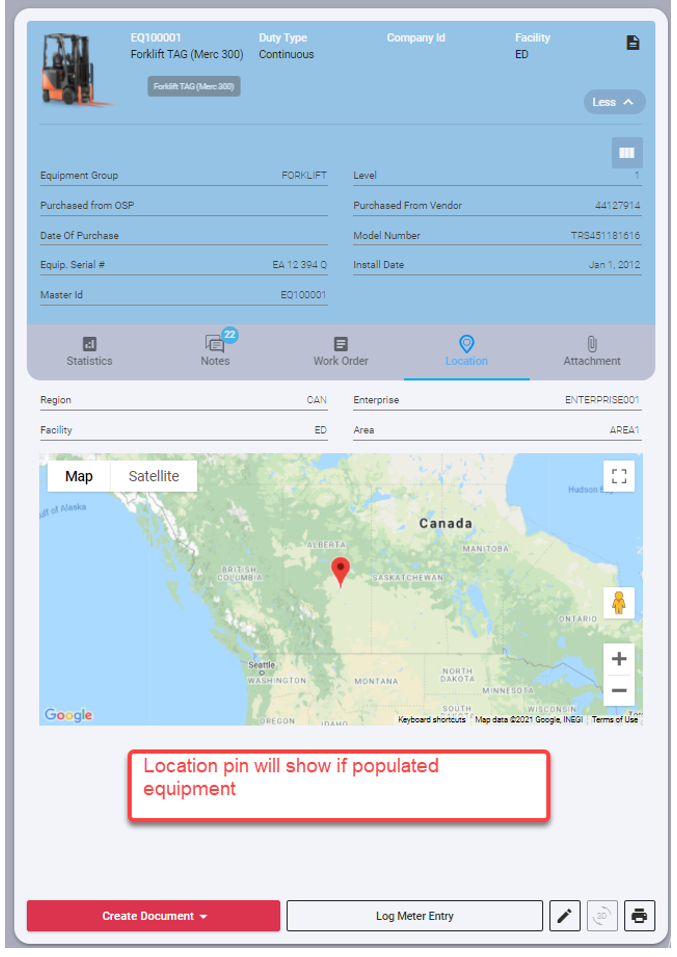
Location pin will show if populated equipment.
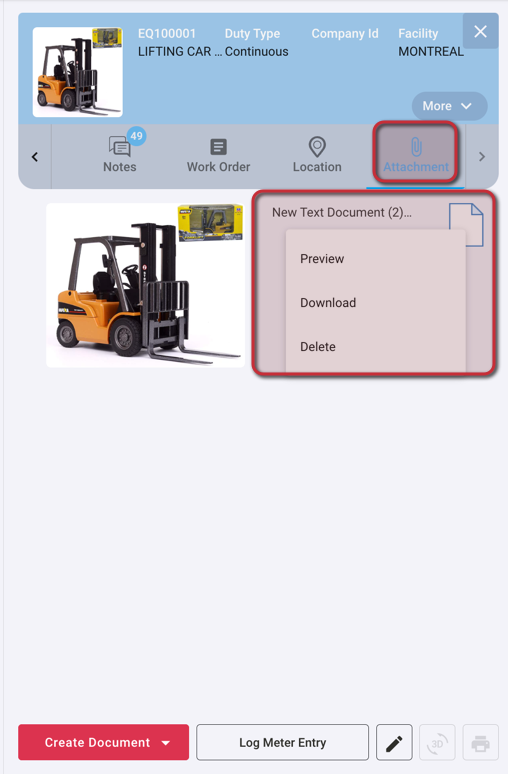
Attachment
Right-click on a picture or file to save, copy, download
URL-highlight and right-click to go to URL on browser
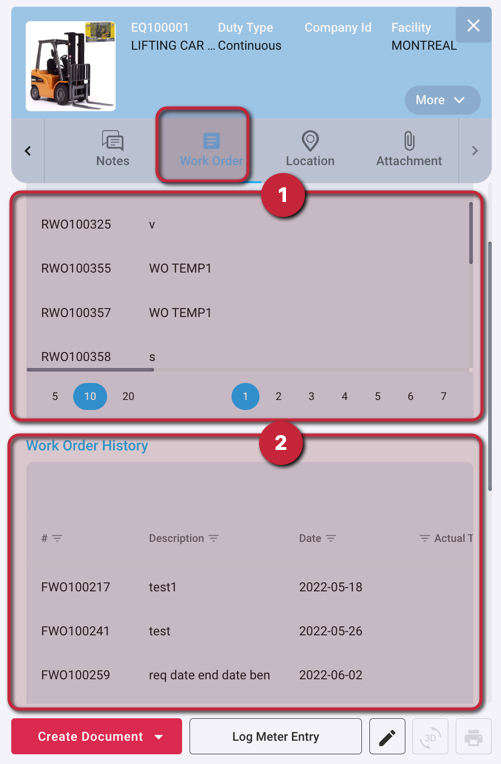
WO list related to the selected equipment
- Upcoming WO
- WO history
Work order opened from equipment
- Click on routing at the top to return
- Can open tasks and report maintenance or booking from here
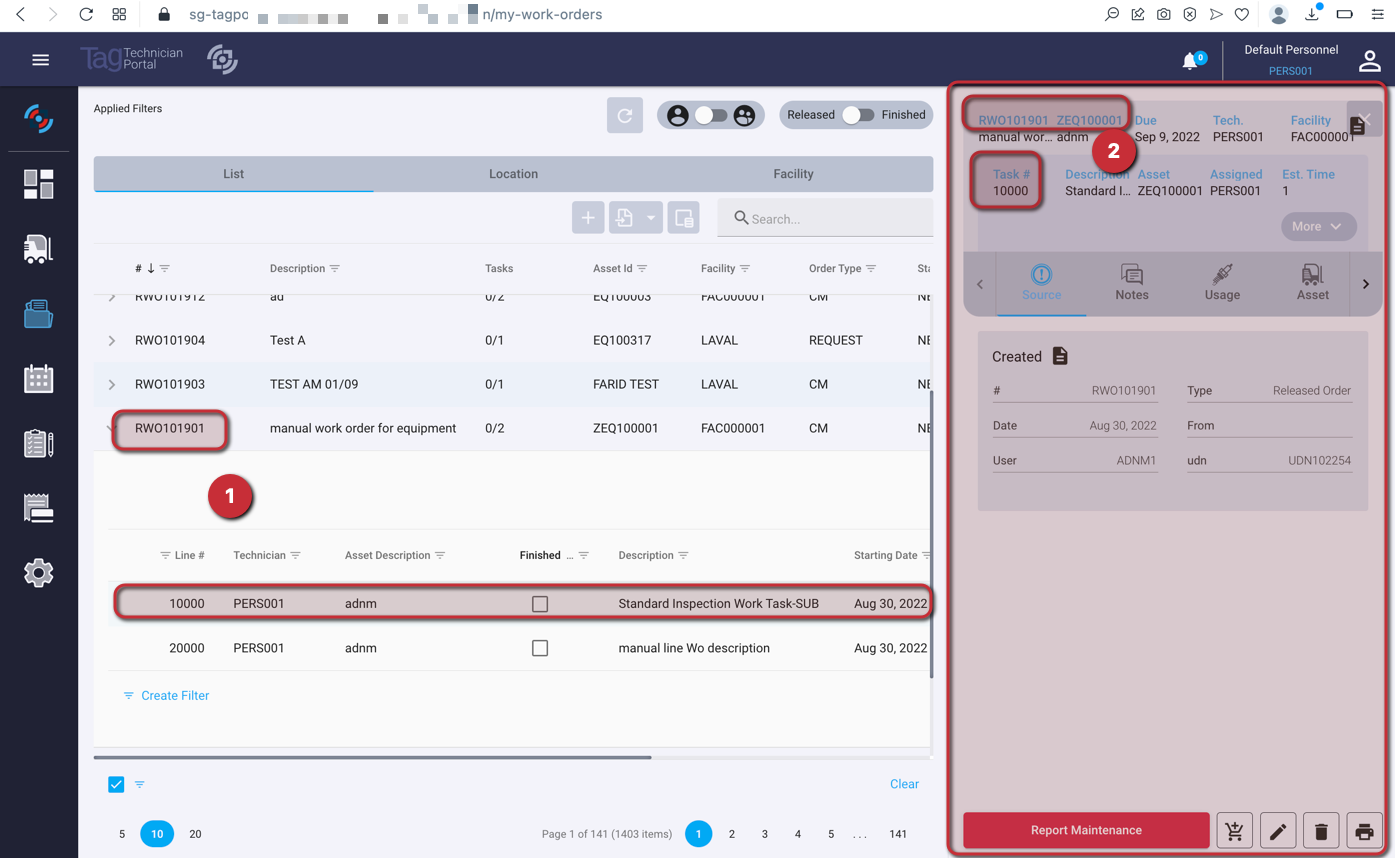
My Work Order List
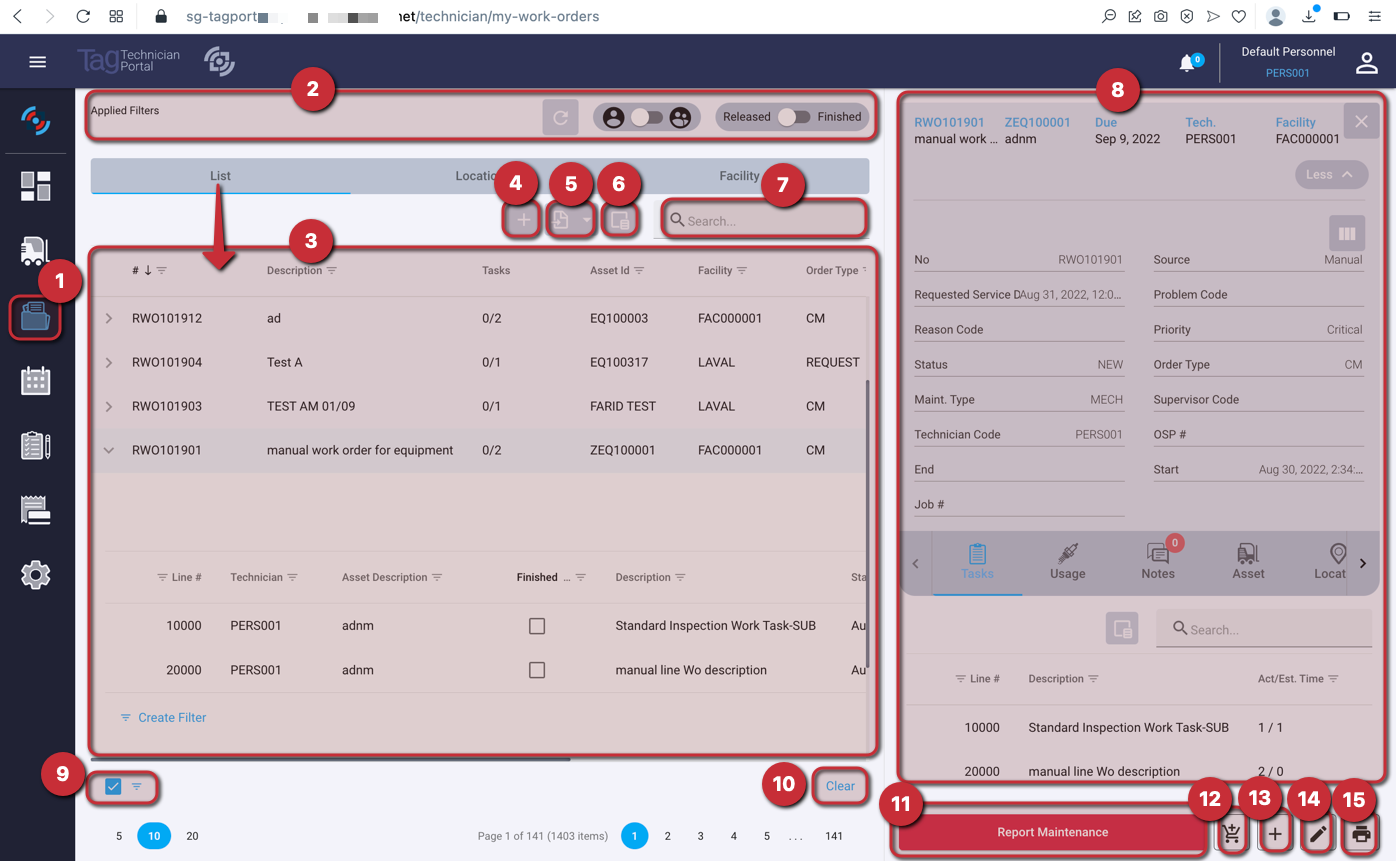
1 - This icon allows the user access to the work order list.
2 - Applied filters allow the user to:
Toggle to select the work order following the selected personal group or per personal.
Toggle between a list of released WO and finished WO.
3 - Summary details for all released WO related to the user tree view of Work order allowing open/close lines
4 - Add new Work order

We can create a new order from the work order list or from the work order header
- 1: Equipment ID
- 2: Description
- 3: Create work order
5 - Export to CSV the list of work order
6 - Select hidden columns
7 - A quick search for any value in any column
8 - Select the list WO view or equipment location view
9 - Filter applied to the columns
10 - Clear filter
11 - Report WO maintenance allow to submit repot maintenance for one or several work order lines.
12 - Create a purchasing order
13 - Create a new task for the selected WO
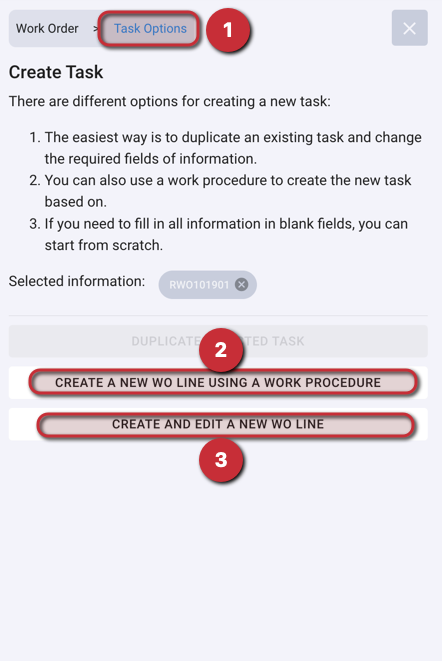
- 1: Return to WO task by clicking on routing line
- 2: Create a general task with a description
- 3: Create a general task with a description
*Note: that after the task is created, the system opens that task work order line on the work order.
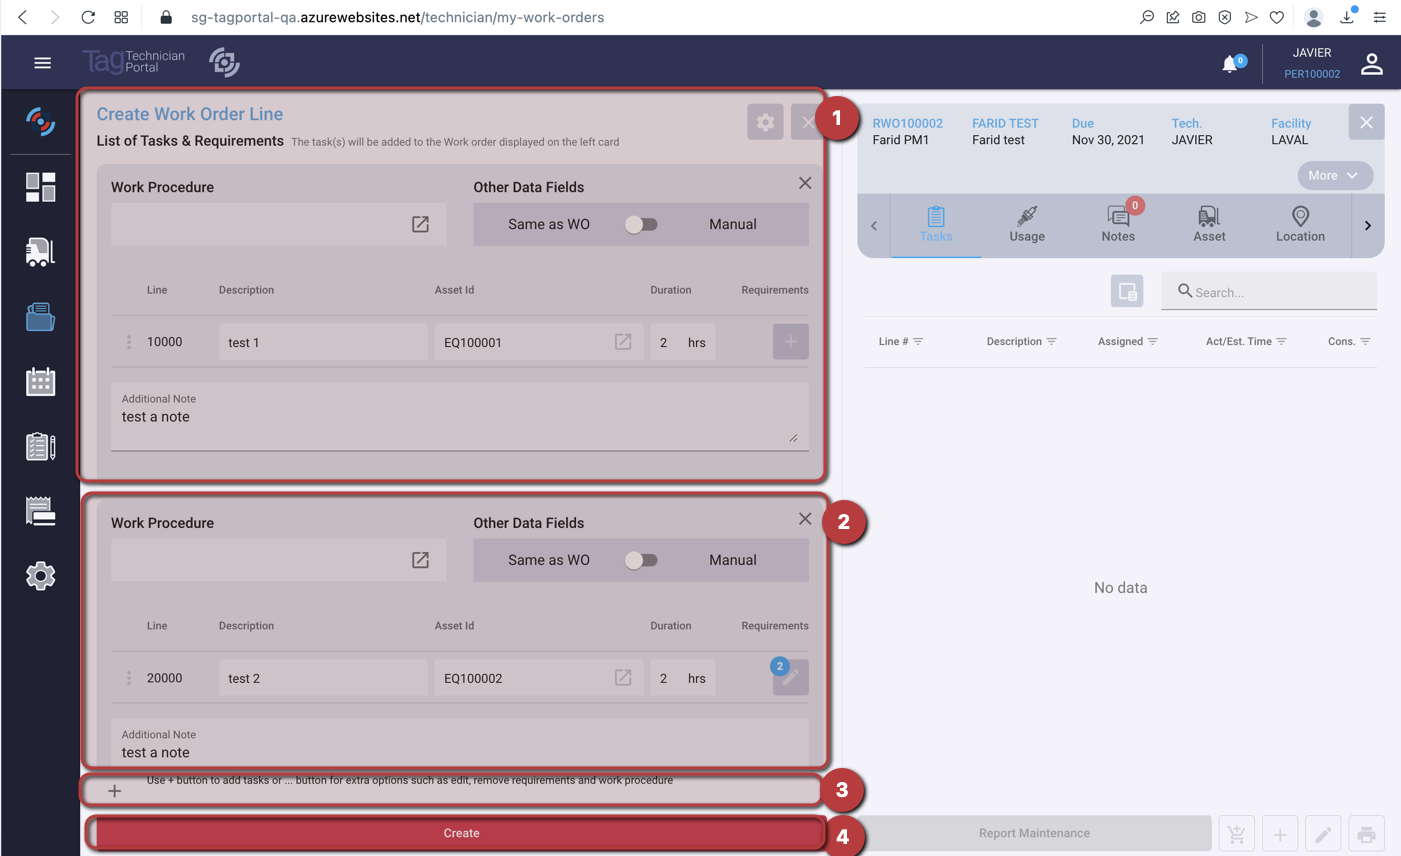
Create a new Work Order line:
- 1: First Work Order line
- 2: Second Work Order line with different equipment
- 3: (+) button to add more work order line
- 4: Create one or several work orders lines
14 - Edit Work Order
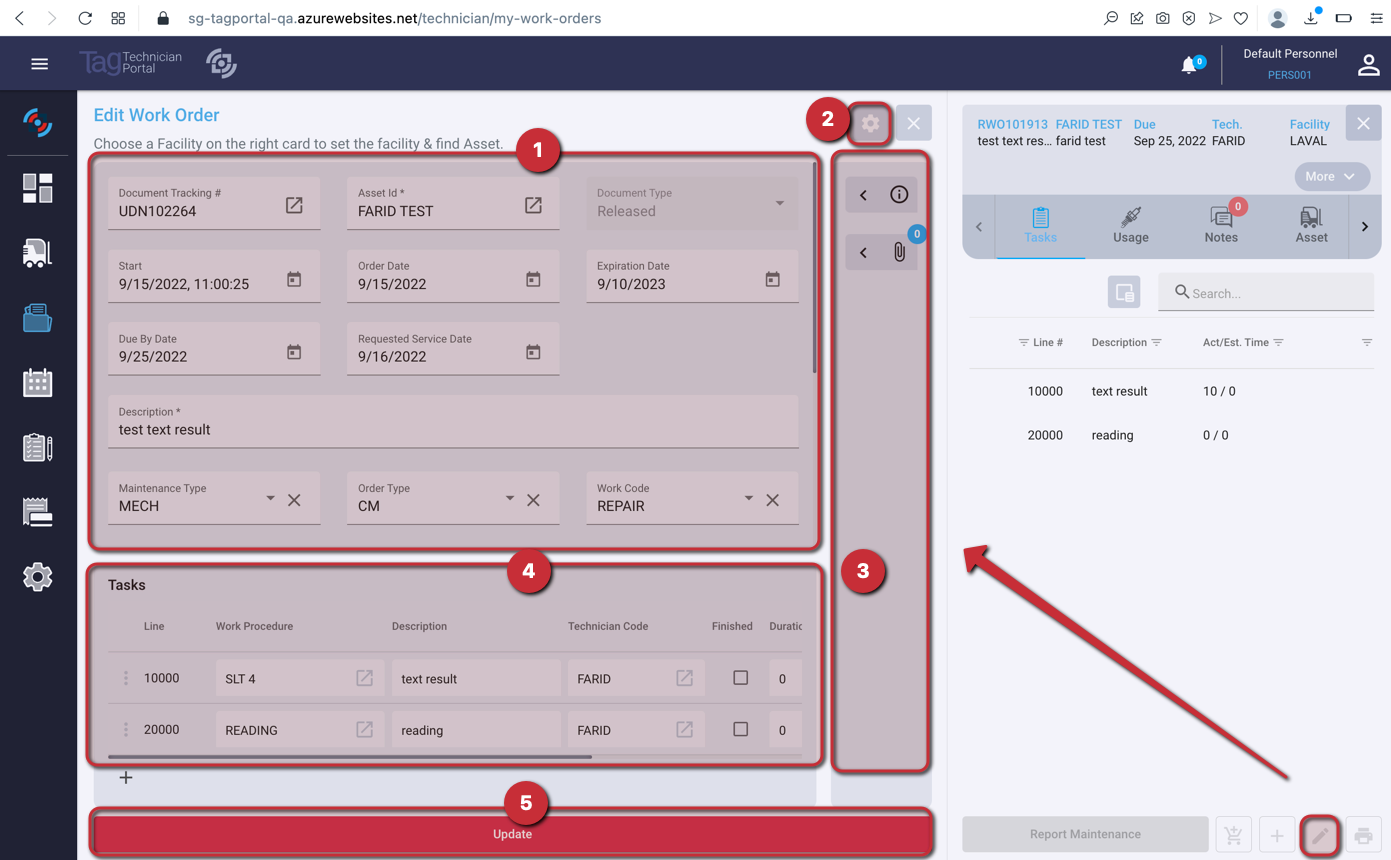
- Edit Work Order
- Edit WO by populating the fields and selecting create
- Yellow are mandatory fields requirements:
- 1: Edit Work Order header values
- 2: View setting
- 3: Insight panel and attachment
- 4: Edit Work Order lines
- 5: Update Work Order
15 - Print Work Order
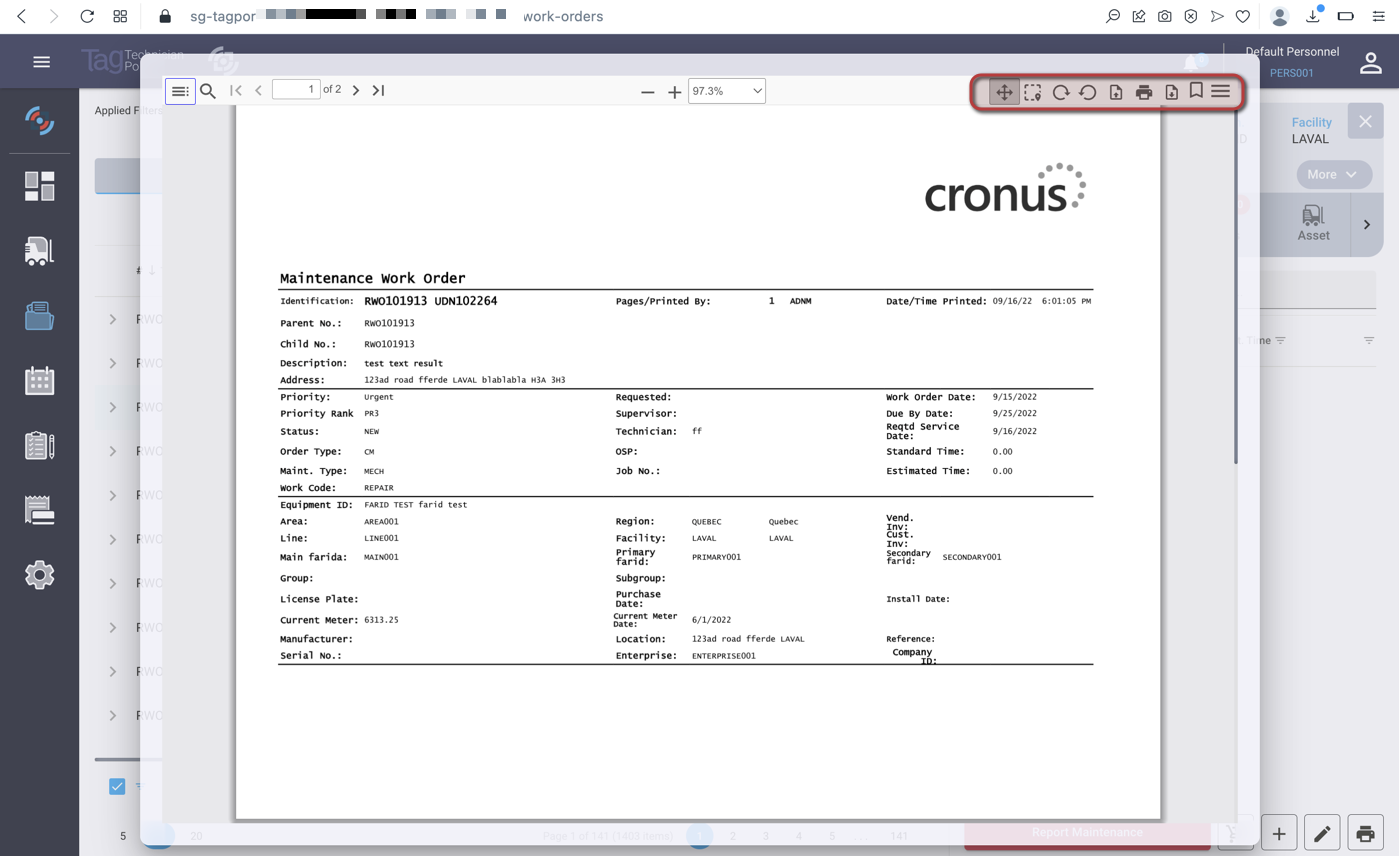
- Can print /overview PDF of the work order
*Note: that this requires a display application
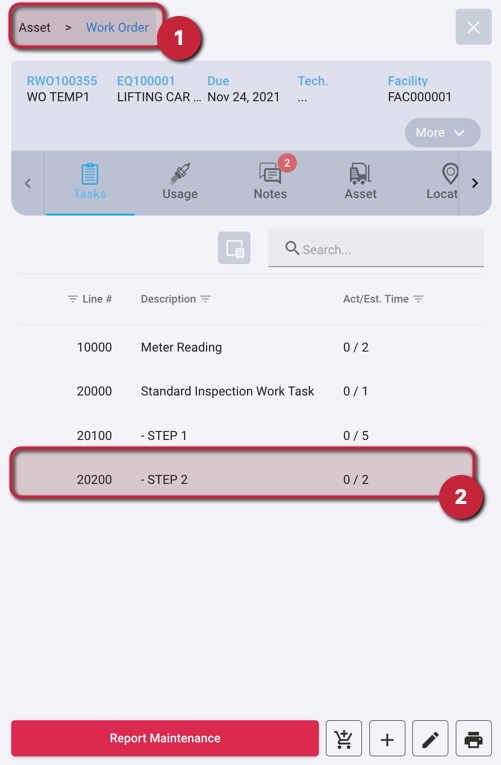
Work Order Line: Task Details
*Note:
- Work order tasks show report maintenance if timesheet = no.
- Work order task will show report maintenance and booking if timesheet = yes
- Show the release work order number, choose the specific work order line
- Release work order card and released work order line/task card

Work order task showing Report maintenance and booking because timesheet = Yes
Work Order Line: Source

Attachment and work order tracking information
Work Order Line: Notes
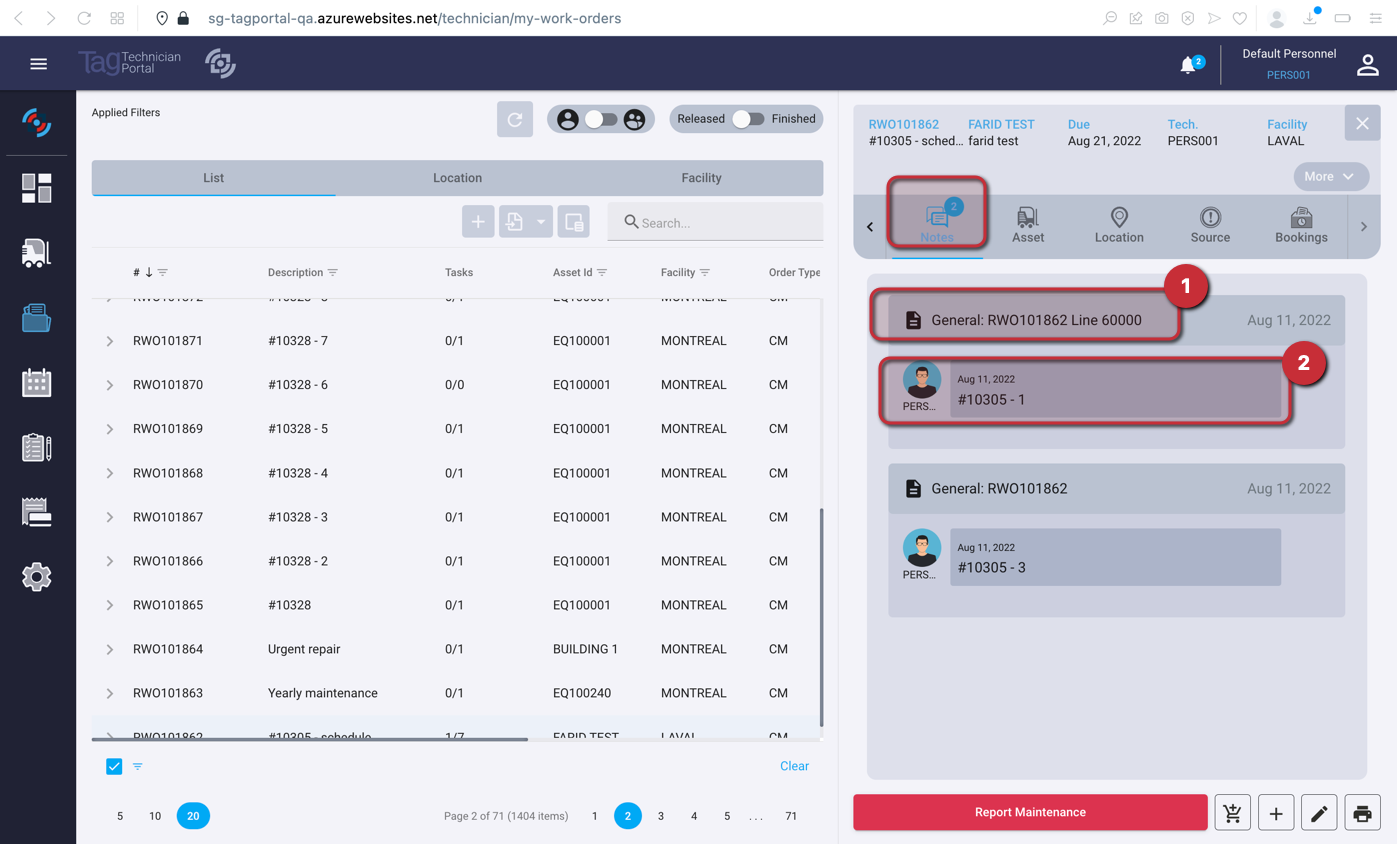
- Feedback type, WO No, Line No, Date, Failure code
- Technician name, Feedback
Work Order Line: Usage

Work order plan requirements also show:
- Expected quantity and actual quantity
- Vendor and vendor No
- Posted and PA quantity for the work order
- Available quantity
- Unit cost
Work Order Line: Equipment Information
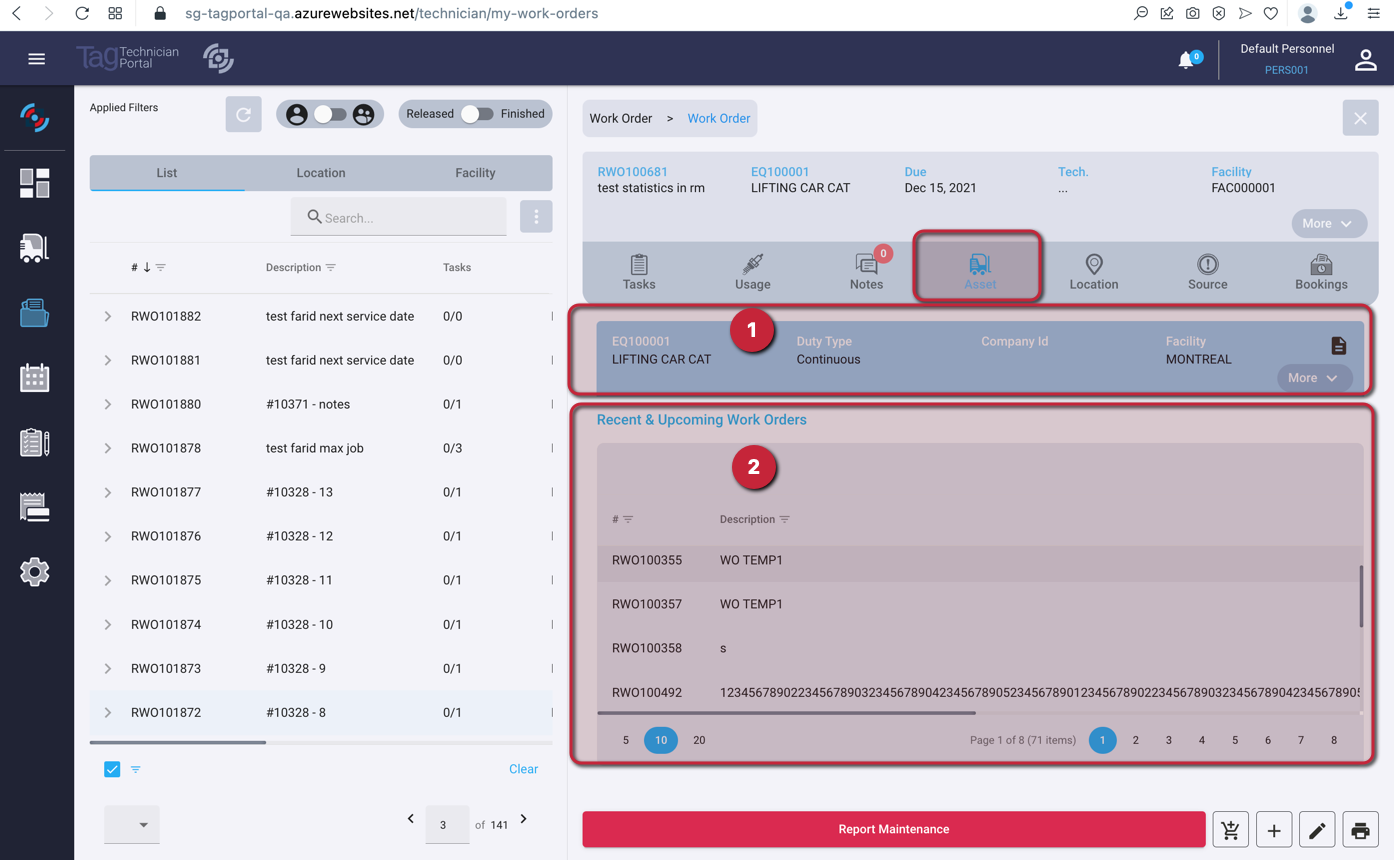
- Equipment information
- Recent and upcoming work orders
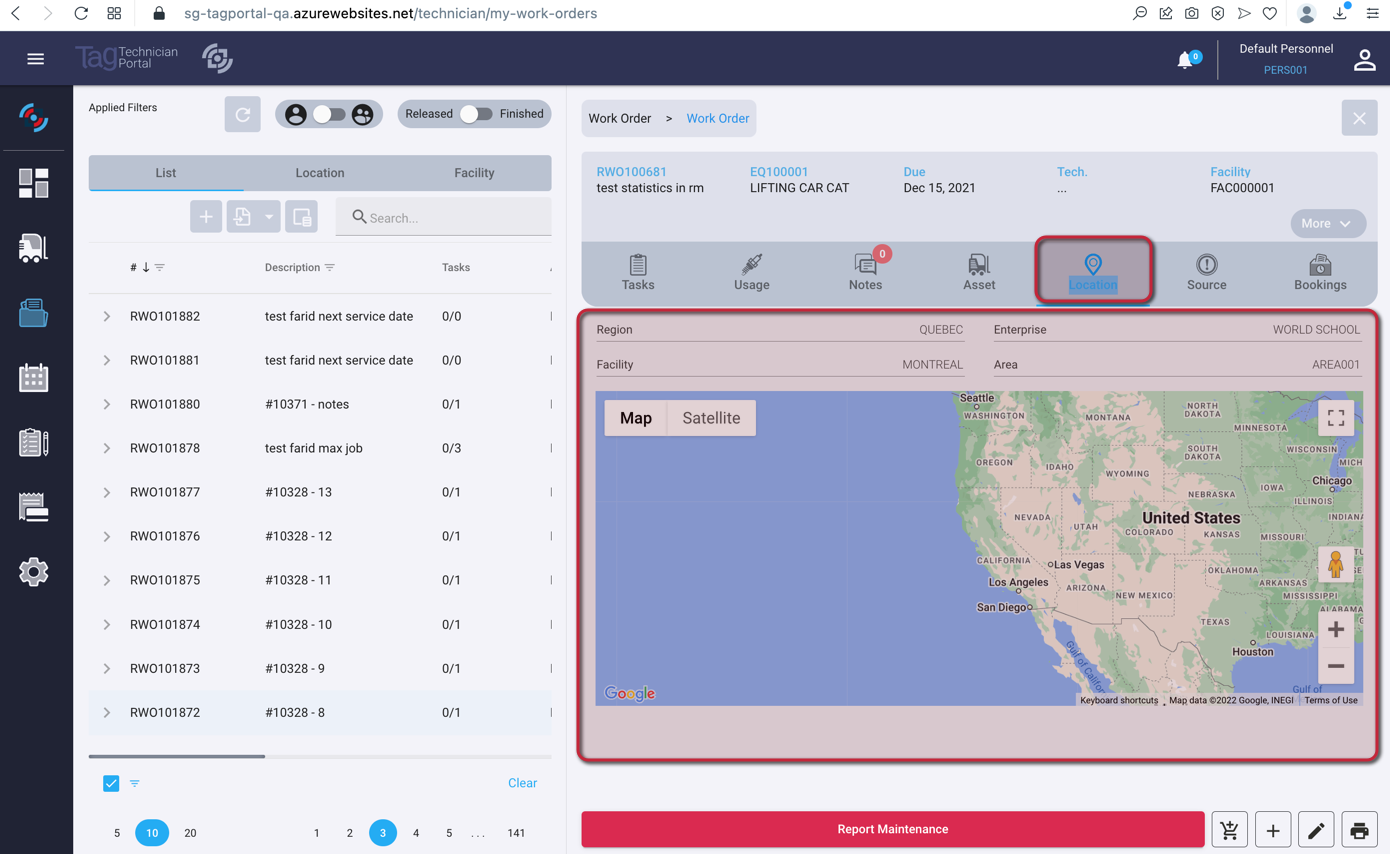
Work Order Line: Location
Report WO Maintenance With Steps
The Report WO maintenance form has changed for version 5. We must follow the steps and fill in the required fields.
The left form has changed to offer better usability by reducing the user’s cognitive workload and helping people think about a single thing at a time. That is the reason we have used stepper here.
We keep the same below functionalities with different logic.
Allow submitting report maintenance for one or several work orders lines.
*Note: if the user technician does not match the technician on order, then the user must select the lines to report maintenance.
Spread time is available if lines are assigned to the technician assigned to the user.
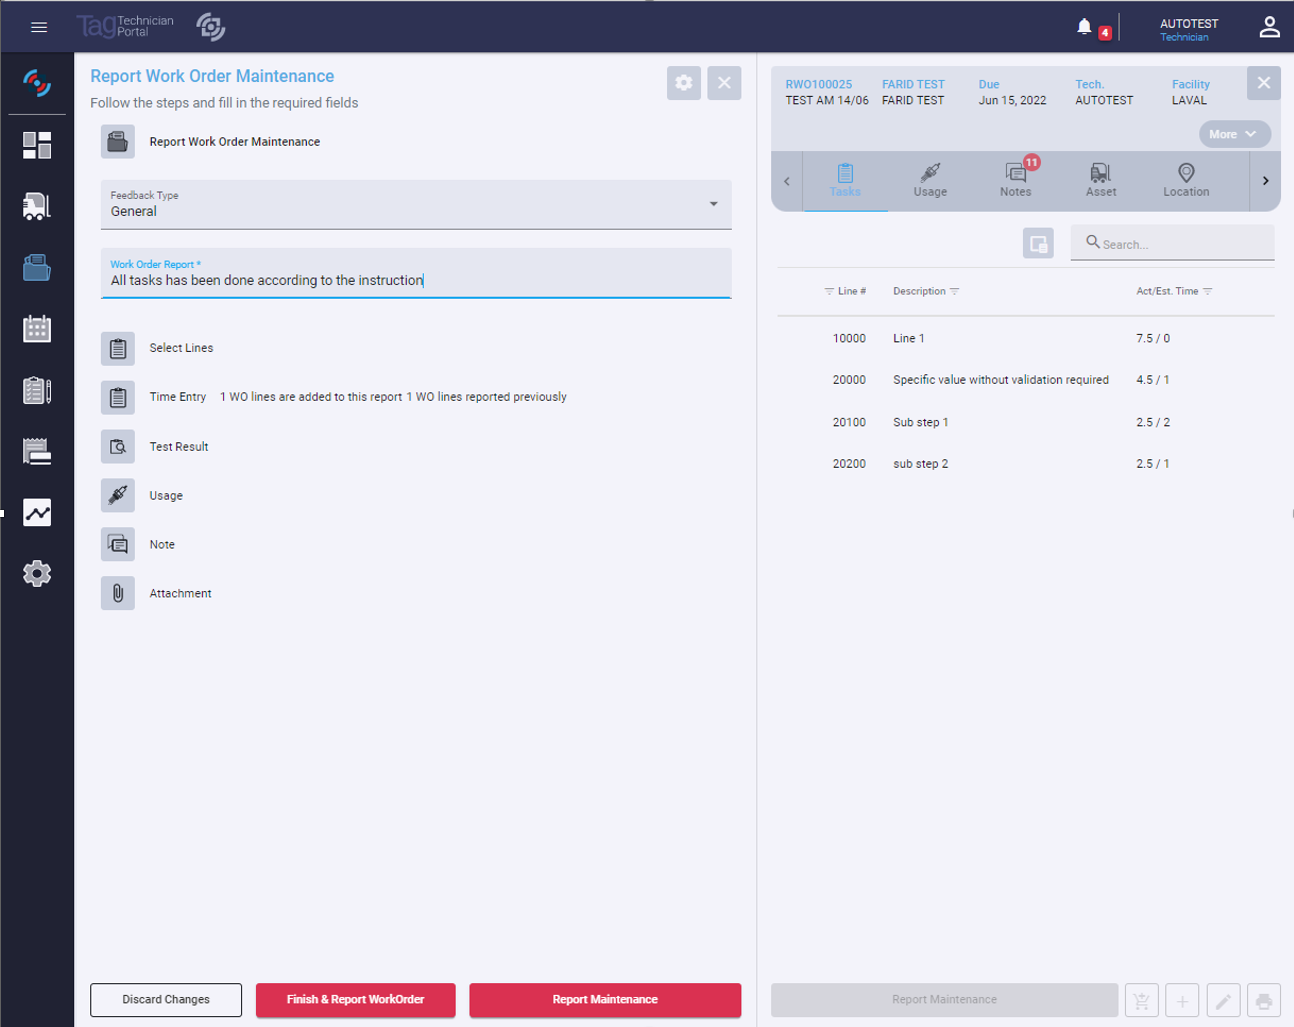
There are seven (7) steps in this step, Report WO maintenance, Select Lines, Time entry, Test result, Usage, Note, and Attachment. Each step has a horizontal bar to show more information about the content of each one.
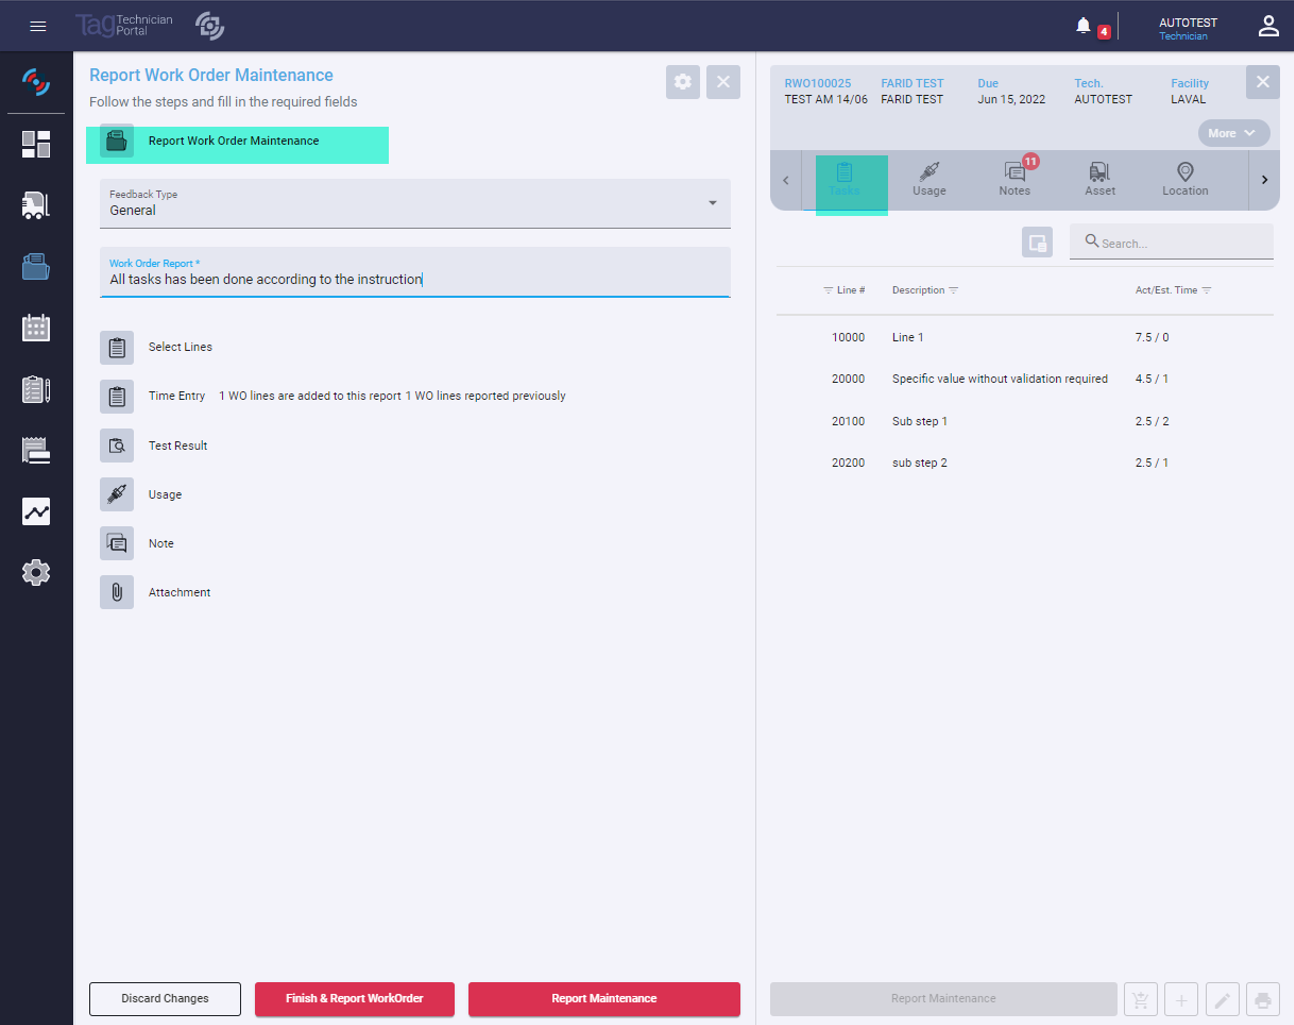
Step1: Report Form
The first step is Report Form with two fields:
- Feedback Type: Defaulted to "General Feedback" (If it is the most frequent option in the list)
- Work Order report
In this step, the correct info card would show the Tasks tab.
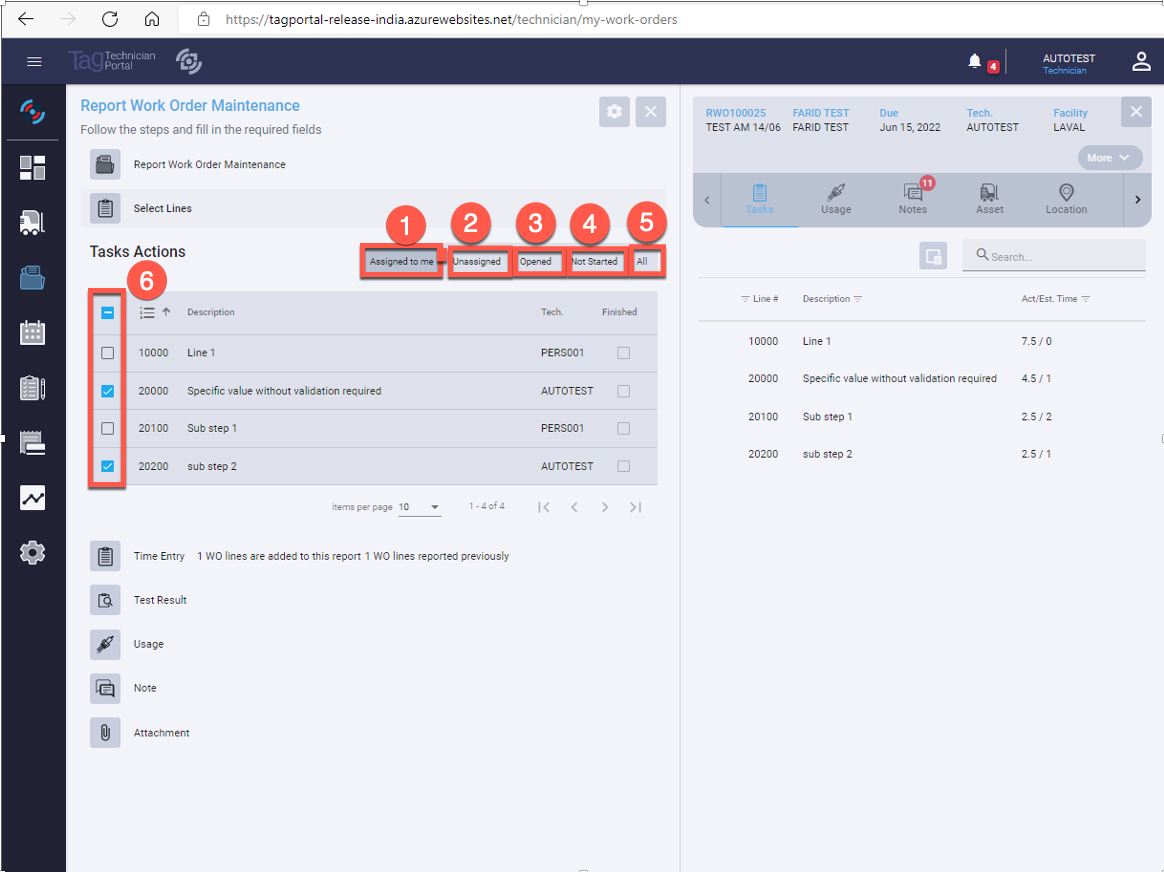
Step 2: Select lines
The second step is ‘Report form’ with tasks action option:
- Assigned to me: This is the default option when the user selects lines. It shows only the WO lines assigned to the current user
- Unassigned: Show only the selected WO line without technician code
- Opened: Show all WO lines not closed
- Not started: Show the WO line with actual time different to 0
- All: Show all the selected WO lines
- Select Checkmark with the specific line(s)/task(s): user will have these selected lines in step 3 to work on
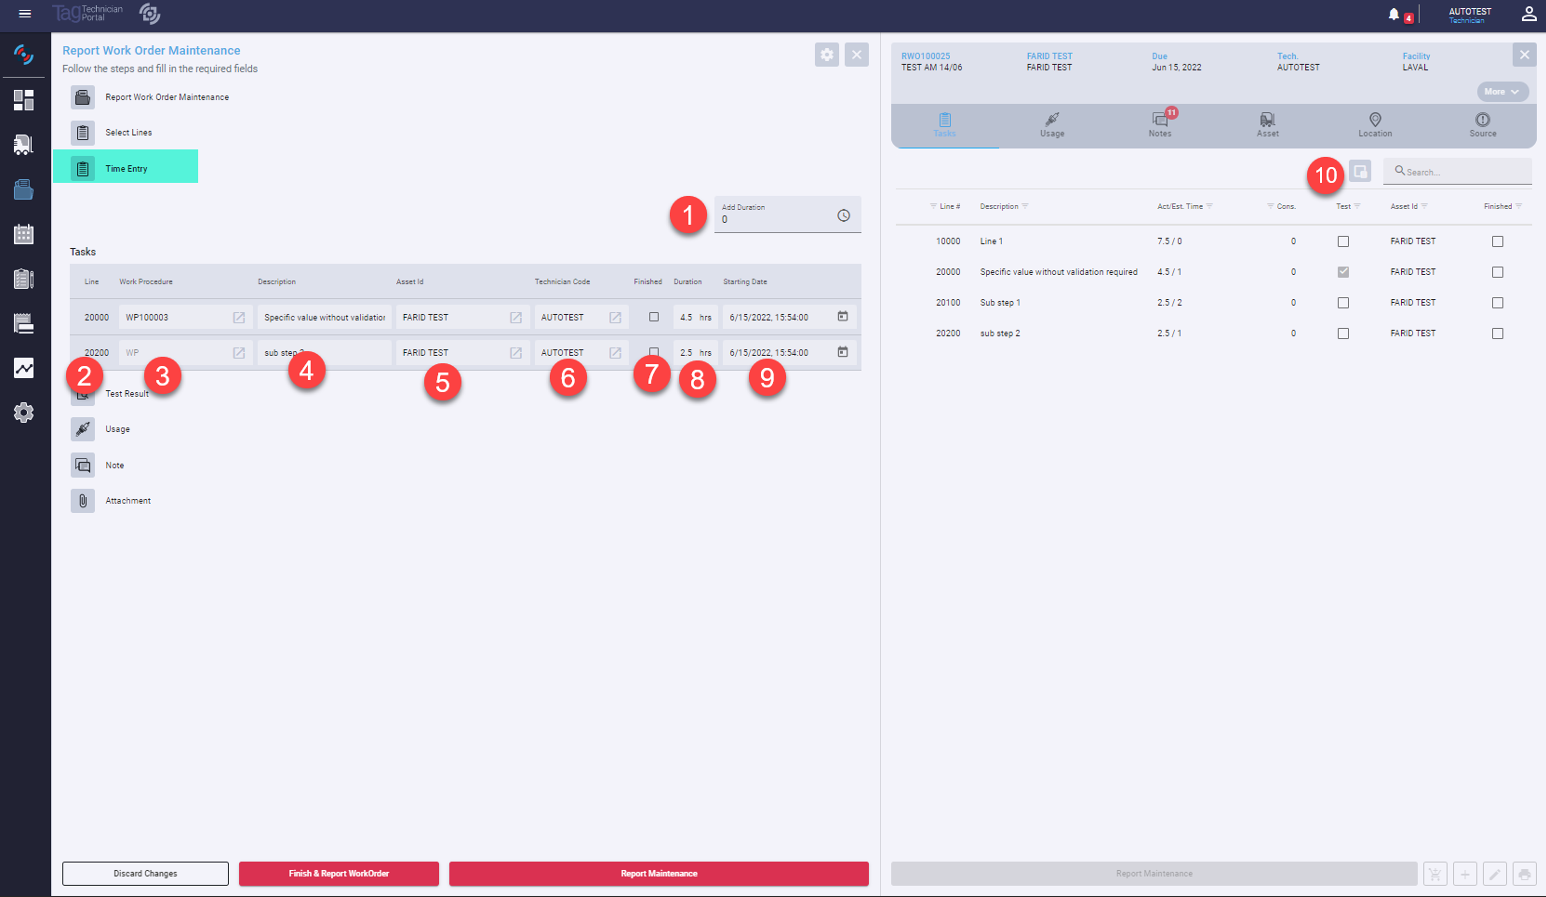
Step 3: Time Entry
- The spread button in this section. By default, it is toggled on. The total duration time entered in the first step will be equally among the added WO lines. The user could also change the duration time of each work order line manually.
- The user has the information about the line number of each WO line
- The user has the information if the WO line contains a WP
- The user has the information about the description of the WO line
- The user has the information about the equipment assigned to the WO line
- The user has the information about the technician code of the specific WO line
- If line/task is finished, check on this checkmark box
- Enter time in the Duration field for that specific line
- Enter the date the maintenance activity took place if required.
- The user has the information on which line required a test result.
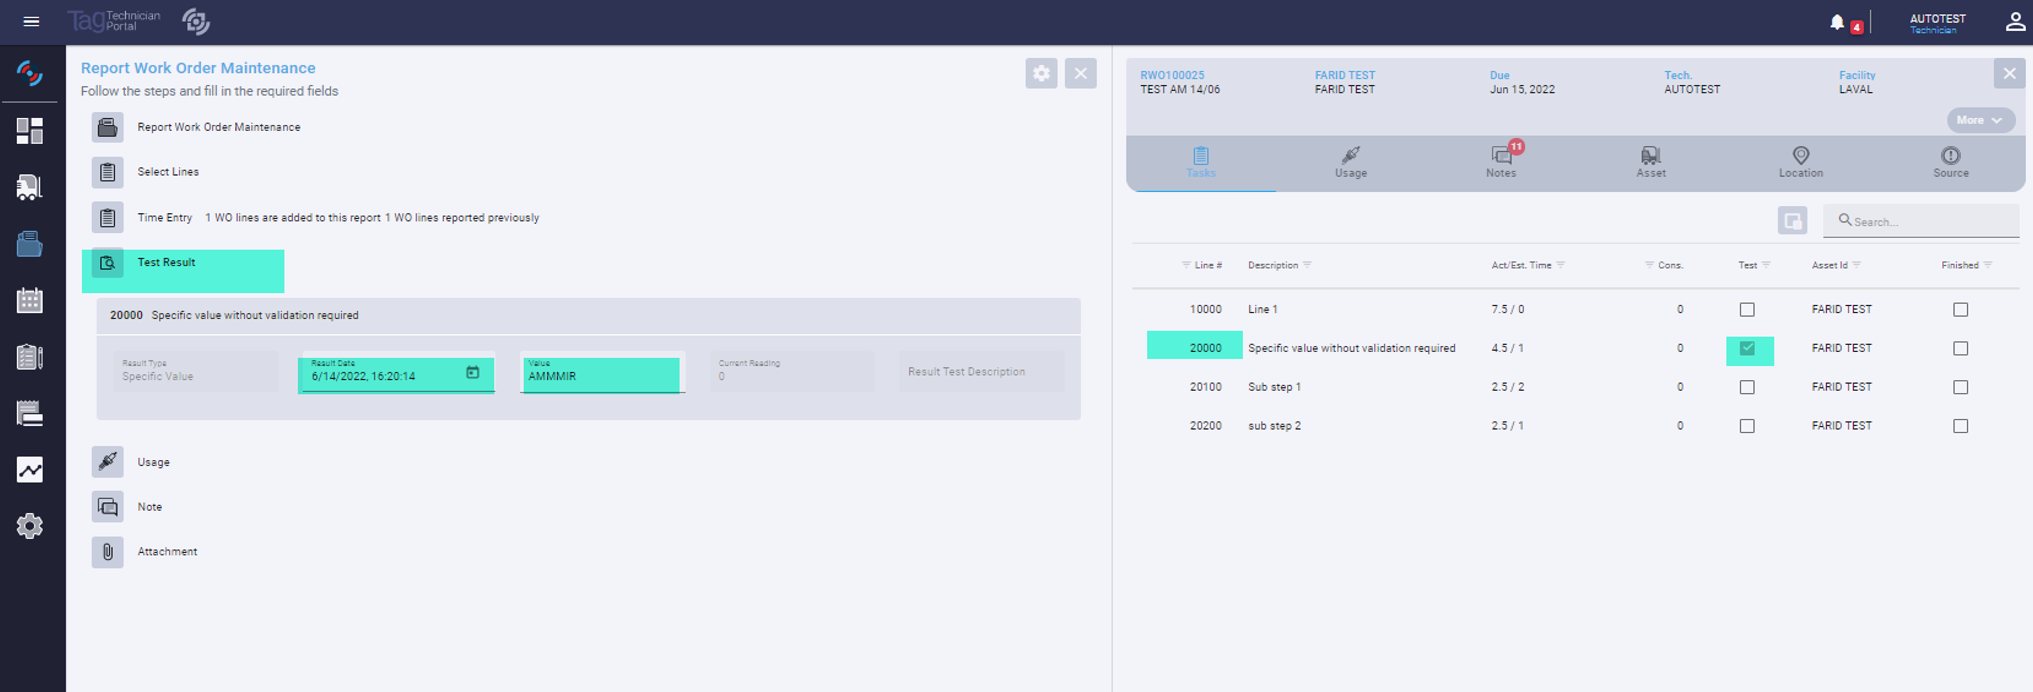
Step 4: Test result
Portal support five (5) input types (Text, specific value, numeric, meter reading and binary test result). The user needs to enter the test result and the result date and time. The test result value is saved even if the user selects another option and returns to the test result option.
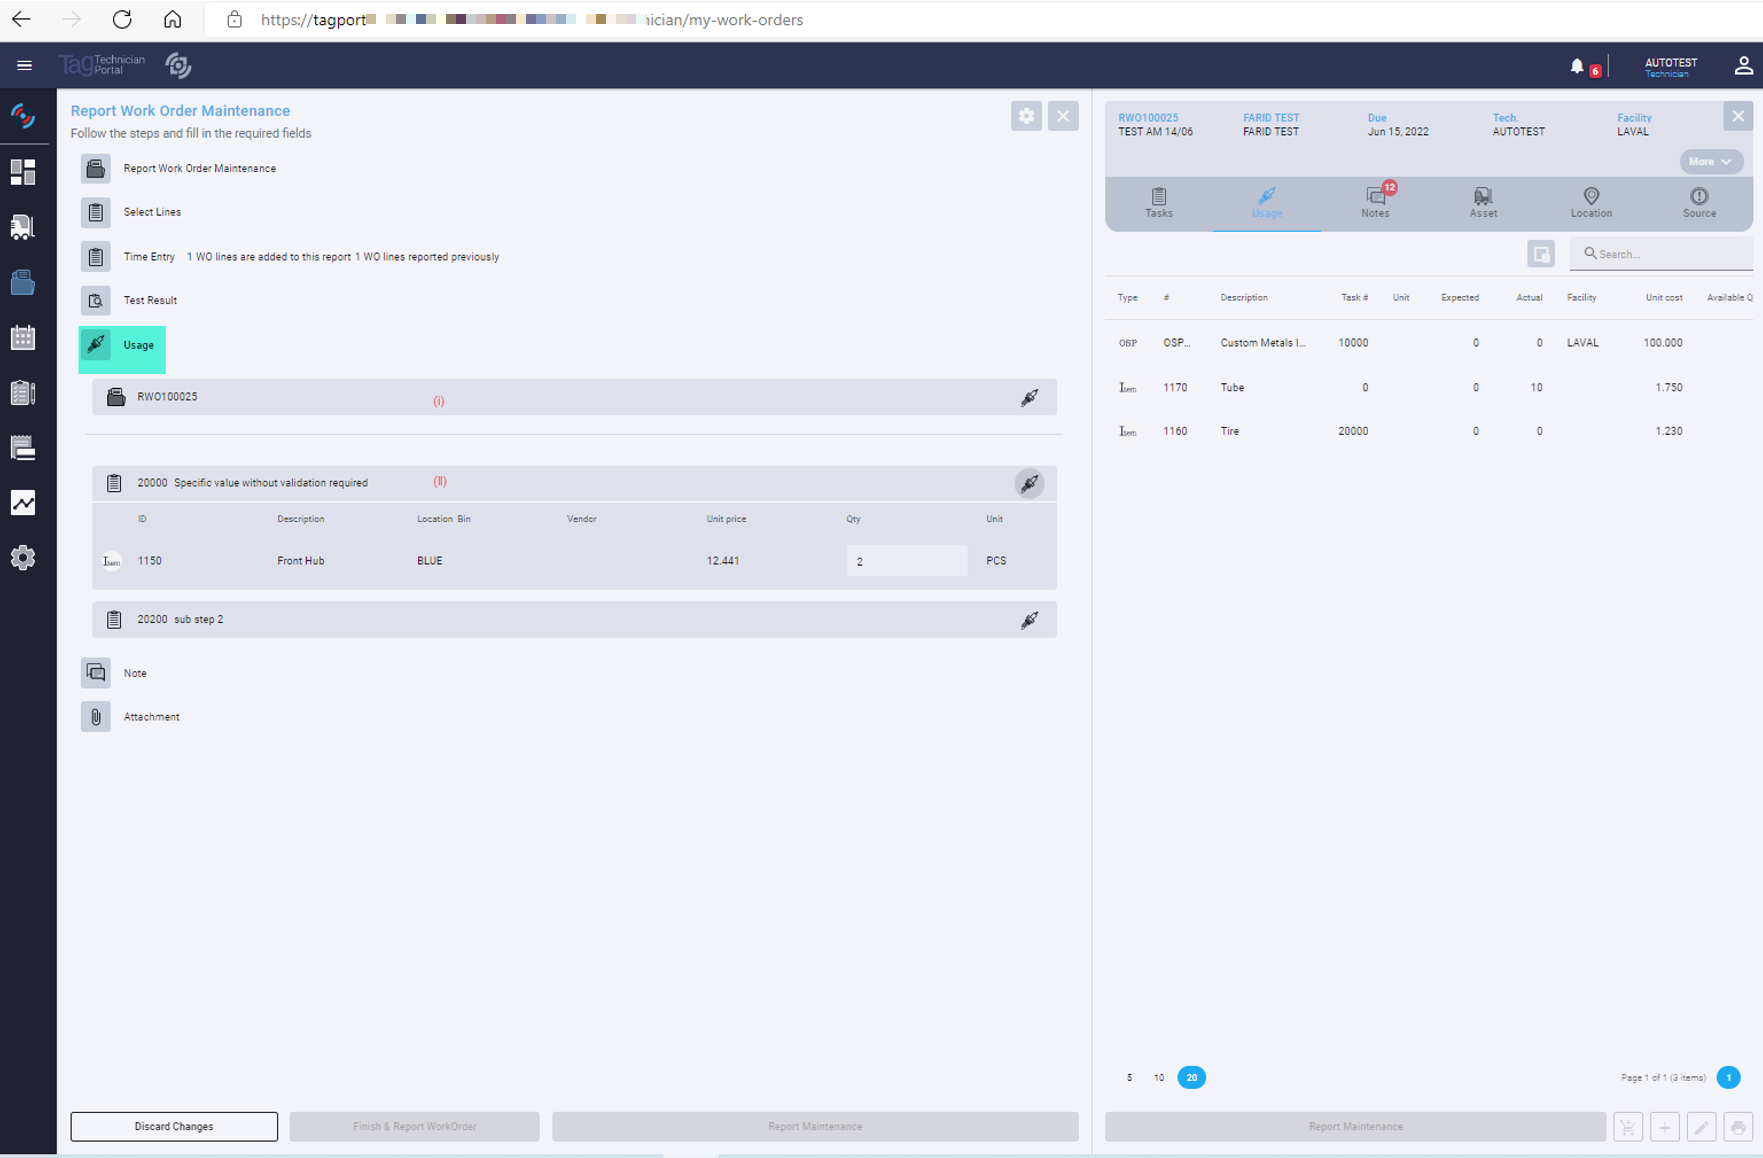
Step 5: Usage
As soon as the user clicks on this step, the correct info card will change to the Usage tab. When the step expanded, the user could see two sets of usages:
- (i) the usages on the WO header and
- (ii) the usages under the lines that are being reported.
The user could see the number of usage items on the badges in front of the lines and could click to expand to see usage lines and changes in the quantity.
Step 6: Note
As soon as the user clicks on this step, the correct info card will also change to the Notes tab. The same grouping structure would be needed here: the notes related to the WO on top and notes against the lines.
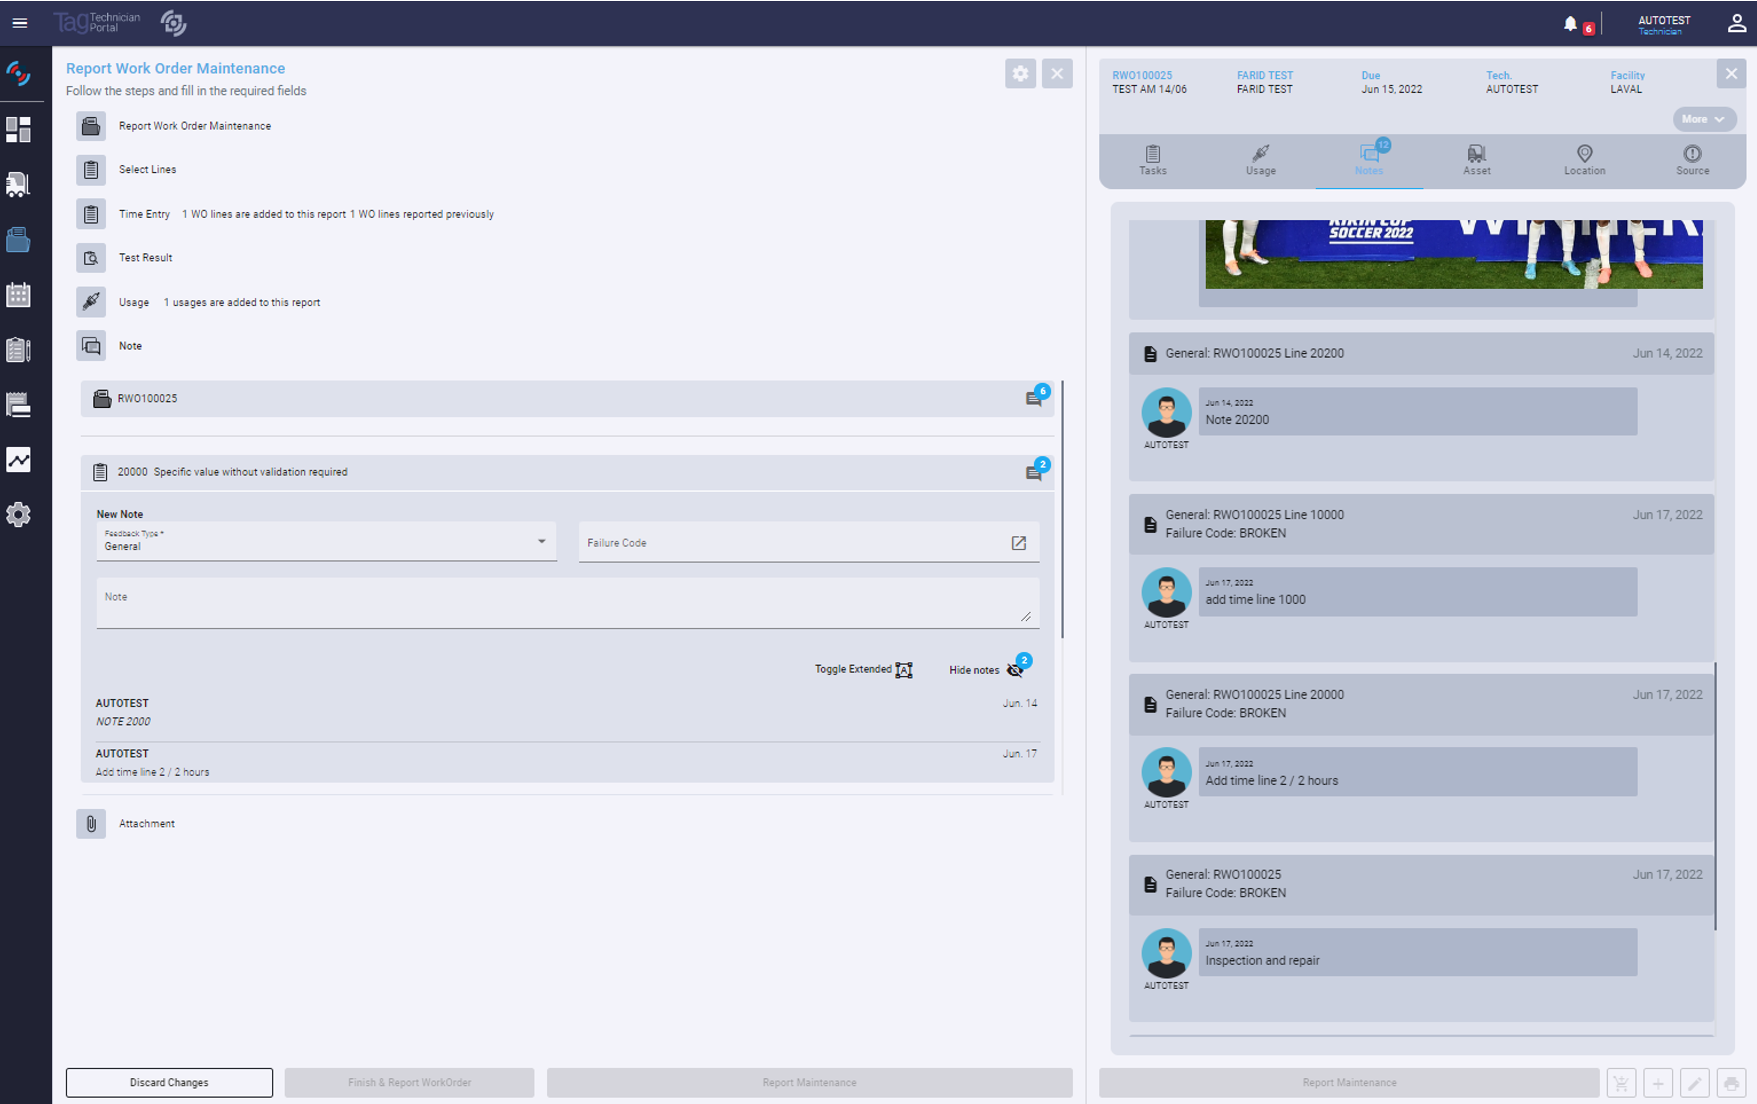
If there are notes already, we should show the badge with the number of existing notes. Otherwise, the text beside the icon will be "Add note".
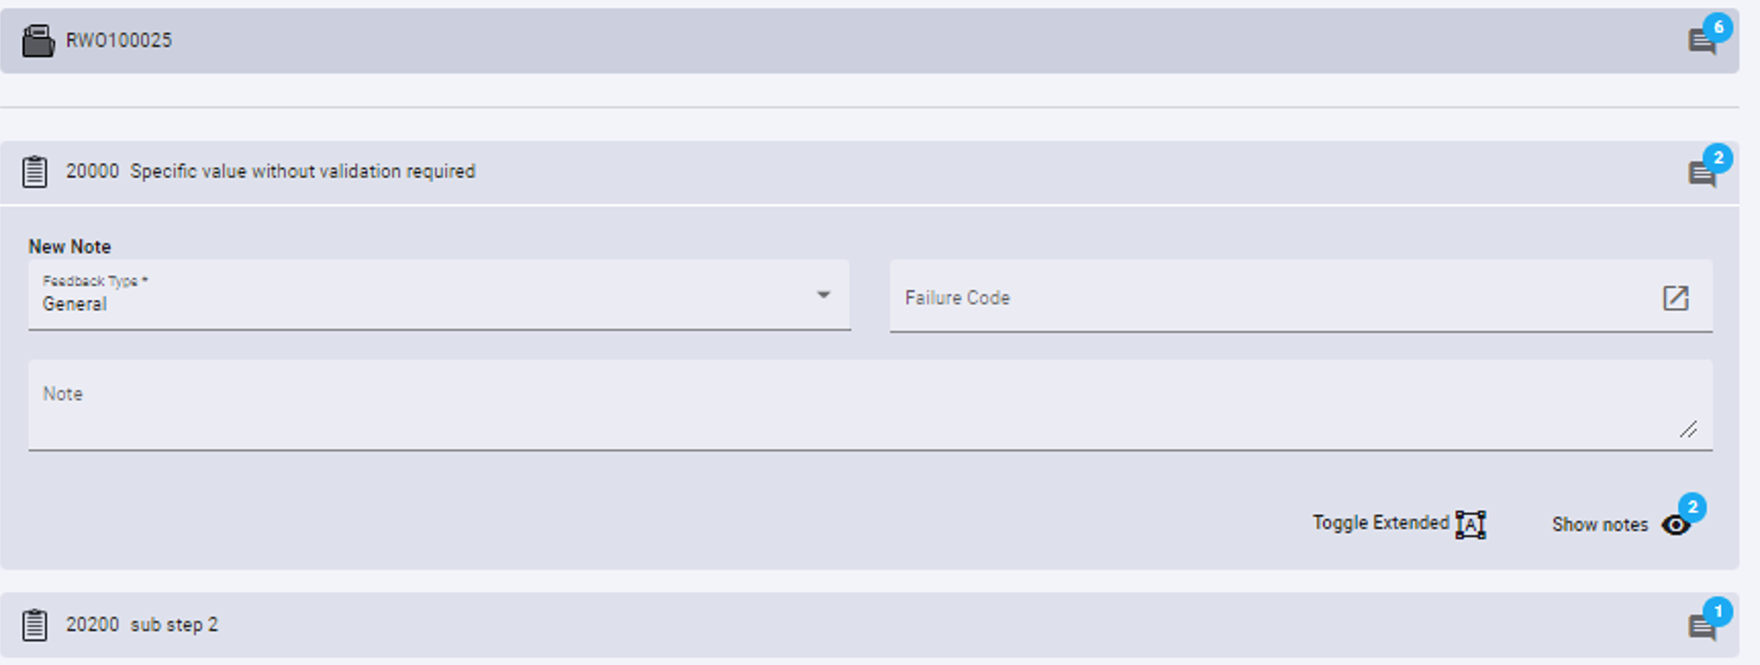
When the lines are expanded, the number of existing notes will be shown beside a view button, and user could toggle to see them. As shown below.
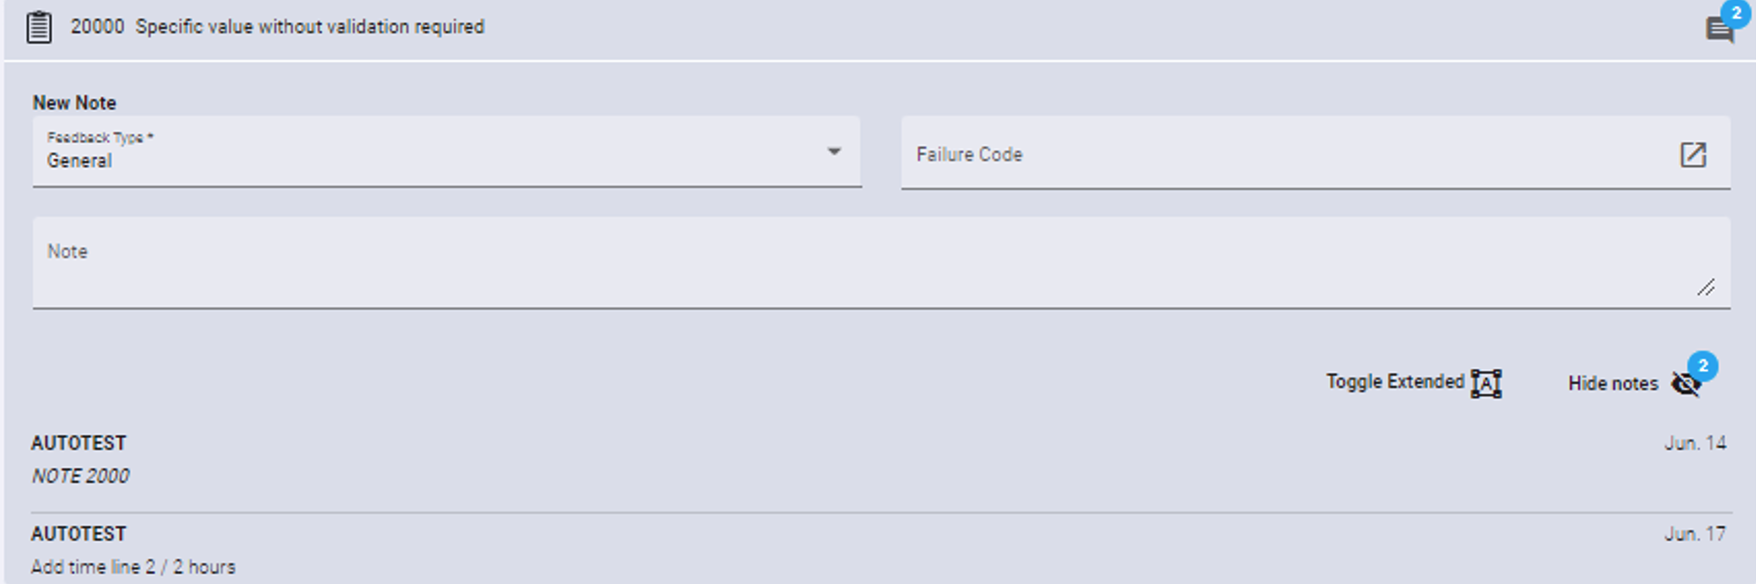
Users could add several notes, post them, and open the advanced text editor to change the style, add tables, etc.
Step 7: Attachment
The same structure as the previous steps will be here too. With this difference that clicking on the "new attachment" field would result in opening a file browser window.
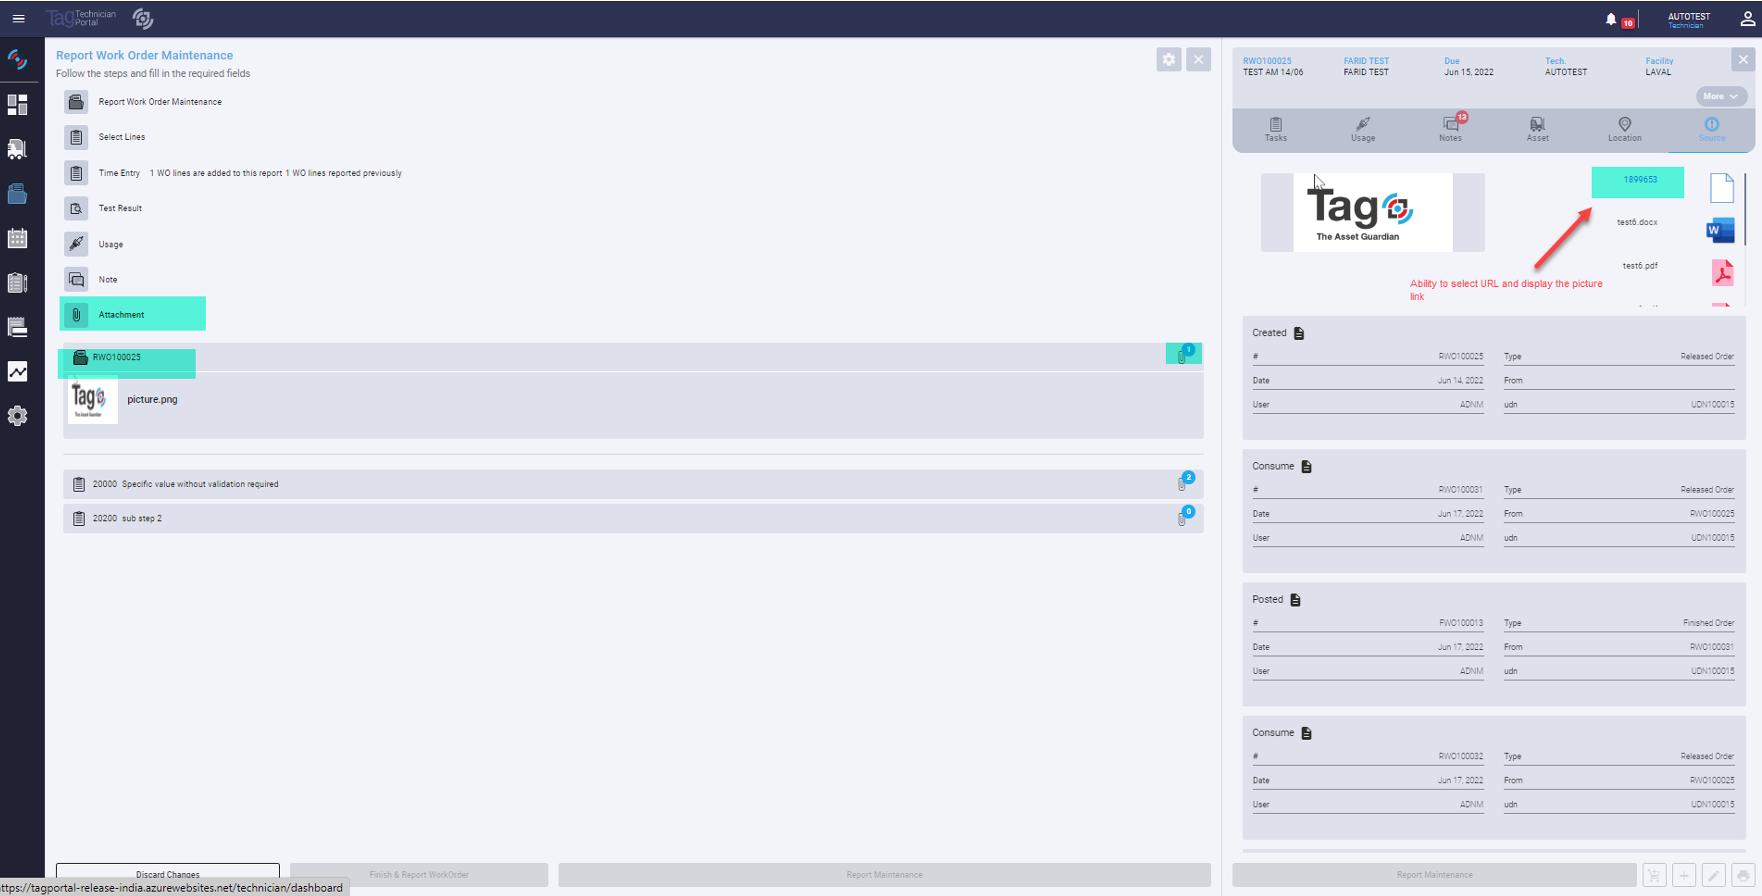
Step 8: Actions buttons
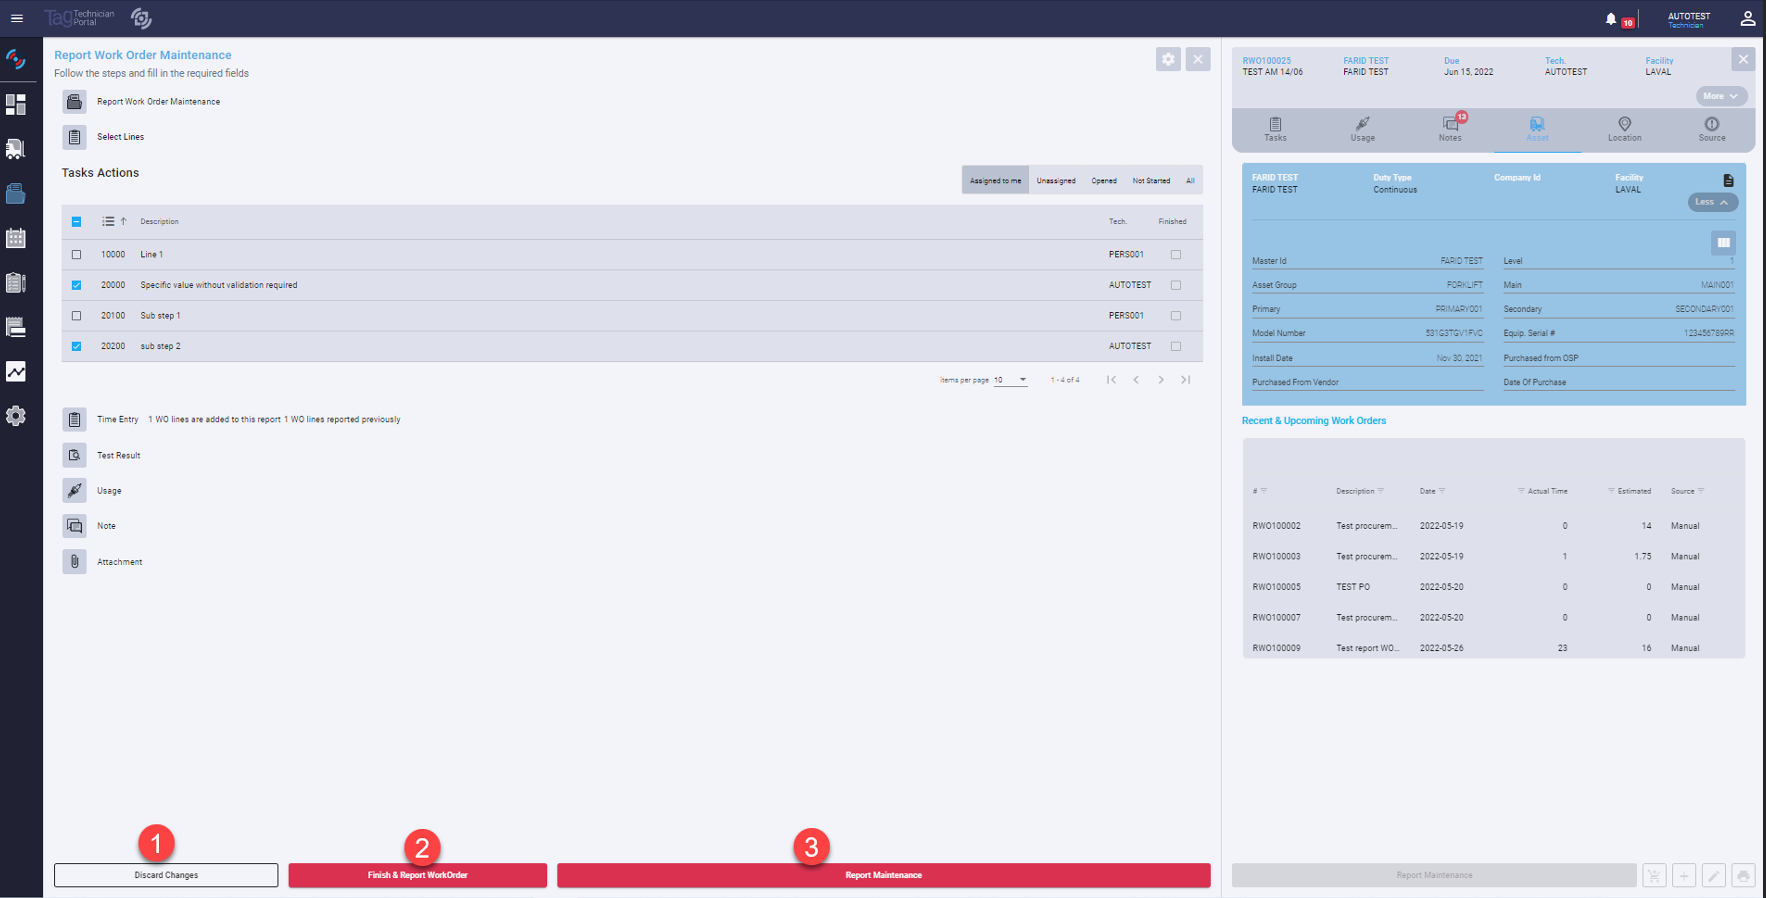
- We can autosave the changes in the cache. "Discard Changes" would clear the cache from all the entered information
- The "Finish and Report Work Order" button would report WO and close the header
- Finally, the primary button will do the report maintenance
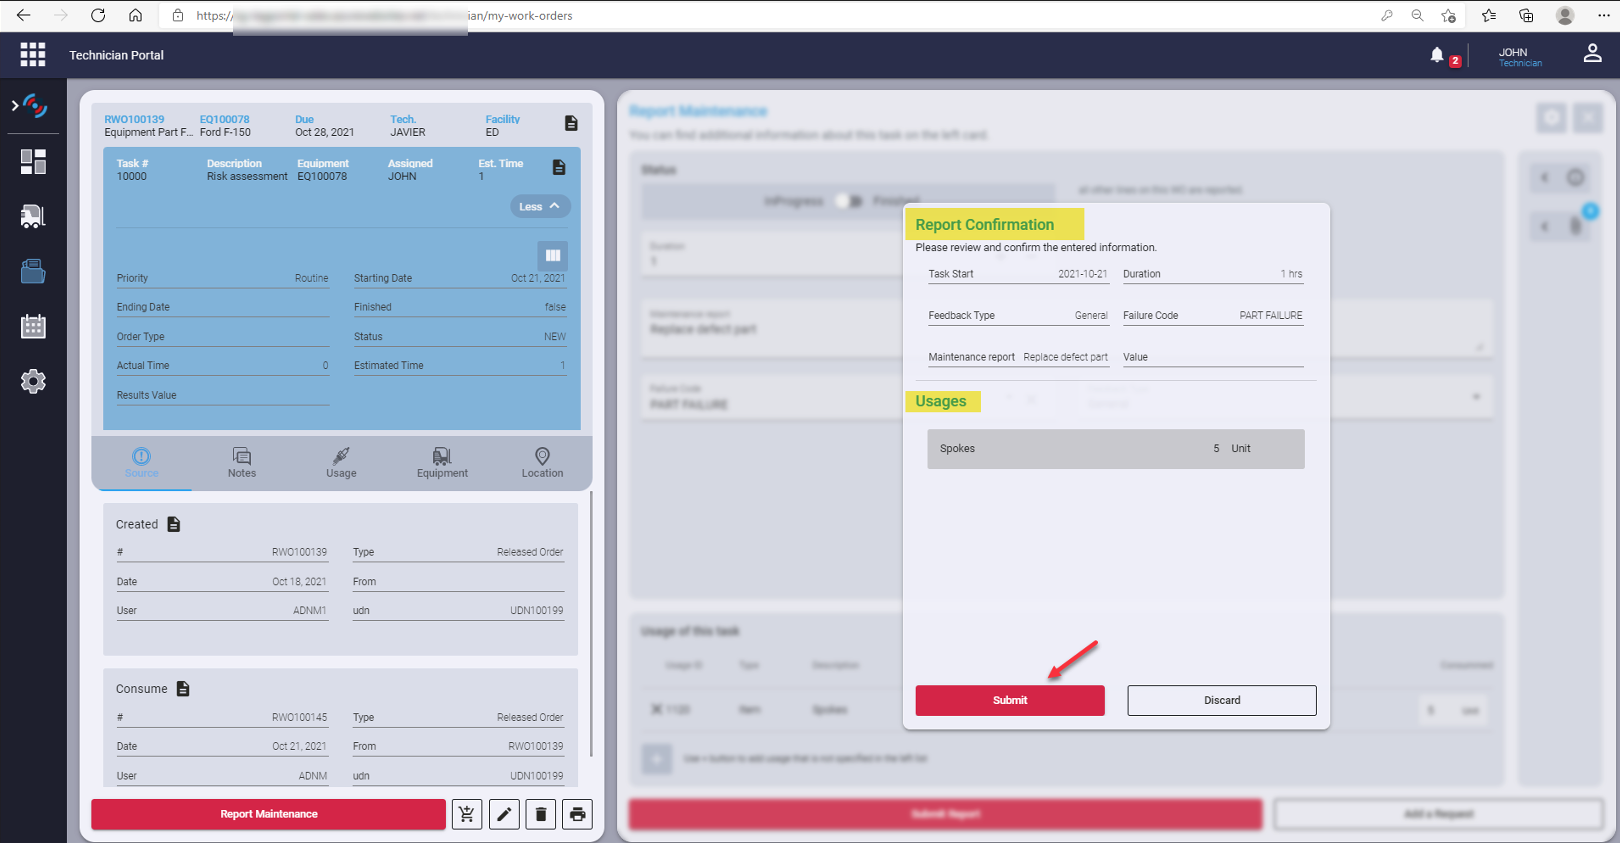
Work Order Line: Report Maintenance
The page checks if the technician is assigned to the work order line. If no, then the technician may be manually assigned.

- Feedback
- Feedback type
- Failure code from the selection
- Mark line as finished
- Work order line time
- Requirement usages (Posted)
- File attachments
- Submit to complete the entry
We have a report confirmation of the inserted value to confirm them before submitting or discarding and making a change.

Work Order Line: Edit Work Order Line
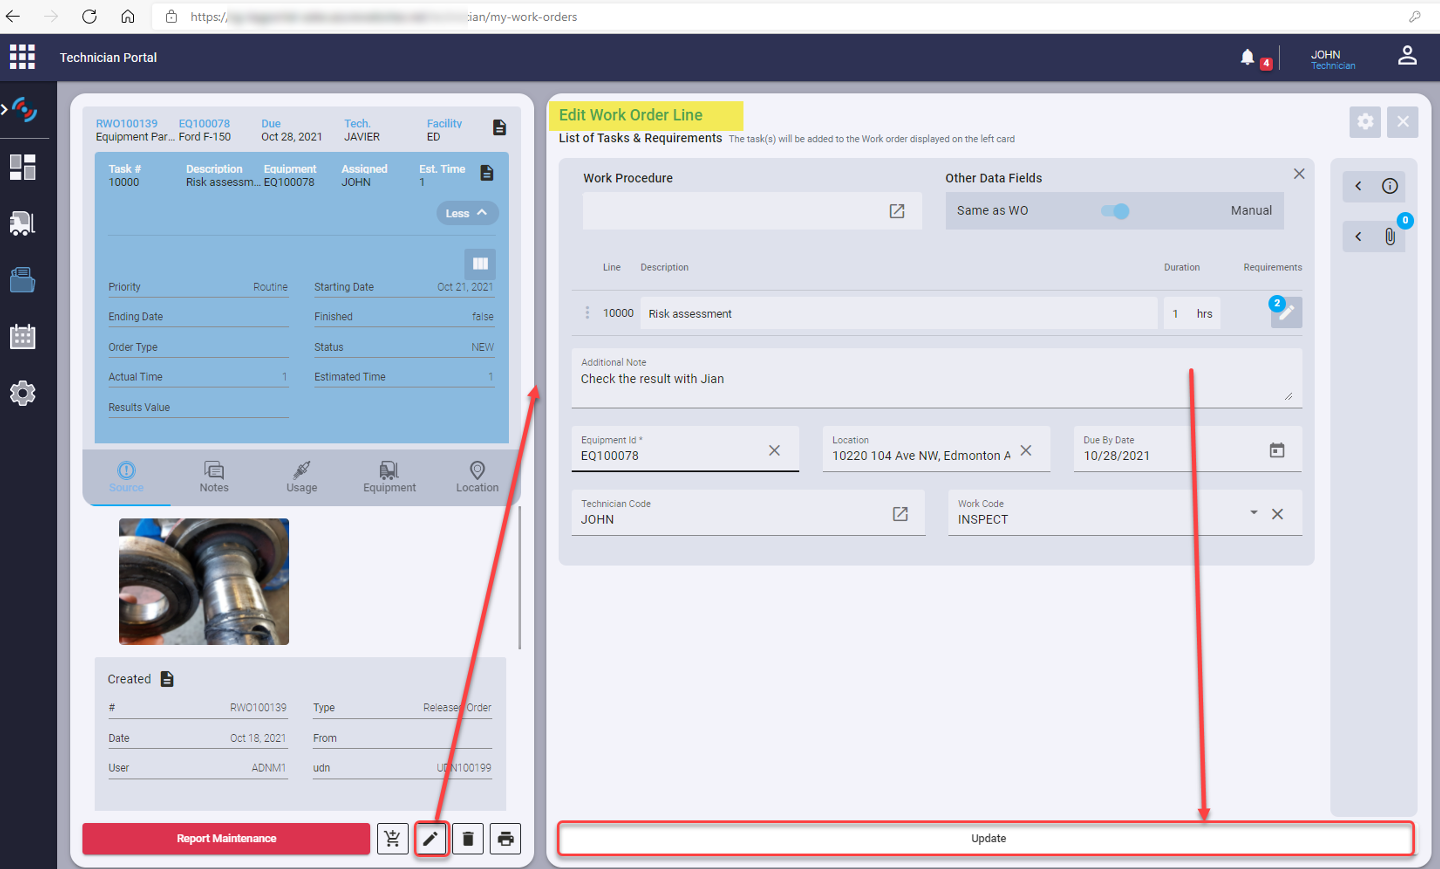
Example:
- Description
- Technician
- Work code
- And more selected options from the view setting
- Press Update to save changes
Schedule – By Week Calendar Form (Without Timesheet)
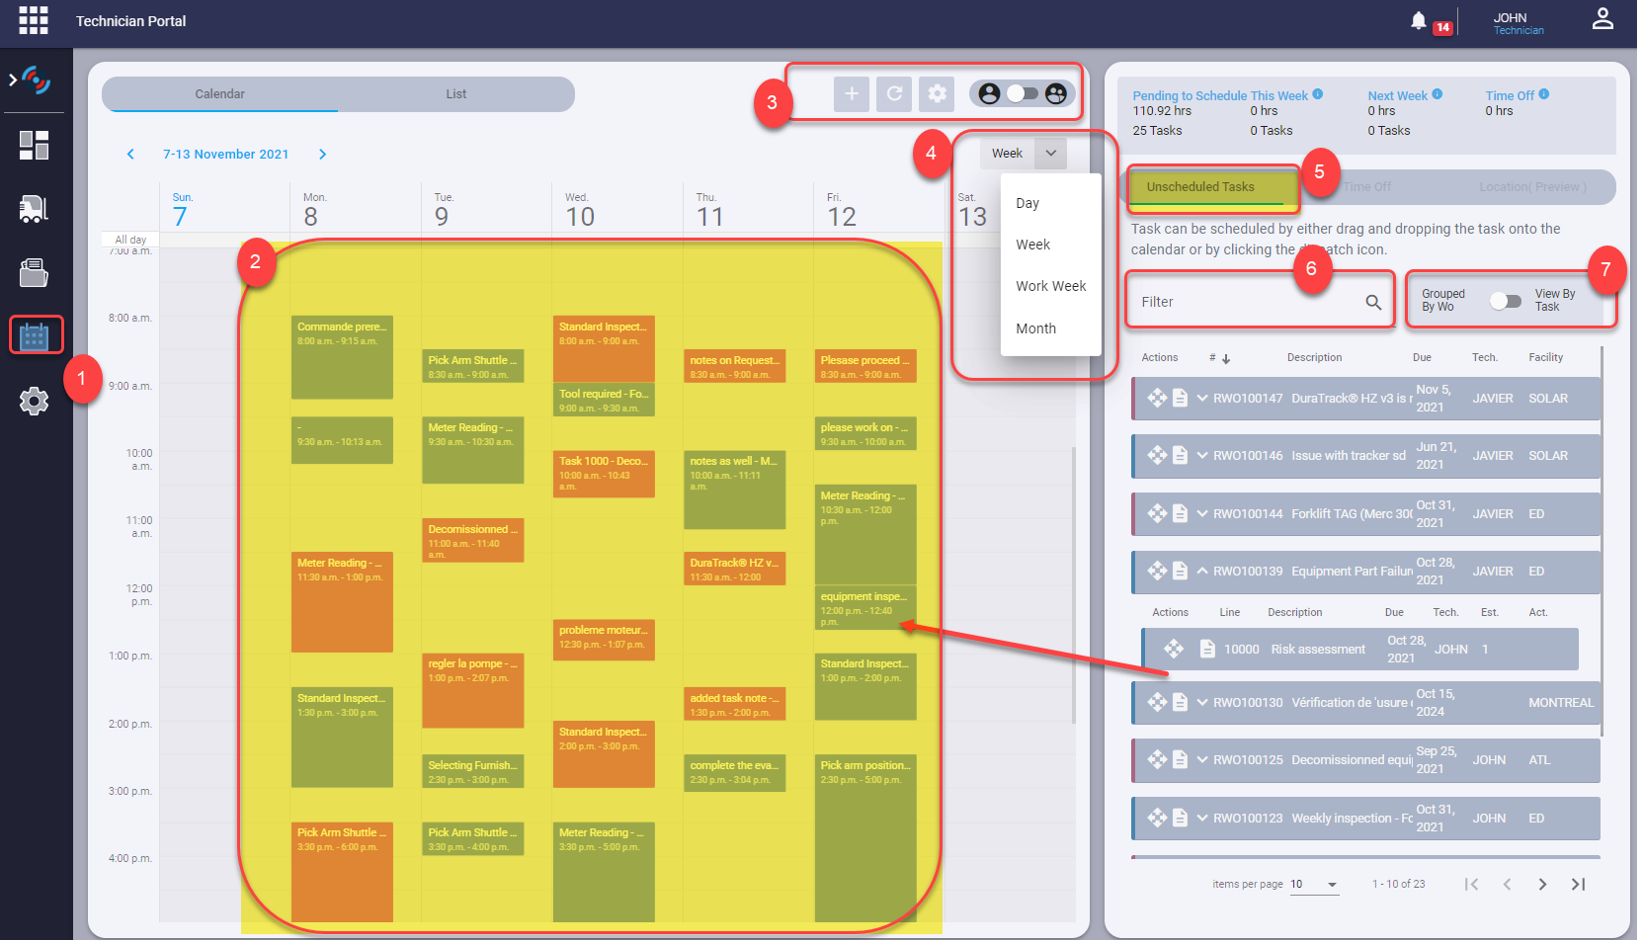
- This icon allows the user access to the schedule- assigned work order task list for the technician
- We can see in the calendar only the WO line with estimated time <>0.
- Toggle for technician task or multi technician, refresh data, filter data and calendar setting
- Work Order Task View by List Daily Calendar, Weekly Calendar, Monthly Calendar
- We can see in the unscheduled tasks only the task that does not have an ending date. The task with actual time <>0 and estimated time <>0 does not appear in the list of unscheduled tasks. It appears only in the calendar.
- Rapid search bar
- View unscheduled tasks grouped by WO or only by task
Schedule - Assigned Work Order Line Tasks
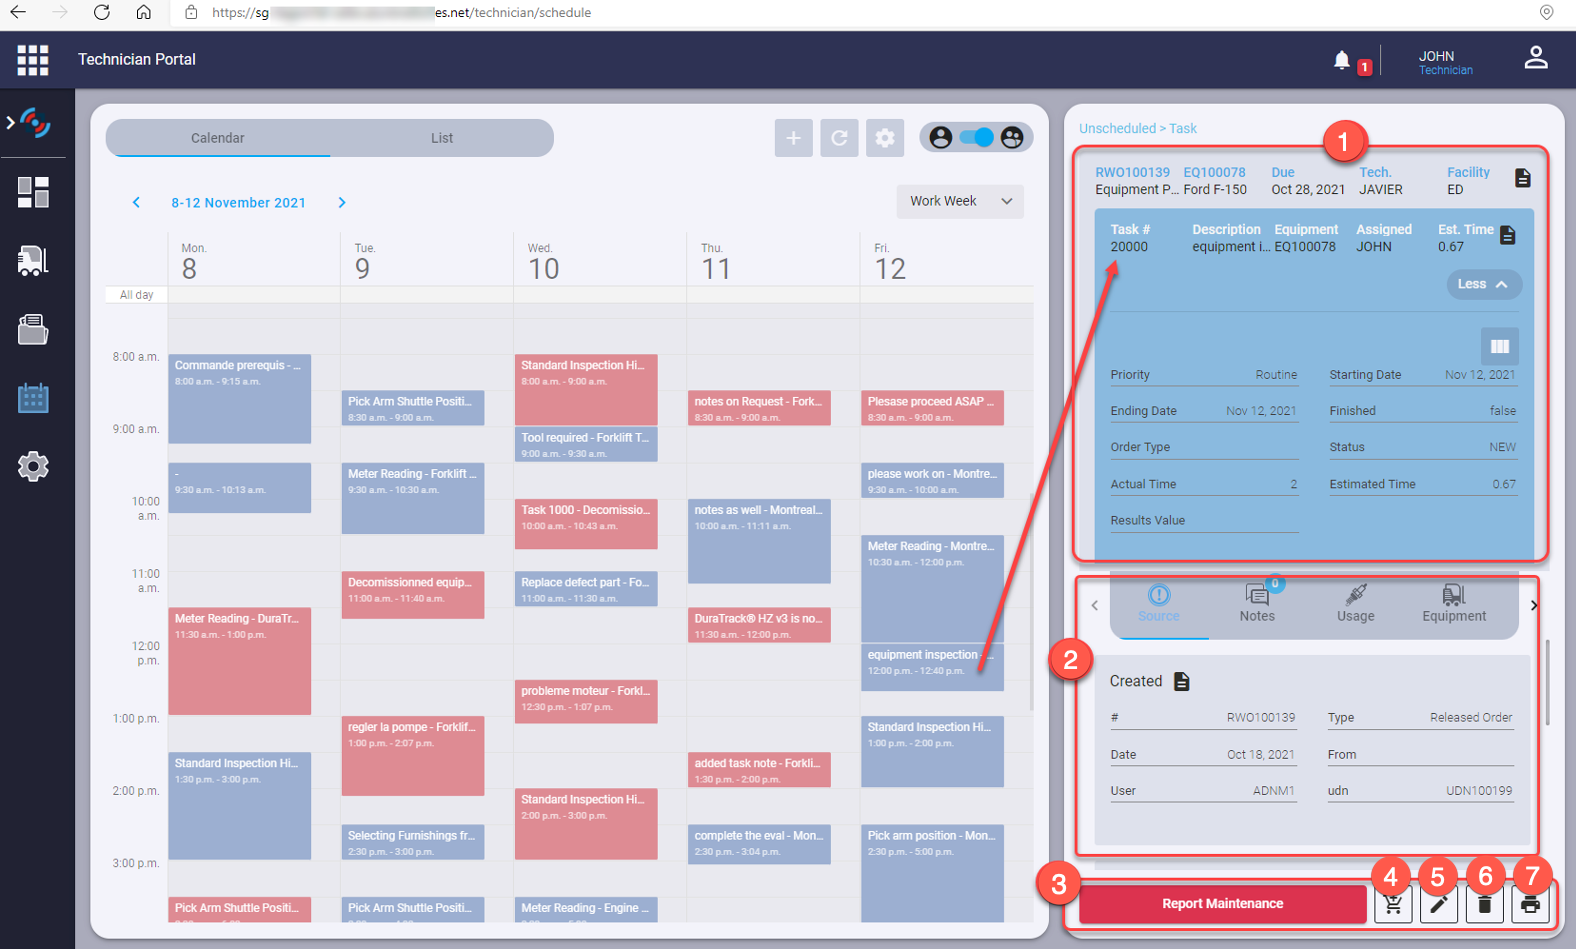
- The work order task selected to show details
- Separate Card view of selected Work Order line with source, notes, usage, equipment details and location.
- Report maintenance to work order task selected
- Purchase section
- Edit work order line
- Delete a work order line
- Print Work order
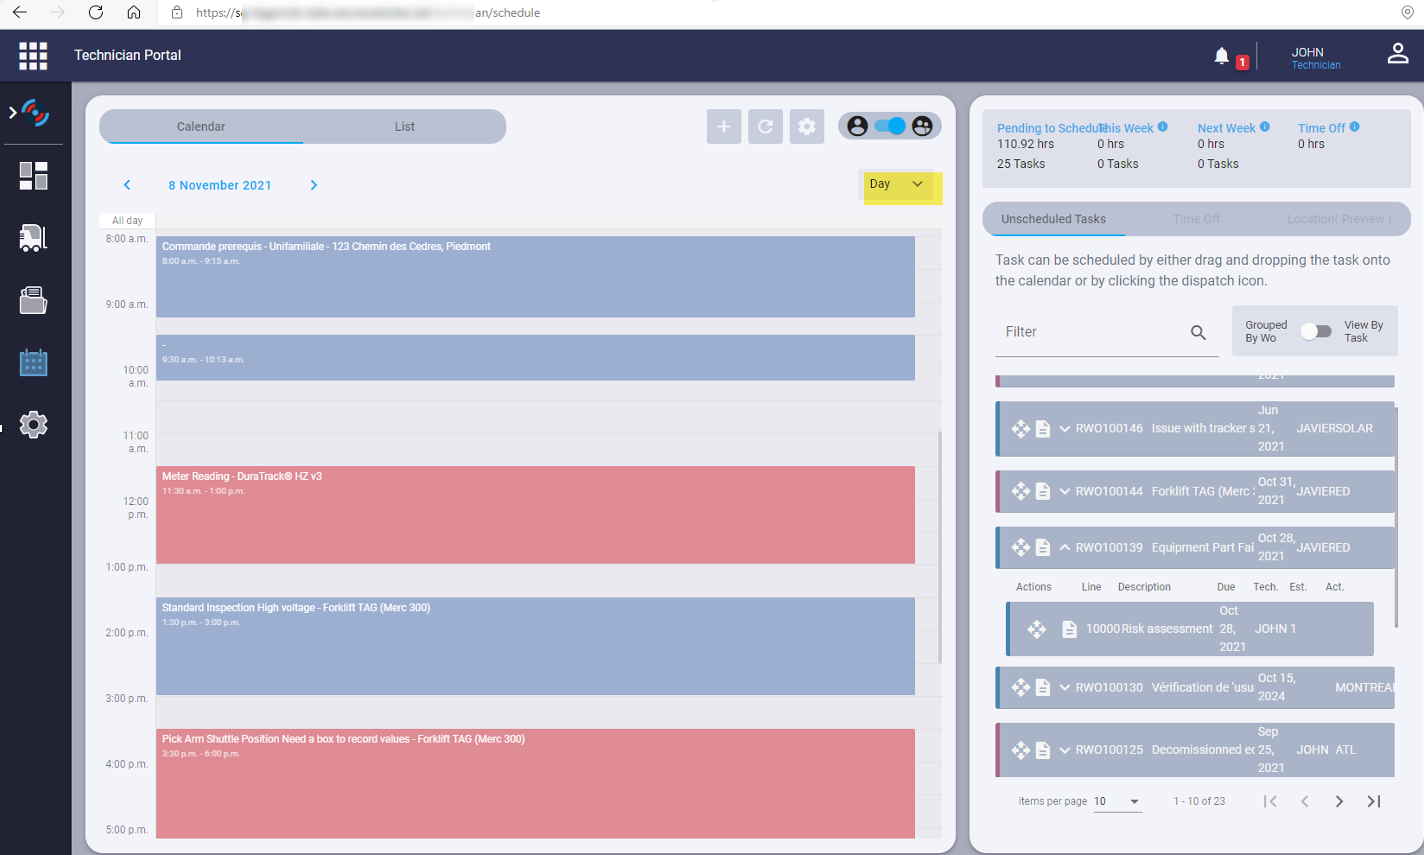
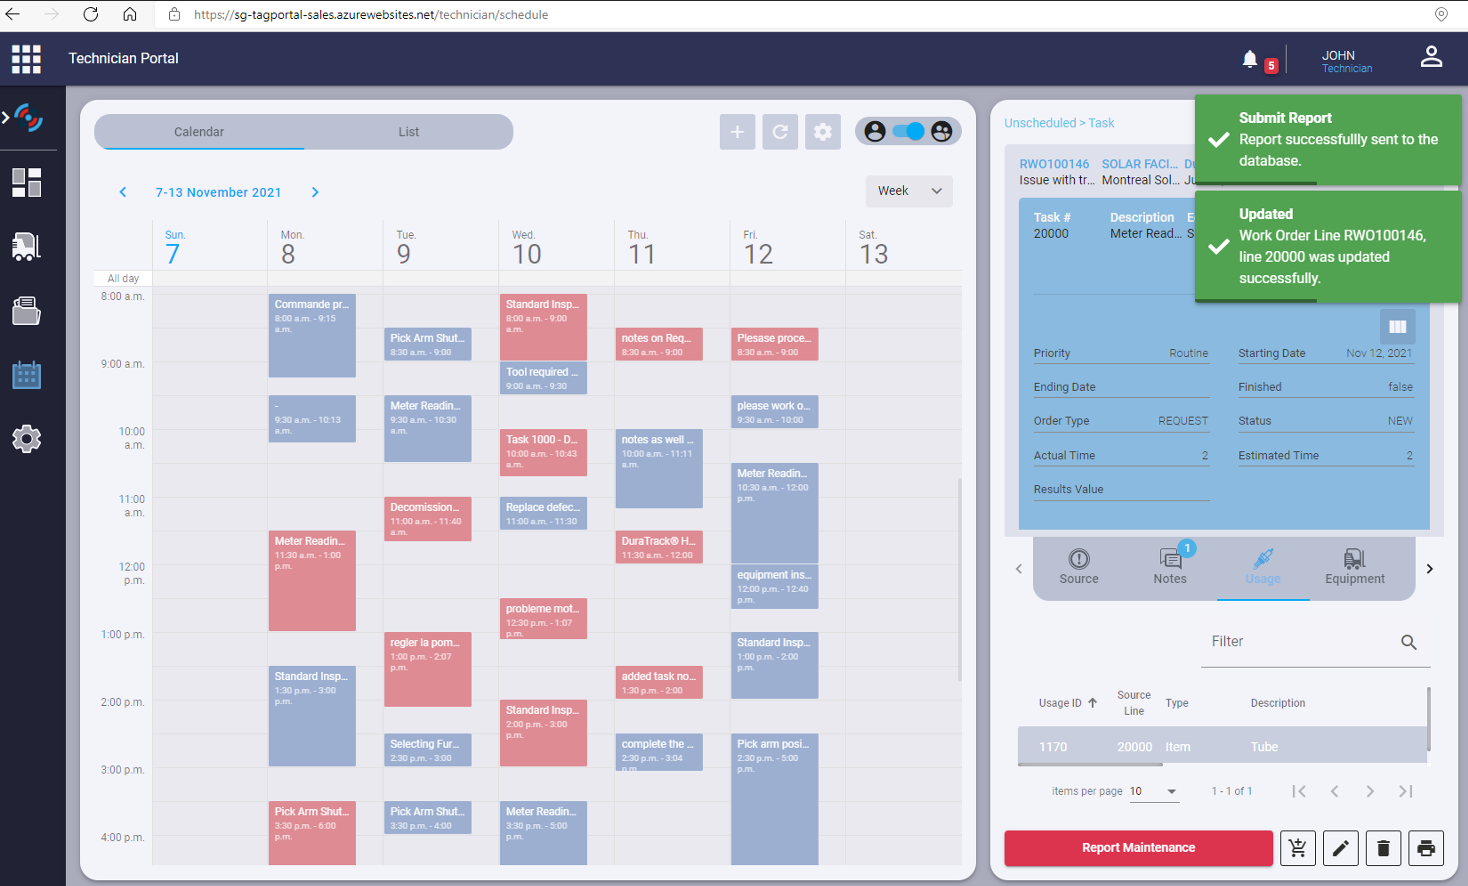
Schedule by Day
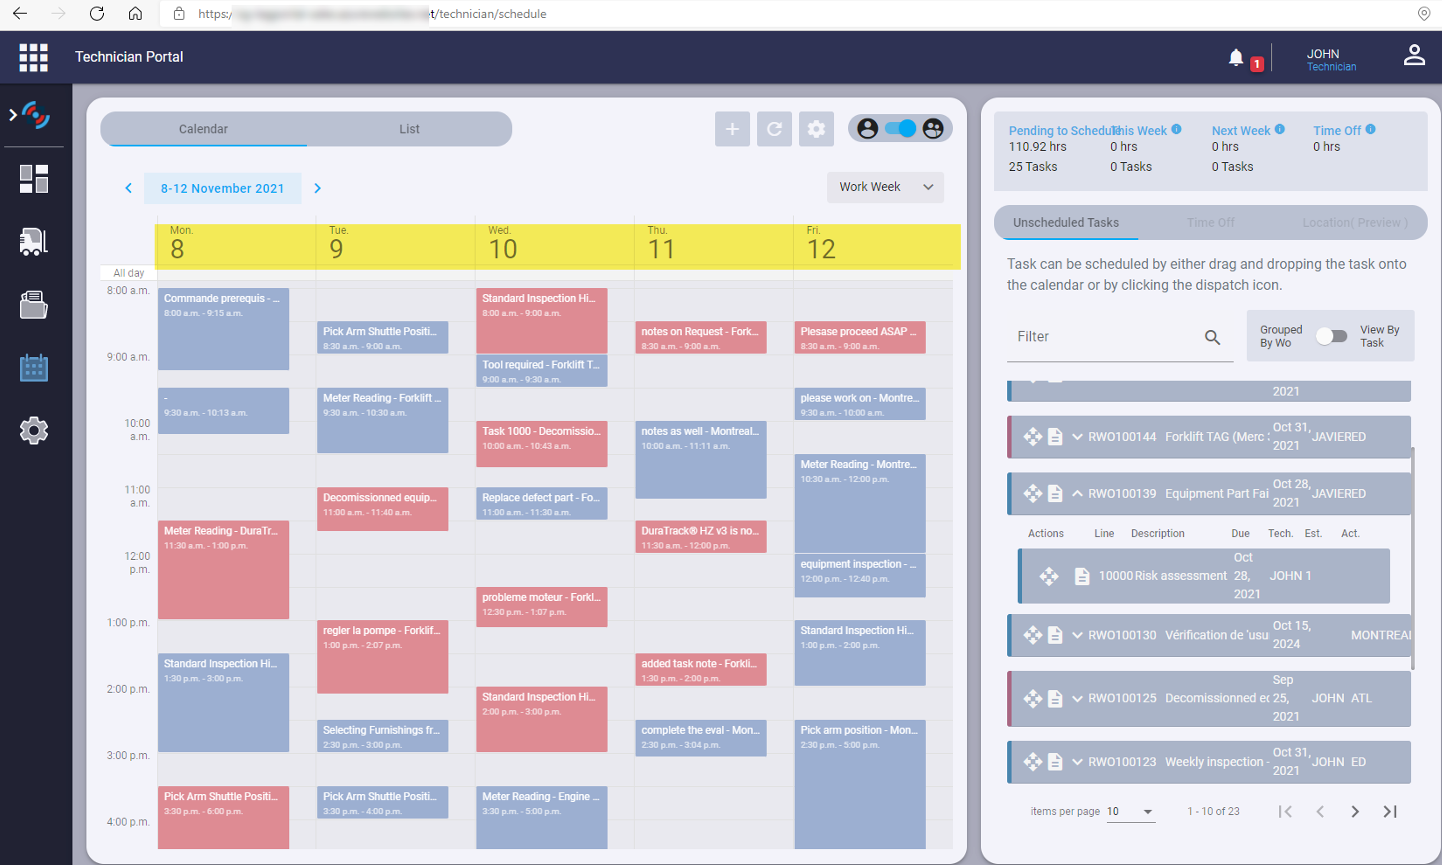
Schedule Work Week
Submit Report From the Schedule
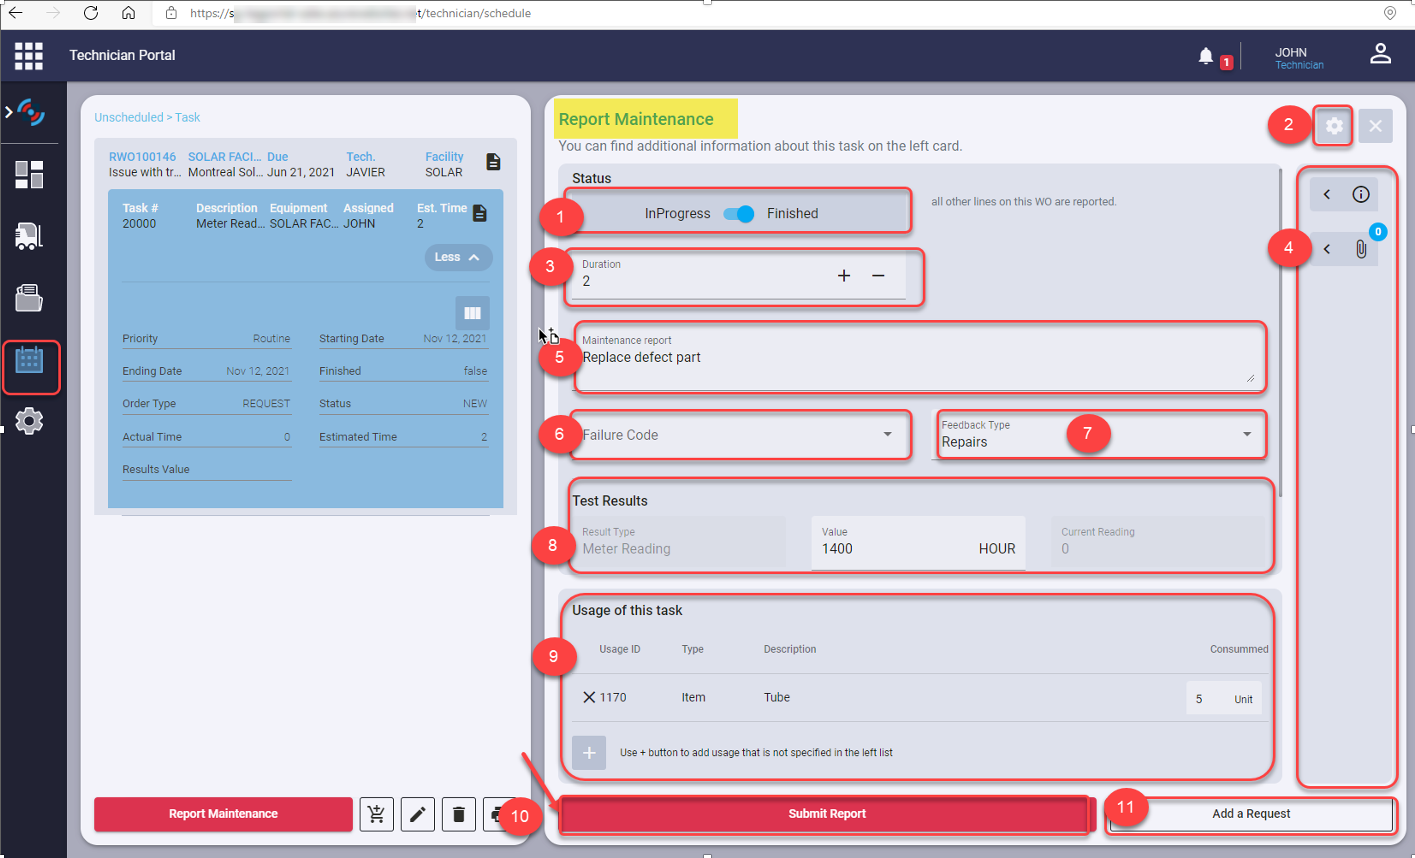
Report maintenance:
- Mark line as finished
- View setting
- Work order line time
- File attachments
- Feedback
- Failure code from the selection
- Feedback type
- Test results (with type binary, text, meter, Boolean…)
- Requirement usages (Posted)
- Submit to complete the entry
- Add a request
We have a report confirmation of the inserted value to confirm them before submitting or discarding and making change.
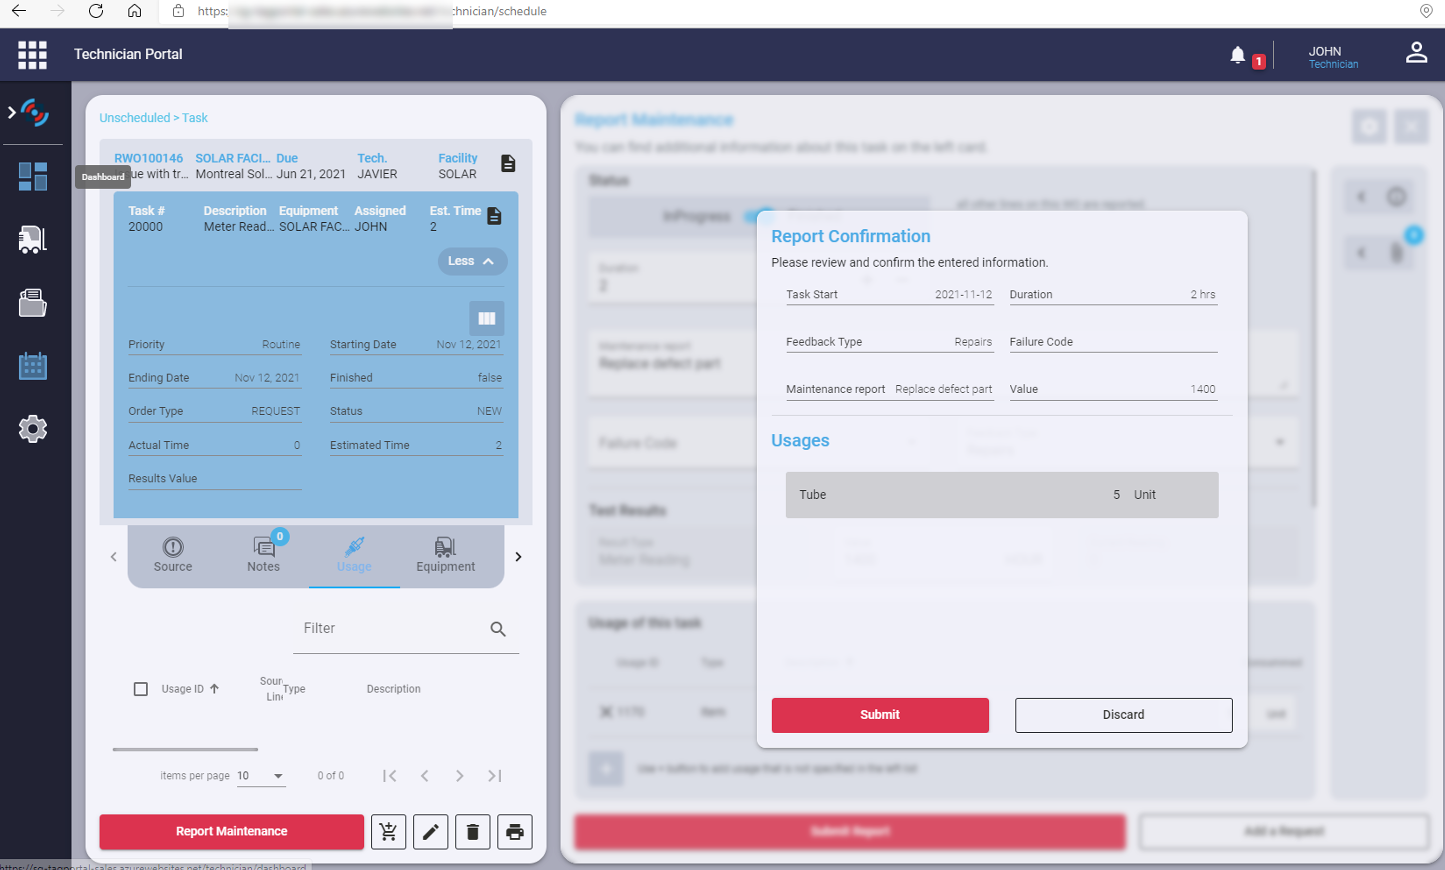
After finishing the record, we can submit it.
Assigned Requests
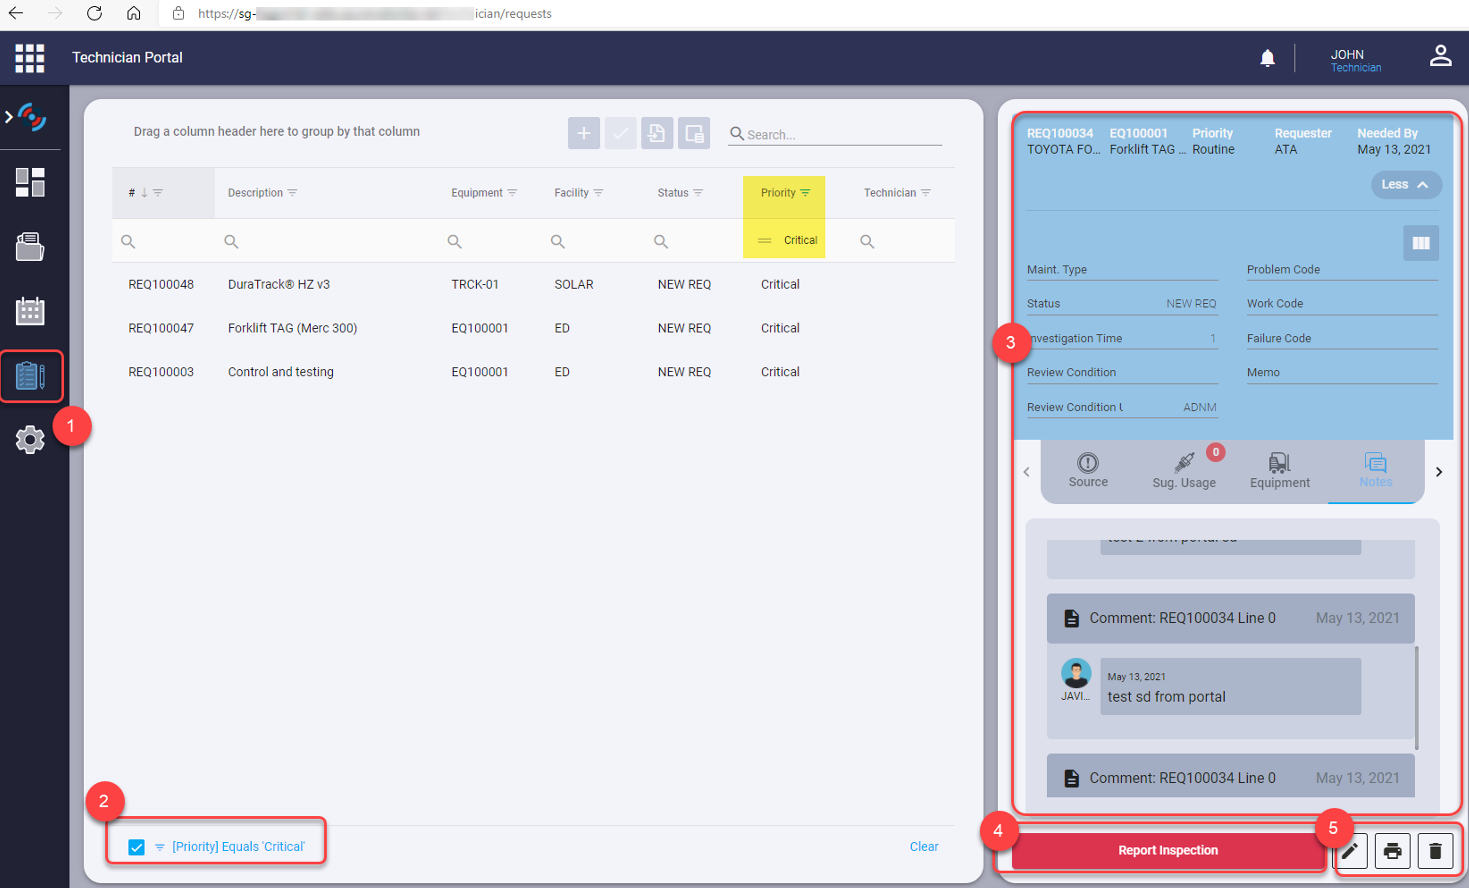
- This icon allows the user access to the list of assigned requests.
- Filter the request list.
- See the request details and equipment details for the selected request.
- Report maintenance for the selected request.
- Edit the request, print the work request or delete this record.
Inspection Report
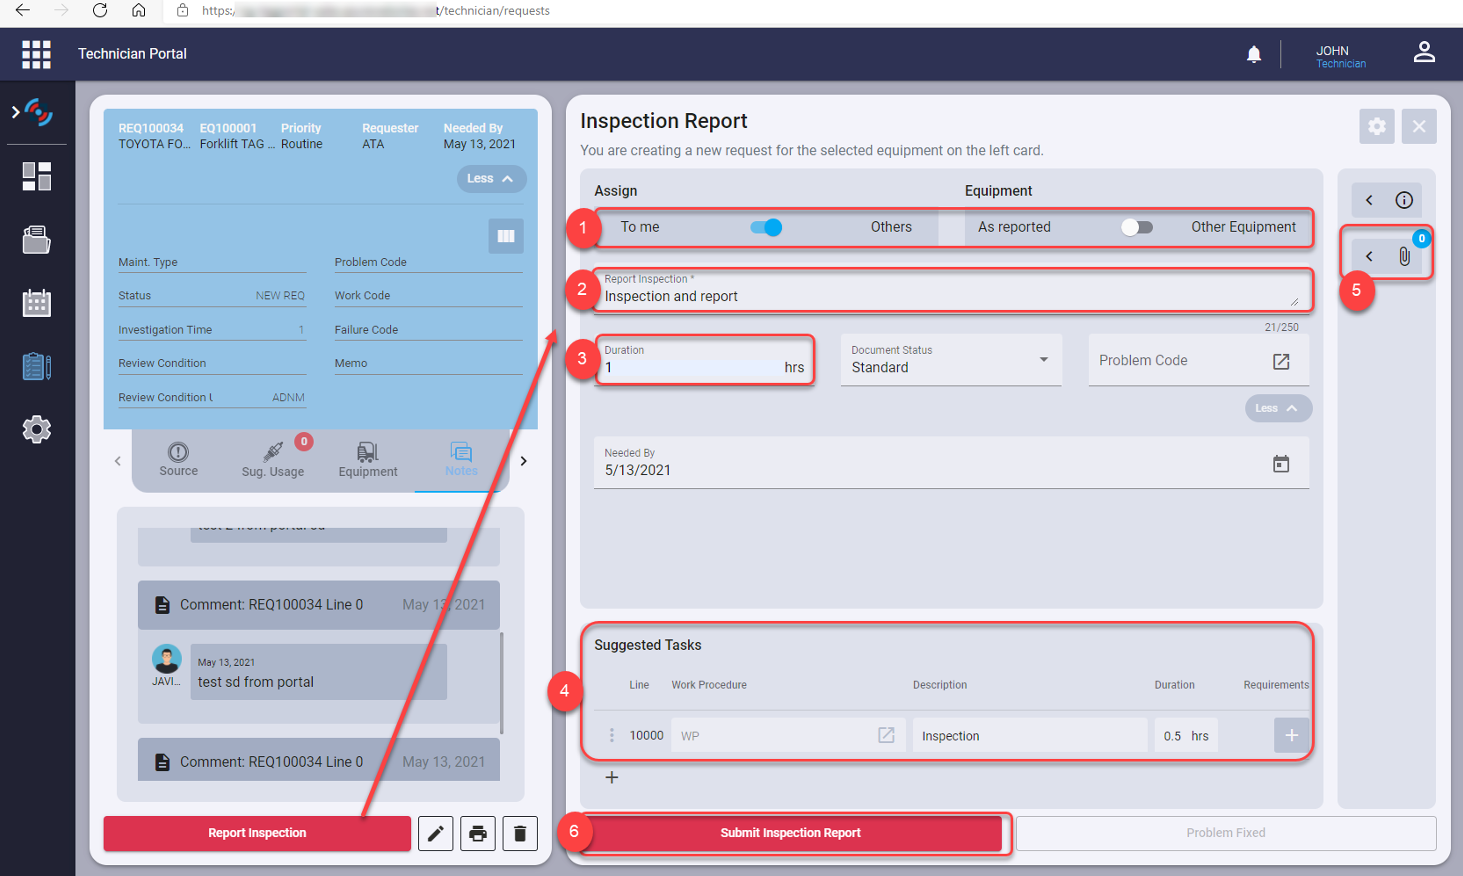
- The left toggle allows assign WO to me or to another technician, the right toggle allows to keep the equipment existed in the header or select another one.
- Add the additional description of the inspection report
- Record the duration
- Add the suggested tasks related to this inspection with the duration and the requirements related to each task. We can after that convert them to WO line when we create the work order from request.
- Add attachments
- Submit the inspection report
Settings
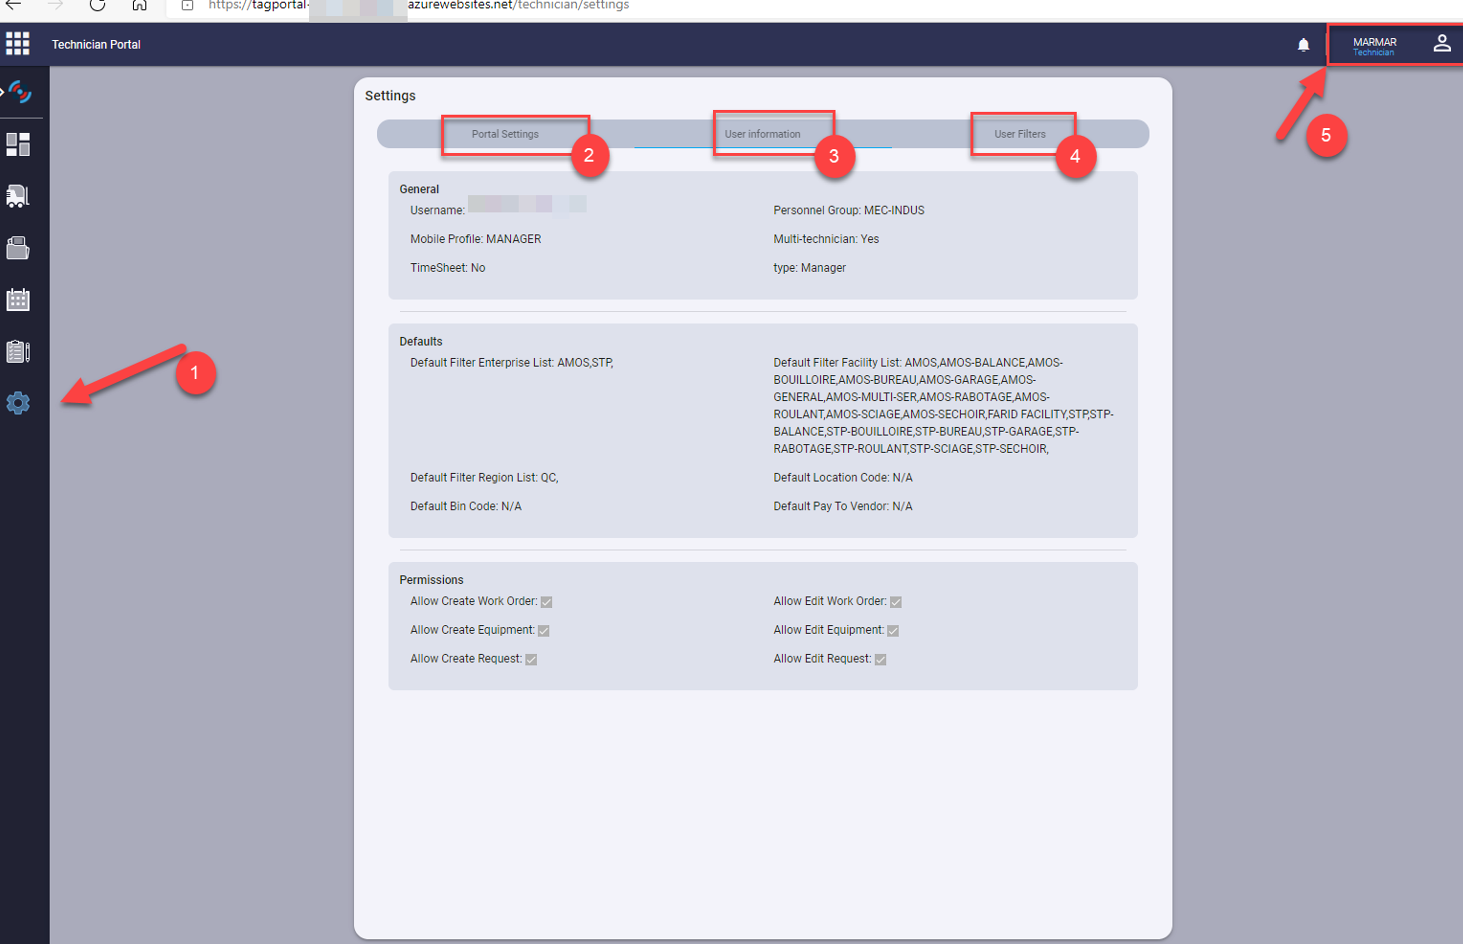
- Go to settings to confirm
- Setup company
- User and permissions details
- Check the security filter
- User primary technician and personnel group
Portal Setting

- Go to Settings to confirm
- Setup company
- Select the language
- Enable the T&A function
- Clear personalization already set by the user
- Reset cache (Empty cache and hard refresh)
- Select save to apply the changes
User Information
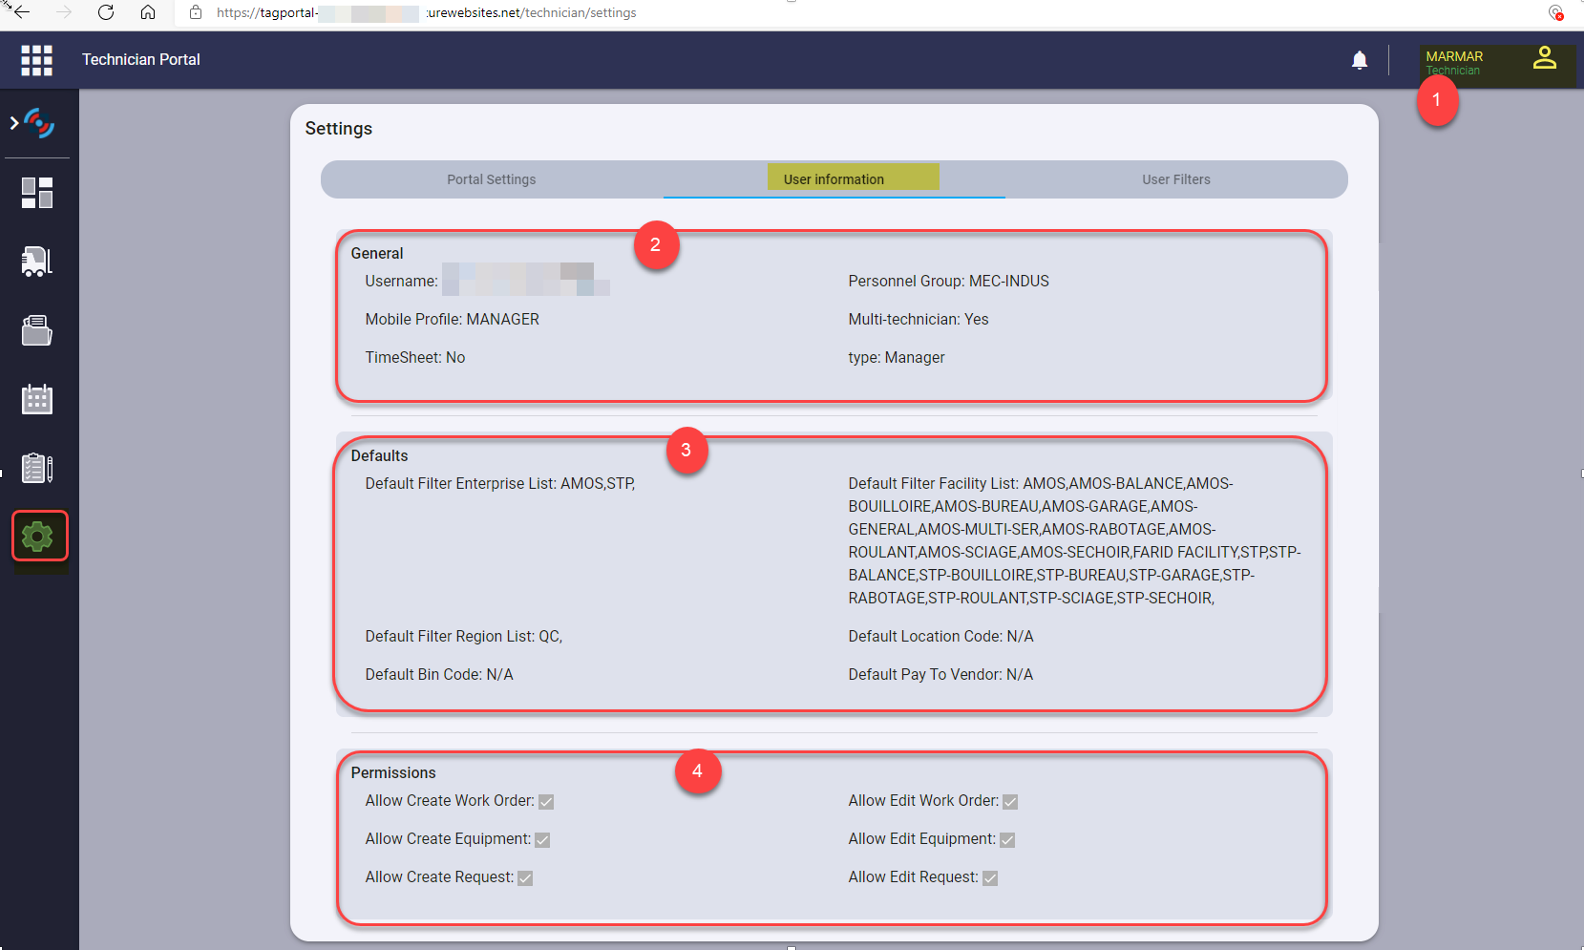
- User primary technician and personnel group
- User details and setup
- Default filter set for the user from the TAG User Setup
- Permission set for the user from the TAG Mobile Profile
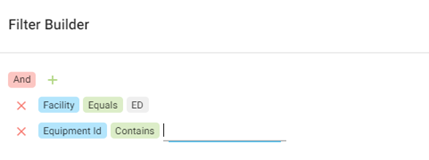
User Filter
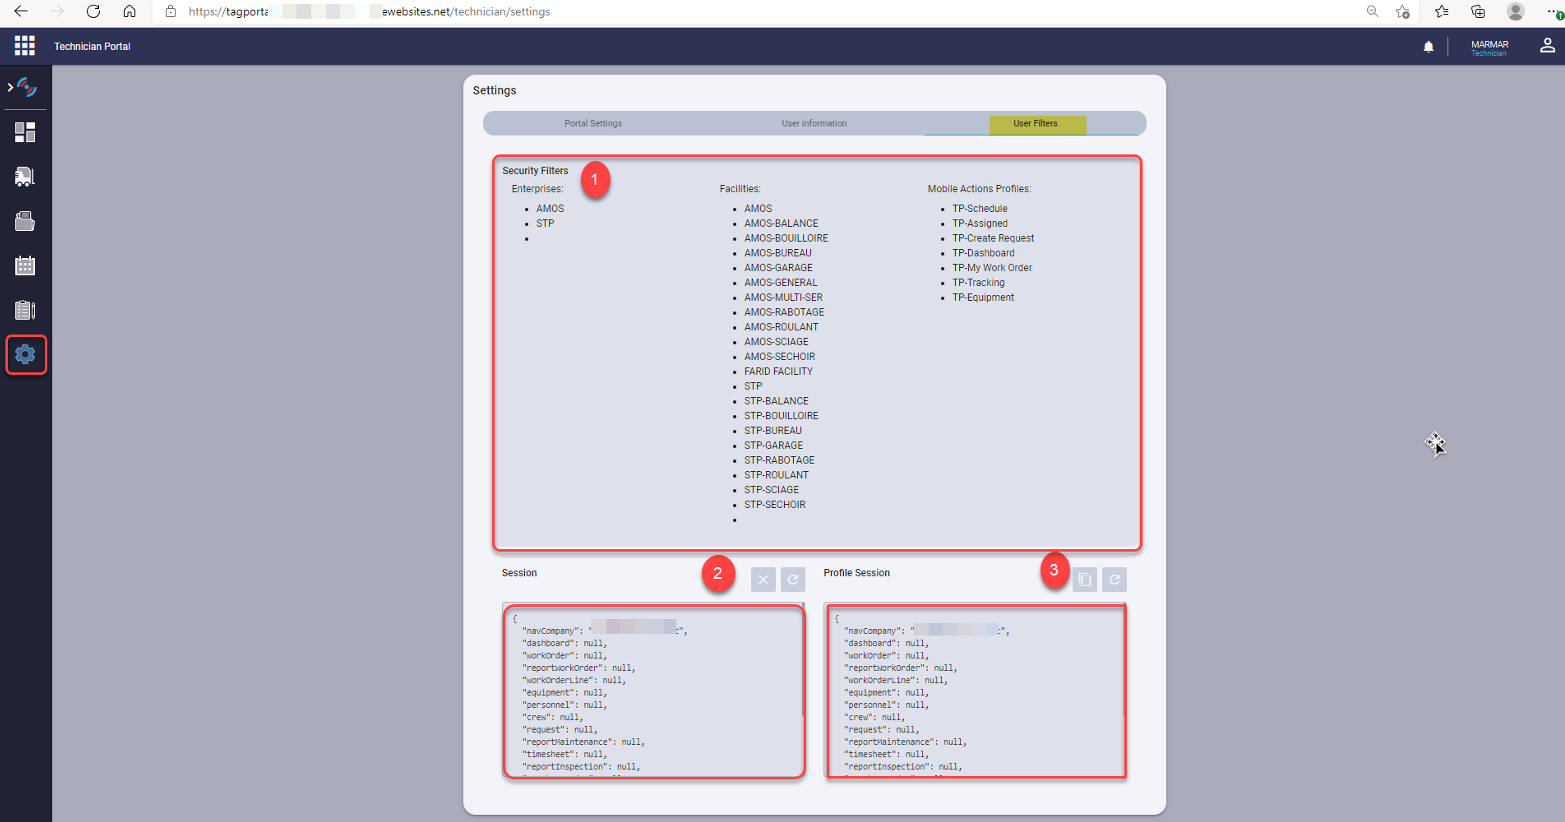
- Security filter already set in TAG User Setup and Mobile Actions Profiles
- Clear or refresh personalization session
- Copy or refresh personalization from the profile
We have two steps to copy portal personalization from one user to another:
- 1: We must copy portal filters from the selected user from the TAG Mobile Profile.
- 2: We must copy the portal filter from the mobile profile to the person. We have two ways to make this:
- 2.1: From portal, we can copy personalization from the profile in the setting/user filter (3). The user will have the same personalization of the portal filter already copied from the TAG Mobile Profile.
- 2.2: From BC, do the same step from the tag user setup. Select the desired user with the same mobile profile and select the button in the main menu, "Copy portal filter from Mobile Profile".